Showing posts with label VMware. Show all posts
Showing posts with label VMware. Show all posts
Friday, September 15, 2017
Rescan All HBA of all ESXI in a simple way.
NAGARAJU AVALA
Friday, September 15, 2017
0
For a Specific Cluster:
get-cluster -name “MY CLUSTER” | get-vmhost | Get-VMHostStorage -RescanAllHBA
All Hosts in VC:
get-vmhost | Get-VMHostStorage -RescanAllHBAThursday, September 14, 2017
Brief Introduction about Annotation/ custom attributes in Vmware
NAGARAJU AVALA
Thursday, September 14, 2017
0
What are custom attributes?
Custom Attributes are attributes that a administrator can define for all Virtual Machines and Hosts in vCenter. The attributes are then displayed in the “Annotations” box for each VM. The custom attributes are also displayed alongside the VM Name, Status, State, CPU Usage, etc, when listing virtual machines in the Datacenter, cluster, host, and resource pool views.Why use them?
Daily, we receive lots of clone requests for VMs. Clones are very good for application development and application troubleshooting. When an application on a VM goes pear shaped, the application vendor may request a clone for a system. They can then work on the clone system to try and fix some issues while the production system (if not broken completely) may in some cases still remain partially available to the end users. Once they are confident that they have resolved the issue, they can then implement the fix in the production environment.
This is all good and well, but here’s the problem. Clones are a drain on your resources. As administrator, you should be very careful to simply hand out clones as the requests come in. Virtual Machine clones can create a nightmare for administrators as they use huge amounts of additional disk space. Some of the clones we have today are in excess of 420GB. When creating clones, we need to make sure that the following information is recorded somewhere in vCenter:
· Who requested the clone;
· The requestor’s contact number/email address
· The date that the clone was made;
· The size of the clone on disk (all vDisk sizes combined + the amount of RAM assigned to the VM);
· Does it need to be backed up (Yes / No);
· Reason for the clone;
Specifying your own Custom Attributes
Creating custom attributes is very simple. In the VI (or vSphere) client on the menu bar, click “Administration” >> “Custom Attributes...”
You’ll now be presented with the Custom Attributes dialog: You can file them b editing them manually once created.

Getting ESXi Network driver firmware details by using Script.
NAGARAJU AVALA
Thursday, September 14, 2017
0
Find the script as follows.
$ExportFilePath = "C:\Users\user\Desktop\esxi.txt"
$PuttyUser = "root"
$PuttyPwd = "w2k8the$"
$HostNic = "vmnic0,vmnic1"
$Plink = "C:\Users\user\Desktop\plink.exe"
$PlinkOptions = " -v -batch -pw $PuttyPwd"
$RCommand = '"' + "ethtool -i " + $HostNic + '"'
$ESXHosts = Get-VMHost | where {$_.Model -match "ProLiant BL*"} | Sort Name
$Report = @()
ForEach ($ESXHost in $ESXHosts) {
$Message = ""
$HostInfo = {} | Select HostName,ESXVersion,Cluster,pNic,DriverName,DriverVersion,DriverFirmware
$HostInfo.HostName = $ESXHost.Name
$HostInfo.ESXVersion = $ESXHost.Version
$HostInfo.Cluster = (Get-Cluster -VMHost $ESXHost.Name).Name
$HostInfo.pNic = $HostNic
Write-Host "Connecting to: " $ESXHost.Name -ForegroundColor Green
$Command = $Plink + " " + $PlinkOptions + " " + $PuttyUser + "@" + $ESXHost.Name + " " + $rcommand
$Message = Invoke-Expression -command $command
$HostInfo.DriverName = ($Message[0] -split"driver:")[1]
$HostInfo.DriverVersion = ($Message[1] -split"version:")[1]
$HostInfo.DriverFirmware = ($Message[2] -split"firmware-version:")[1]
$Report += $HostInfo
}
$Report = $Report | Sort-Object HostName
IF ($Report -ne "") {
$Report | Export-Csv $ExportFilePath -NoTypeInformation
}
Invoke-Item $ExportFilePath
Wednesday, September 13, 2017
Collecting diagnostic information of all ESXi By using PowerCLi Script
NAGARAJU AVALA
Wednesday, September 13, 2017
0
VMware Technical Support routinely requests
diagnostic information from you when a support request is handled. This
diagnostic information contains product specific logs, configuration
files, and data appropriate to the situation. The information is
gathered using a specific script or tool for each product and can
include a host support bundle from the ESXi host and vCenter Server
support bundle. Data collected in a host support bundle may be
considered sensitive.
#Variable declaration
$vCenterIPorFQDN="VCName"
$vCenterUsername="domain\user" #Any User name who has access to Vcenter.
$vCenterPassword="xxxx"
$destination ="C:\Users\user\Desktop\naga\" #Location where to download support bundles
Write-Host "Connecting to vCenter" -foregroundcolor "magenta"
Connect-VIServer -Server $vCenterIPorFQDN -User $vCenterUsername -Password $vCenterPassword
$hosts = Get-VMHost #Retrieve all hosts from vCenter
Write-Host "Downloading vCenter support bundle" -foregroundcolor "magenta"
Get-Log -Bundle -DestinationPath $destination
foreach ($esxihost in $hosts){
Write-Host "Downloading support bundle for ESXi host $($esxihost.Name)" -foregroundcolor "magenta"
Get-Log -VMHost (Get-VMHost -Name $esxihost.Name) -Bundle -DestinationPath $destination
}
This article provides the procedures for obtaining this diagnostic
information of all ESX/ESXi hosts
using VMware vSphere PowerCLI.
#Variable declaration
$vCenterIPorFQDN="VCName"
$vCenterUsername="domain\user" #Any User name who has access to Vcenter.
$vCenterPassword="xxxx"
$destination ="C:\Users\user\Desktop\naga\" #Location where to download support bundles
Write-Host "Connecting to vCenter" -foregroundcolor "magenta"
Connect-VIServer -Server $vCenterIPorFQDN -User $vCenterUsername -Password $vCenterPassword
$hosts = Get-VMHost #Retrieve all hosts from vCenter
Write-Host "Downloading vCenter support bundle" -foregroundcolor "magenta"
Get-Log -Bundle -DestinationPath $destination
foreach ($esxihost in $hosts){
Write-Host "Downloading support bundle for ESXi host $($esxihost.Name)" -foregroundcolor "magenta"
Get-Log -VMHost (Get-VMHost -Name $esxihost.Name) -Bundle -DestinationPath $destination
}
Wednesday, September 6, 2017
Explain about vpxd.cfg Configuration
NAGARAJU AVALA
Wednesday, September 06, 2017
0
vpxd.cfg is an XML formatted file which can be
modified to alter the native behavior of the VMware vCenter Server.
Sparse references on the internet document the changes that can be made
in this environment.
The vpxd.cfg file is located on the VMware vCenter Server by default at %ALLUSERPROFILE%\Application Data\VMware\VMware VirtualCenter\vpxd.cfg
**Disclaimer**
As with anything found on this site and much of the internet in general, information is provided “as is” without warranty. Modify settings at your own risk. I suggest thoroughly researching the changes first and also checking with VMware Support.
The vpxd.cfg file is located on the VMware vCenter Server by default at %ALLUSERPROFILE%\Application Data\VMware\VMware VirtualCenter\vpxd.cfg
- On Windows Server 2008, this would generally be C:\ProgramData\VMware\VMware VirtualCenter\vpxd.cfg
- On Windows Server 2003, this would generally be C:\Documents and Settings\All Users\Application Data\VMware\VMware VirtualCenter\vpxd.cfg
**Disclaimer**
As with anything found on this site and much of the internet in general, information is provided “as is” without warranty. Modify settings at your own risk. I suggest thoroughly researching the changes first and also checking with VMware Support.
Backup and Restore ESXi Configuration with PowerCLI Commands
NAGARAJU AVALA
Wednesday, September 06, 2017
0
Now, the process of backing up and restoring the configuration of ESXi is fairly simple.
Backup and Restore ESXi Configuration with PowerCLI, the steps:
Open PowerCLI > Connect to vCenter with Connect VI-Server command and enter this single line to backup the configuration of all the hosts that are attached to vCenter server.
get-vmhost | get-vmhostfirmware -BackupConfiguration -DestinationPath “C:\temp\anyfolder” all files fileswill be copied to c:\temp\any folder
Now, if We need to restore a host’s configuration, need to put the host into maintenance mode first and then
Enter the restore command:
Set-VMHostFirmware -VMHost <IP_or_FQDN> -Restore -Force -SourcePathThe host will reboot immediately after we hit the enter key without any prompt.
Reset the root password of an ESXi server using Host Profiles
NAGARAJU AVALA
Wednesday, September 06, 2017
0
Here is an overview of the steps to reset the root password:
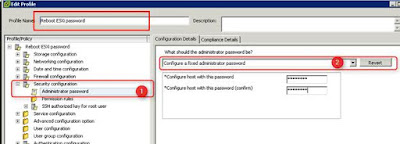
- Select the ESXI server.
- Put the host in Maintenance mode
- Open the vSphere Client
- In Host Profiles, Create a Profile from existing host and select the host, enter the Name
- Nagivate to the security configuration, Administrator Password and select “Configure a fixed administrator password”
- Enter the new root password twice
- Attach the host profile to the host
- Right-click the host and select Apply Profile
- Wait till the Host Profile Compliance status is Compliant. The root password is now changed!
- Test if it is possible to SSH to the ESXi host
- Delete the Host Profile
- Exit maintenance mode
How to change the root password for all esxi hosts in a vcenter using script
NAGARAJU AVALA
Wednesday, September 06, 2017
0
The following script will change the root password for all esxi hosts in a vcenter. We should run the script using PowerCLI.
Before We run the script you should create a scripts folder on the root of our C:\ drive and copy the script to there. We need to have the current root password, the new root password and the name of the vCenter.The script uses the Set-VMHostAccount cmdlet to change the root account password.
#Change Root Password Script for all hosts in a particular cluster
Copy the below code in a text file and rename with passwd.ps1#Prompt user for vCenter server and connect.
$vcenter = Read-Host "Enter vCenter Server: "
$vCenterUser = Read-Host "Enter your vCenter Username: "
$vCenterPw = Read-Host "Enter your vCenter Password: "
Connect-VIServer -Server $vcenter -User $vCenterUser -Password $vCenterPw
Write-Host "Connected to vCenter Server: $vcenter"
#Prompt user for datacenter and cluster
$datacenter = Read-Host "Enter Datacenter: "
$cluster = Read-Host "Enter Cluster: "
#Gather hosts from vCenter for chosen cluster
Write-Host "Getting hosts from datacenter..."
$MyVMHosts = Get-Datacenter $datacenter | Get-Cluster $cluster | Get-VMHost
# If we want to chnage for all ESXi hosts
# $MyVMHosts =Get-VMHost
#Disconnect from vCenter
Disconnect-VIServer -Confirm:$false
Write-Host "Got the hosts. Next..."
#Prompt user for old root password and new password
$oldpassword = Read-Host "Enter onfiguration backup utility to download a backup of this to your management server. old root password: "
$newpassword = Read-Host "Enter new root password: "
$newpassword2 = Read-Host "Enter new root password again: "
#Connect to hosts and change root password, then disconnect.
if ($newpassword -eq $newpassword2){
foreach ($line in $MyVMHosts) {
Connect-VIServer -Server "$line" -User "root" -Password "$oldpassword" -WarningAction SilentlyContinue
Set-VMHostAccount -UserAccount "root" -Password "$newpassword"
Disconnect-VIServer -Confirm:$false
Write-Host "$line...done."
}
}else{
Write-Host "New passwords do not match!"
}
Tuesday, September 5, 2017
How to backup ESXi configuration using VMA
NAGARAJU AVALA
Tuesday, September 05, 2017
0
vMA -vSphere Management Assistant it’s free download and it comes with your VMware vSphere.
First we need to open a console session on vMA with vi-admin as a user.
Then enter this command with an -s switch (S is for save…)
vicfg-cfgbackup -s -server 195.168.0.10 /tmp/esxi5
To restore the same its quite easy, we can use the same command with -l as a switch (jusyt like “load” configuration). The ESXi server needs to reboot after the loading the configuration from backup and so we must reply YES to complete the command. The ESXi host will reboot.
vicfg-cfgbackup -l -server 195.168.0.10 /tmp/esxi5
After rebooting the ESXi server finds it’s configuration files restored.
ENABLE Copy Paste operation between a Virtual Machine and your local machine Via Powershell
NAGARAJU AVALA
Tuesday, September 05, 2017
0
Below steps allows you to ENABLE Copy Paste operation between a Virtual Machine and your local computer.
However VMware does not recommend this manipulation to avoid and limit Exposure of Sensitive Data Copied to the Clipboard section.
Enable-VMCopyPaste function allows you to enable copy Paste operation between a Virtual Machine and your local machine.
When using PowerCli, this setting can be applied without powering off the VM. However you'll need to do a stun/unstun operation (i.e. power on/off, suspend/resume, create/delete snapshot/storage VMotion) to achieve the same thing.
Enable-VMCopyPaste -VM "test"
This will enable the copy paste of the server/Computer name test.
Tuesday, June 14, 2016
VMFS volume on the VMware ESX/ESXi host is locked due to an I/O error.
NAGARAJU AVALA
Tuesday, June 14, 2016
0
If naa.60060160b3c018009bd1e02f725fdd11:1 represents one of the partitions used in a VMFS volume, you see this message when the VMFS volume is inaccessible:
volume
on device naa.60060160b3c018009bd1e02f725fdd11:1 locked, possibly
because remote host 10.17.211.73 encountered an error during a volume
operation and couldn’t recover.
If this issue occurs, the VMFS volume (and the
virtual machines residing on the affected volume) are unavailable to
the ESX/ESXi host.
In the /var/log/vmkernel.log file, you may see similar message indicating the same issue:
WARNING: LVM: 13127: The volume
on the device naa.6000eb3b3638efa50000000000000258:1 locked, possibly
because some remote host encountered an error during a volume operation
and could not recover.
LVM: 11786: Failed to open device naa.6000eb3b3638efa50000000000000258:1 : Lock was not free
LVM: 11786: Failed to open device naa.6000eb3b3638efa50000000000000258:1 : Lock was not free
To resolve this issue, remove the lock on the indicated volume.
-
Log in to the ESX/ESXi console.
-
For information on how to log in to ESXi 4.1 and 5.x hosts
-
For information on how to log in to ESXi 4.0, see
-
Log in to the terminal of the VMware ESX or ESXi host and run these commands:
To break the lock: -
Break the existing LVM lock on the datastore by running this command:
# vmkfstools –B vmfs deviceNote: You can also use the parameter --breaklock instead of -B with the vmkfstools command.
From the preceding error message, this command is used:
# vmkfstools -B /vmfs/devices/disks/naa.60060160b3c018009bd1e02f725fdd11:1You see output similar to:
VMware ESX Question:
LVM lock on device /vmfs/devices/disks/naa.60060160b3c018009bd1e02f725fdd11:1 will be forcibly broken. Please consult vmkfstools or ESX documentation to understand the consequences of this.
Please ensure that multiple servers aren't accessing this device.
Continue to break lock?
0) Yes
1) No
Please choose a number [0-1]: -
Enter 0 to break the lock.
-
Re-read and reload VMFS datastore metadata to memory by running this command:
# vmkfstools –V -
From the vSphere UI, refresh the Storage Datastores View under Configuration tab.
VSphere 6.0 important log files and its locations
NAGARAJU AVALA
Tuesday, June 14, 2016
0
VSphere 6.0 has made some significant changes to the logging locations
for its contained vCenter and PSC services. Everything has been
condensed into a common area of the directory structure and labeled with
the service name. In short, it makes a LOT more sense now than it did
before.
This is an overview of what the structure looks like now and where to find what you need.
Windows Log Locations
C:\ProgramData\VMware\vCenterServer\logs
vCenter Appliance Log Locations
/var/log/vmware
Use this to troubleshoot issues with issues relating directly operation of the vCenter. Everything from DB connectivity problems to vCenter crashes are in here. This log will have a LOT of information in it and is a good place to start on many issues.
Formally the ds.log in 5.x. The format and location has changed.
invsvc\wrapper.log
Used to troubleshoot why the inventory service will not start.
This is a good log to use as a “one-stop-shop” for SSO authentication issues. Authentication requests/failures as well as problems with an identity source will post here.
vmafd\vdcpromo.log
Contains installation errors during configuration of vmdir. Especially useful for errors when adding another PSC to the same SSO domain.
vmdird\vmdird-syslog.log
Has information concerning the SSO LDAP instance named vmdir. Problems with ldap operations and replication within SSO can be found here.
Operational information about the local vPostgres instance. This is just a renamed version on pg_log in normal Postgresql.
An excellent source of information when troubleshooting errors within the Web Client. If you receive errors from simply clicking on objects, you begin chasing them down here!
vsphere-client\wrapper.log
Entries in here can help determine why your vSphere Web Client service won’t start, or if it suddenly crashes. This log will not have as much on issues received while inside the Web Client
This service is used to poll ESXi hosts for IPMI information for the Hardware Status tab. Entries in here can determine why the service won’t start, is malfunctioning, or if it suddenly crashes.
Has information on the Performance Charts section of the vCenter. If the charts fail to load, look here first.
This is an overview of what the structure looks like now and where to find what you need.
Windows Log Locations
C:\ProgramData\VMware\vCenterServer\logs
vCenter Appliance Log Locations
/var/log/vmware
vCenter Service
vmware-vpx\vpxd.logUse this to troubleshoot issues with issues relating directly operation of the vCenter. Everything from DB connectivity problems to vCenter crashes are in here. This log will have a LOT of information in it and is a good place to start on many issues.
Inventory Service
invsvc\inv-svc.logFormally the ds.log in 5.x. The format and location has changed.
invsvc\wrapper.log
Used to troubleshoot why the inventory service will not start.
Single Sign on
sso\vmware-sts-idmd.logThis is a good log to use as a “one-stop-shop” for SSO authentication issues. Authentication requests/failures as well as problems with an identity source will post here.
vmafd\vdcpromo.log
Contains installation errors during configuration of vmdir. Especially useful for errors when adding another PSC to the same SSO domain.
vmdird\vmdird-syslog.log
Has information concerning the SSO LDAP instance named vmdir. Problems with ldap operations and replication within SSO can be found here.
vPostgres Service
vpostgres\postgresql-##.logOperational information about the local vPostgres instance. This is just a renamed version on pg_log in normal Postgresql.
vSphere Web Client
vsphere-client\logs\vsphere_client_virgo.logAn excellent source of information when troubleshooting errors within the Web Client. If you receive errors from simply clicking on objects, you begin chasing them down here!
vsphere-client\wrapper.log
Entries in here can help determine why your vSphere Web Client service won’t start, or if it suddenly crashes. This log will not have as much on issues received while inside the Web Client
VMware System and Hardware Health Manager
vws\wrapper.logThis service is used to poll ESXi hosts for IPMI information for the Hardware Status tab. Entries in here can determine why the service won’t start, is malfunctioning, or if it suddenly crashes.
Performance Charts
perfcharts\stats.logHas information on the Performance Charts section of the vCenter. If the charts fail to load, look here first.
How to change the database password in Update Manager 4.1 Update 1, 5.x and 6.0
NAGARAJU AVALA
Tuesday, June 14, 2016
0
To change the database password in Update Manager 4.1 Update 1, 5.x and 6.0
Navigate to the directory where Update Manager is installed. The default location is:
- C:\Program Files (x86)\VMware\Infrastructure\Update Manager\.
- Launch VMwareUpdateManagerUtility.exe.
- Use an account with administrator privileges on vCenter Server to log in to the utility.
- Click Database Settings.
- Type your new username and password in the appropriate fields.
- Click Apply.
- Close the VMware vCenter Update Manager utility.
- Restart the VMware vCenter Update Manager service.
Changing the vCenter Server database user ID and password
NAGARAJU AVALA
Tuesday, June 14, 2016
0
To change the vCenter Server user ID for SQL database connections for vCenter Server 5.x and earlier:
Note: Before making any registry modifications, ensure that you have a current and valid backup of the registry.
Take a full backup of the registry prior to editing it. Do not skip this step.Click Start > Run, type regedit and click OK.
In the Windows Registry Editor, navigate to:
HKEY_LOCAL_MACHINE\SOFTWARE\VMware, Inc.\VMware VirtualCenter\DB (under My Computer)
For 32-bit versions of vCenter Server running on 64-bit versions of Windows:
HKEY_LOCAL_MACHINE\SOFTWARE\Wow6432Node\VMware, Inc.\VMware VirtualCenter\DB
For vCenter Server 5.0
HKEY_LOCAL_MACHINE\SOFTWARE\VMware, Inc.\VMware VirtualCenter\DBNote: To see these keys in a 32-bit version of the Registry Editor in a 64-bit operating system, click Start > Run, type %systemroot%\syswow64\regedit, and click OK.
Right-click 2 and click Modify.
Enter the database user ID in the Value data field.
Click OK.
To change the vCenter Server user ID for SQL database connections for vCenter Server 6.0:
Stop the vCenter Server service.Navigate to: C:\ProgramData\VMware\vCenterServer\cfg\vmware-vpx.
Take a backup copy of vpxd.cfg.
Open vpxd.cfg in a text editor.
Locate the <DB> element and modify the value for <key_2> to reflect the new database user ID. ...
<DB>
<key_2>database_user_id</key2>
<key_3>*joqDY/eQvwyLBdLcXXJYZvDAd+FXYY8q7x///vhy4LE=</key_3>
</DB>
...
If you are using Windows Integrated Authentication to connect to the vCenter Server database, remove the value for <key_3>.
Save vpxd.cfg.
Start the vCenter Server service.
Note: If the vCenter Server database password has changed, follow the steps below to update the vCenter Server database password before starting the vCenter Server service.
To update the password used by the vCenter Server for database connections to the SQL Database, use one of these options:
Follow these steps in VMware Infrastructure (VI) Client for VirtualCenter 2.5 only
Click Administration > VirtualCenter Management Server Configuration.Click Database.
In the Database Setting page, enter the new password in the Password field.
Click OK.
For VirtualCenter 2.5 Update 2 and later, the -p command line flag sets the database password in vCenter Server:
Click Start, right-click Command Prompt, and select Run as administrator to open a command prompt as an administrator.
Run this command:
For vCenter Server 5.5 and earlier
C:\Program Files\VMware\Infrastructure\VirtualCenter Server\vpxd.exe -pFor vCenter Server 6.0:
C:\Program Files\VMware\vCenter Server\vpxd\vpxd.exe -p
Note:This is the default path to the vCenter Server installation directory. Change the path appropriately, if required.
Enter a new password when prompted.
Note: If changing any SQL authentication modes or credentials (for example, changing from SQL to Windows authentication), ensure that the ODBC System DSN utilized for the vCenter Server database connection is also updated to reflect the credential changes.
Restart the vCenter Server service.
Saturday, March 5, 2016
vSphere 6 – new virtual hardware version 11
NAGARAJU AVALA
Saturday, March 05, 2016
0
This new hardware version enables new maximum configurations and features listed below. Below you can find a list with enhancements and a compatiblity list showing vSphere Version to supported virtual hardware versions.
New configuration maximums for virtual machines with vHW11:
128 vCPUs
4 TB vRAM
32 serial ports
New features with vHW11:
vNUMA aware hot-add RAM
WDDM 1.1 GDI acceleration
USB 3.0 xHCI controller
extended support for virtual graphics incl. Nvidia vGPU
Expanded Guest OS Support:
Solaris 11.2
Oracle Unbreakable Enterprise Kernel Release 3 Quaterly Update 3
Asanux 4 SP4
Ubuntu 12.04.5 and 14.04.1
Oracle Linux 7
FreeBSD 9.3
Mac OSX 10.10

Importing media into VMware Update Manager fails with the error: Cannot upload file, because it is an invalid package
NAGARAJU AVALA
Saturday, March 05, 2016
0
Whenever
Attempting to import an ESXi update image fail with below erros
Cannot upload file, because it is an invalid package.
Failed to import data. The uploaded upgrade package cannot be used with VMware vSphere Update Manager
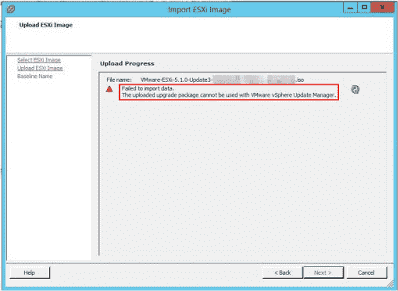
The resolution will be
“ You must use the same version of vSphere Update Manager to upgrade to the corresponding version of ESXi”
Attempting to import an ESXi update image fail with below erros
Cannot upload file, because it is an invalid package.
Failed to import data. The uploaded upgrade package cannot be used with VMware vSphere Update Manager
The resolution will be
“ You must use the same version of vSphere Update Manager to upgrade to the corresponding version of ESXi”
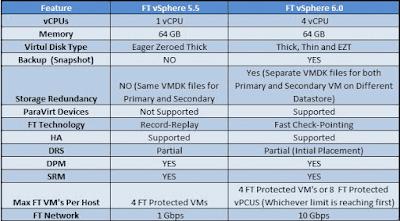
vSphere 6.0 – What’s New in VMware Fault Tolerance (FT)
NAGARAJU AVALA
Saturday, March 05, 2016
0
Finally, With vSphere 6.0, VMware broken the limitation lock of Fault Tolerance. FT VM now Supports upto 4 vCPUs and 64 GB of RAM (Which was 1 vCPu and 64 GB RAM in vSphere 5.5). With this vSMP support, Now FT can be used to protect your Mission Critical applications. Along with the vSMP FT support, There are lot more features has been added in FT with vSphere 6.0, Let’s take a look at what’s new in vSphere 6.0 Fault Tolerance(FT)
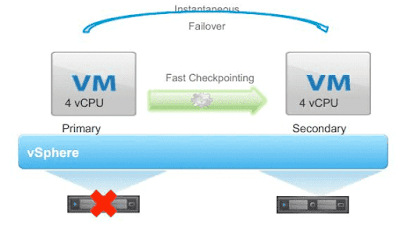 Benefits of Fault Tolerance

- Continuous Availablity with Zero downtime and Zero data loss
- NO TCP connections loss during failover
- Fault Tolerance is completely transparent to Guest OS.
- FT doesn’t depend on Guest OS and application
- Instantaneous Failover from Primary VM to Secondary VM in case of ESXi host failure
- FT support upto 4 vCPUs and 64 GB RAM
- Fast Check-Pointing, a new Scalable technology is introduced to keep primary and secondary in Sync by replacing “Record-Replay”
- vSphere 6.0, Supports vMotion of both Primary and Secondary Virtual Machine
- With vSphere 6.0, You will be able to backup your virtual machines. FT supports for vStorage APIs for Data Protection (VADP) and it also supports all leading VADP solutions in Market like symantec, EMC, HP ,etc.
- With vSphere 6.0, FT Supports all Virtual Disk Type like EZT, Thick or Thin Provisioned disks. It supports only Eager Zeroed Thick with vSphere 5.5 and earlier versions
- Snapshot of FT configured Virtual Machines are supported with vSphere 6.0
- New version of FT keeps the Separate copies of VM files like .VMX, .VMDk files to protect primary VM from both Host and Storage failures. You are allowed to keep both Primary and Secondary VM files on different datastore.
-

Friday, March 4, 2016
Deprecated VMFS Volumes found on host. Please consider upgrading volume(s) to the latest version error in vsphere 6.0
NAGARAJU AVALA
Friday, March 04, 2016
0
The ESXi hosts display a false positive warning:
Deprecated VMFS volume(s) found on the host. Please consider upgrading volume(s) to the latest version
This is a known issue affecting vCenter Server 6.0.
Currently, there is no resolution.
This issue occurs because the version of the filesystem is not known during the initial detection. Therefore, comparing it against the list of valid filesystems does not return a match.
Workaround or Fix :
To work around this issue, restart the management agents on the impacted hosts to clear the warning using the below command.
Services.sh restart
After restarting the management agents on my ESXi 6.0 host, warning about deprecated VMFS volumes on ESXi host is cleared automatically. I hope this informative for you. Thanks for Reading!!!. Be Social and share it in social media, if you feel worth sharing it.
Wednesday, February 24, 2016
Remediating an ESXi 5.x or 6.0 host fails with the error: The host returns esxupdate error code:15. The package manager transaction is not successful
NAGARAJU AVALA
Wednesday, February 24, 2016
0
Symptoms
You cannot remediate an ESXi 5.x or 6.0 host using vCenter Update Manager.
Remediating ESXi 5.x or 6.0 hosts fails.
A package is to be updated on the host, particularly when VMware_locker_tools-light* is corrupt.
You see the error:
error code:15. The package manager transaction is not successful. Check the Update Manager log files and esxupdate log files for more details.
Cause
This issue occurs if the package files for floppies in the /locker/packages/Version/ folder is corrupt or full.
For example:
In ESXi 5.0 systems – /locker/packages/5.0.0/
In ESXi 5.1 systems – /locker/packages/5.1.0/
In ESXi 5.5 systems – /locker/packages/5.5.0/
In ESXi 6.0 systems – /locker/packages/6.0.0/
Resolution
To resolve this issue, recreate the/locker/packages/version/ folder, where version is:
ESXi 5.0 – /locker/packages/5.0.0/
ESXi 5.1 – /locker/packages/5.1.0/
ESXi 5.5 – /locker/packages/5.5.0/
ESXi 6.0 – /locker/packages/6.0.0/
To verify the store folders contents and symbolic link:
Connect to the ESXi host using an SSH session.
Check for information in the /store folder by running this command:
ls /store
This folder must contain packages and var folder.
Run this command to verify that the symbolic link is valid:
ls -l /
The /store folder should be linked to /locker and appear as:
locker -> /store
If that link is not displayed, run this command to add the symbolic link:
ln -s /store /locker
To recreate the/locker/packages/version/ folder:
Put the host in the maintenance mode.
Navigate to the /locker/packages/version/ folder on the host.
Rename /locker/packages/version/ folder to /locker/packages/version.old.
Remediate the host using Update Manager.
The /locker/packages/version/ folder is recreated and the remediation should now be successful.
Note: Verify if you can change to the other folders in /locker/packages/version/. If not, rename all the three folders including floppies.
An alternative resolution for ESXi:
Put the host in the maintenance mode.
Navigate to the /locker/packages/version/ folder on the host.
Rename the folder to:
/locker/packages/ version.old
Run this command as the root user to recreate the folder:
mkdir / locker/packages/ version/
For example:
In ESXi 5.0:
mkdir / locker/packages/5.0.0/
In ESXi 5.1:
mkdir / locker/packages/5.1.0/
In ESXi 5.5:
mkdir / locker/packages/5.5.0/
In ESXi 6.0:
mkdir / locker/packages/6.0.0/
Use WinSCP to copy the folders and files from the / locker/packages/ version/ directory on a working host to the affected host.
If the preceding methods do not resolve the issue:
Verify and ensure that there is sufficient free space on root folder by running this command
vdf -h
Check the locker location by running this command:
ls -ltr /
If the locker is not pointing to a datastore:
Rename the old locker file by running this command:
mv /locker /locker.old
Recreate the symbolic link by running this command:
ln -s /store /locker
Wednesday, February 17, 2016
Collecting diagnostic information using the vm-support command in VMware ESX/ESXi
NAGARAJU AVALA
Wednesday, February 17, 2016
0
Purpose
VMware Technical Support routinely requests the diagnostic information from you when a support request is addressed. This diagnostic information contains product specific logs and configuration files from the host on which the product is running. This information is gathered using a specific script or tool within the product.
This article provides procedures for obtaining diagnostic information for a VMware ESXi/ESX host using the vm-support command line utility.
The diagnostic information obtained by using this article is uploaded to VMware Technical Support. To uniquely identify your information, use the Support Request (SR) number you receive when you create the new SR.
Resolution
The command-line vm-support utility is present on all versions of VMware ESXi/ESX, though some of the options available with the utility differ among versions.
Running vm-support in a console session on ESXi/ESX hosts
The traditional way of using the vm-support command-line utility produces a gzipped tarball (.tgz file) locally on the host. The resulting file can be copied off the host using FTP, SCP, or another method.
Open a console to the ESX or ESXi host.
Run the command:
vm-support
Note: Additional options can be specified to customize the log bundle collection. Use the vm-support -h command for a list of options available on a given version of ESXi/ESX.
A compressed bundle of logs is produced and stored in a file with a .tgz extension in one of these locations:
/var/tmp/
/var/log/
The current working directory
To export the log bundle to a shared vmfs datastore, use this command:
vm-support -f -w /vmfs/volumes/DATASTORE_NAME
Note: The -f option is not available in ESXi 5.x, ESXi/ESX 4.1 Update 3, and later.
The log bundle is collected and downloaded to a client, upload the logs to the SFTP/FTP site.
Streaming vm-support output from an ESXi 5.x and 6.0 host
Starting with ESXi 5.0, the vm-support command-line utility supports streaming content to the standard output. This allows to send the content over an SSH connection without saving anything locally on the ESXi host.
Enable SSH access to the ESXi shell.
Using a Linux or Posix client, such as the vSphere Management Assistant appliance, log in to the ESXi host and run the vm-support command with the streaming option enabled, specifying a new local file. A compressed bundle of logs is produced on the client at the specified location. For example:
ssh root@ESXHostnameOrIPAddress vm-support -s > vm-support-Hostname.tgz
Note: This requires you to enter a password for the root account, and cannot be used with lockdown mode.
You can also direct the support log bundle to a desired datastore location using the same command (mentioning the destination path). For example:
ssh root@ESXHostnameOrIPAddress 'vm-support -s > /vmfs/volumes/datastorexxx/vm-support-Hostname.tgz'
After the log bundle has been collected and downloaded to a client, upload the logs to the SFTP/FTP site.
HTTP-based download of vm-support output from an ESXi 5.x and 6.0 host
Starting with ESXi 5.0, the vm-support command-line utility can be invoked via HTTP. This allows you to download content using a web browser or a command line tool like wget or curl.
Using any HTTP client, download the resource from:
https://ESXHostnameOrIPAddress/cgi-bin/vm-support.cgi
For example, download the resource using the wget utility on a Linux or other Posix client, such as the vSphere Management Assistant appliance. A compressed bundle of logs is produced on the client at the specified location:
wget https://10.11.12.13/cgi-bin/vm-support.cgi
After the log bundle is collected and downloaded to a client, upload the logs to the SFTP/FTP site.