This Blog is to share our knowledge and expertise on Linux System Administration and VMware Administration

Tuesday, December 29, 2015

Differences between upgraded and newly created VMFS-5 datastores:

Tuesday, December 29, 2015 0
Differences between upgraded and newly created VMFS-5 datastores:
  • VMFS-5 upgraded from VMFS-3 continues to use the previous file block size which may be larger than the unified 1MB file block size. Copy operations between datastores with different block sizes won’t be able to leverage VAAI.  This is the primary reason I would recommend the creation of new VMFS-5 datastores and migrating virtual machines to new VMFS-5 datastores rather than performing in place upgrades of VMFS-3 datastores.
  • VMFS-5 upgraded from VMFS-3 continues to use 64KB sub-blocks and not new 8K sub-blocks.
  • VMFS-5 upgraded from VMFS-3 continues to have a file limit of 30,720 rather than the new file limit of > 100,000 for newly created VMFS-5.
  • VMFS-5 upgraded from VMFS-3 continues to use MBR (Master Boot Record) partition type; when the VMFS-5 volume is grown above 2TB, it automatically switches from MBR to GPT (GUID Partition Table) without impact to the running VMs.
  • VMFS-5 upgraded from VMFS-3 will continue to have a partition starting on sector 128; newly created VMFS-5 partitions start at sector 2,048.

Based on the information above, the best approach to migrate to VMFS-5 is to create net new VMFS-5 datastores if you have the extra storage space, can afford the number of Storage vMotions required, and have a VAAI capable storage array holding existing datastores with 2, 4, or 8MB block sizes.

Difference between VMFS 3 and VMFS 5 -- Part1

Tuesday, December 29, 2015 0
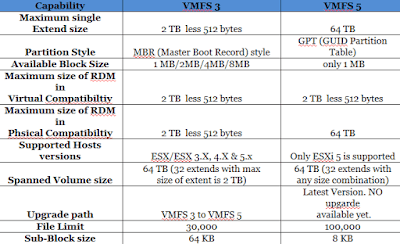
  • Explains you the major difference between VMFS 3 and VMFS 5. VM FS 5 is available as part of vSphere 5. VMFS 5 is introduced with lot of performance enhancements. 
  • Newly installed ESXi 5 will be formatted with VMFS 5 version but if you have upgraded the ESX 4 or ESX 4.1 to ESXi 5, then datastore version will be VMFS 3 only. 
  • You will able to upgrade the VMFS 3 to VMFS 5 via vSphere client once ESXi upgrade is Complete. This posts tells you some major differences between    VMFS 3 and VMFS 5


How to Identify the virtual machines with Raw Device Mappings (RDMs) using PowerCLI

Tuesday, December 29, 2015 0
Open the vSphere PowerCLI command-line.
Run the command:

Get-VM | Get-HardDisk -DiskType "RawPhysical","RawVirtual" | Select Parent,Name,DiskType,ScsiCanonicalName,DeviceName | fl

This command produces a list of virtual machines with RDMs, along with the backing SCSI device for the RDMs.

An output looks similar to:

Parent                      Virtual Machine Display Name
Name                       Hard Disk n
DiskType                  RawVirtual
ScsiCanonicalName naa.646892957789abcdef0892957789abcde
DeviceName            vml.020000000060912873645abcdef0123456789abcde9128736450ab

If you need to save the output to a file the command can be modified:

Get-VM | Get-HardDisk -DiskType "RawPhysical","RawVirtual" | Select Parent,Name,DiskType,ScsiCanonicalName,DeviceName | fl | Out-File –FilePath RDM-list.txt

Identify the backing SCSI device from either the ScsiCanonicalName or DeviceName identifiers.

Snapshot consolidation "error: maximum consolidate retries was exceeded for scsix:x"

Tuesday, December 29, 2015 0
Whenever you cannot perform snapshot consolidation in VMware ESXi 5.5 and ESXi 6.0.x.Performing a snapshot consolidation in ESXi 5.5 fails.

or

When attempting to consolidate snapshots using the vSphere Client, you see the error:

maximum consolidate retries was exceeded for scsix:x

Consolidate Disks message: The virtual machine has exceeded the maximum downtime of 12 seconds for disk consolidation.

 This issue occurs because ESXi 5.5 introduced a different behavior to prevent the virtual machine from being stunned for an extended period of time.

This message is reported if the virtual machine is powered on and the asynchronous consolidation fails after 10 iterations. An additional iteration is performed if the estimated stun time is over 12 seconds.This occurs when the virtual machine generates data faster than the consolidated rate.

To resolve this issue, turn off the snapshots consolidation enhancement in ESXi 5.5 and ESXi 6.0.x, so that it works like earlier versions of ESX/ESXi. This can be done by setting the snapshot.asyncConsolidate.forceSync to TRUE.

  Note: If the parameter is set to true, the virtual machine is stunned for long time to perform the snapshot consolidation, and it may not respond to ping during the consolidation.

To set the parameter snapshot.asyncConsolidate.forceSync to TRUE using the vSphere client:

Shut down the virtual machine.

Right-click the virtual machine and click Edit settings.

Click the Options tab.

Under Advanced, right-click General

Click Configuration Parameters, then click Add Row.

In the left pane, add this parameter:

snapshot.asyncConsolidate.forceSync

In the right pane, add this value:


TRUE

Click OK to save your change, and power on the virtual machine.

To set the parameter snapshot.asyncConsolidate.forceSync to TRUE without shutting down the virtual machine, run this Powercli command:

get-vm virtual_machine_name | New-AdvancedSetting -Name snapshot.asyncConsolidate.forceSync -Value TRUE -Confirm:$False

How to resolve : Cannot take a quiesced snapshot of Windows 2008 R2 virtual machine

Tuesday, December 29, 2015 0
When creating a snapshot on a Windows 2008 R2 virtual machine on ESXi/ESX 4.1 and later versions, you may experience these symptoms:
  • The snapshot operation fails to complete.
  • Unable to create a quiesced snapshot of the virtual machine.
  • Unable to back up the virtual machine.
  • Cloning a Windows 2008 R2 virtual machine fails.
  • In the Application section of the Event Viewer in virtual machine, Windows guest operating system reports an VSS error similar to:
           Volume Shadow Copy Service error: Unexpected error calling routine IOCTL_DISK_SET_SNAPSHOT_INFO(\\.\PHYSICALDRIVE1) fails with winerror 1168. hr = 0x80070490, Element not found.
  •  Any process that creates a quiesced snapshot fails.
  •  You see the error:
    Can not create a quiesced snapshot because the create snapshot operation exceeded the time limit for holding off I/O in the frozen virtual machine.

Backup applications, such as VMware Data Recovery, fails.You see the error:

  • Failed to create snapshot for vmname, error -3960 (cannot quiesce virtual machine)
  • This is a known issue with VSS application snapshots which is not caused by VMware software. It affects ESXi/ESX 4.1 and later versions.
  • Currently, there is no resolution.
  • To work around this issue, disable VSS quiesced application-based snapshots and revert to file system quiesced snapshots. You can disable VSS applications quiescing with either the VMware vSphere Client or with VMware Tools. Use one of these procedures:
 Disable VSS application quiescing using the vSphere Client:
  •  Power off the virtual machine.
  •  Log in to the vCenter Server or the ESXi/ESX host through the vSphere Client.
  •  Right-click the virtual machine and click Edit settings.
  •  Click the Options tab.
  •  Navigate to Advanced > General > Configuration Parameters.
  •  Add or modify the row disk.EnableUUID with the value FALSE.
  •  Click OK to save.
  •  Click OK to exit.
  •  Reboot the virtual machine for changes to take in effect.
Note: If this change is done through the command line using a text editor, the vim-cmd command to reload the vmx is enough to see the changes. For more information
Alternatively, un-register the virtual machine from the vCenter Server inventory. To un-register, right-click the virtual machine and click Remove from Inventory.
        Re-register the virtual machine back to the inventory.

Disable VSS application quiescing using VMware Tools:

  • Open the C:\ProgramData\VMware\VMware Tools\Tools.conf file in a text editor, such as Notepad. If the file does not exist, create it.
  • Add these lines to the file
            [vmbackup]
            vss.disableAppQuiescing = true
  • Save and close the file.
  • Restart the VMware Tools Service for the changes to take effect.
  • Click Start > Run, type services.msc, and click OK.
  • Right-click the VMware Tools Service and click Restart.

Taking a snapshot fails with the Error "Failed to take a memory snapshot, since the virtual machine is configured with independent disks"

Tuesday, December 29, 2015 0
When attempting to take a snapshot of a powered on virtual machine, you experience these symptoms:
You cannot take a snapshot with the Snapshot the virtual machine's memory option selected.

You see this error:

Failed to take a memory snapshot, since the virtual machine is configured with independent disks.

Resolution


This is an expected behavior, virtual machines with Independent disks cannot use memory or quiesced snapshots.

To resolve this issue, use one of these options:
When taking a snapshot of a virtual machine, deselect the Snapshot the virtual machine's memory and Quiesce Snapshot options.
Deselect the independent option in the virtual disk options.

To change the options for the virtual disk(s):

  • Open the vSphere Client.
  • Right-click the virtual machine and click Edit Settings.
  • Find the affected virtual disk(s) and deselect the Independent option.
  • Click OK to apply and save the changes to the virtual machine configuration.
 Note: This change requires the virtual machine to be powered off. If not, the option is grayed out.

How to Troubleshoot the NTP issue on ESX and ESXi 4.x / 5.x

Tuesday, December 29, 2015 0
Validate network connectivity between the ESXi/ESX host and the NTP server using the ping command.

Query ntpd service using ntpq

Use the NTP Query utility program ntpq to remotely query the ESXi/ESX host's ntpd service.
The ntpq utility is commonly installed on Linux clients and is also available in the ESX service console and the vSphere Management Assistant. For more information on the installation and use of the ntpq utility program on a given Linux distribution, see your Linux distribution's documentation.

For an ESXi 5.x host, the ntpq utility is included by default and does not need to be installed. It can be run locally from the ESXi 5.x host.


The ntpq utility is not available on ESXi 3.x/4.x. To query an ESXi host's NTP service ntpd, install ntpq on a remote Linux client and query the ESXi host's ntpd service from the Linux client.

To use the NTP Query utility ntpq to remotely query the ESX host's NTP service (ntpd) and determine whether it is successfully synchronizing with the upstream NTP server:

When using a Linux client, open a console session on the client where ntpq is installed.
Run this command:


When using an SSH shell or local console session on ESXi 5.5 and 5.1:
# "watch ntpq -p localhost_or_127.0.0.1"

When using a Linux client for ESXi/ESX 4.x:
# watch "ntpq -p ESX_host_IP_or_domain_name"

Monitor the output for 30 seconds and press Ctrl+C on your keyboard to stop the watch command.


Note: In ESXi 5.5 and 5.1, the output you see either localhost or loopback (127.0.0.1).

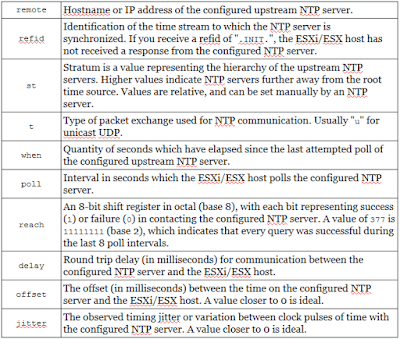
remote              refid    st  t  when poll reach delay  offset  jitter
======================================================
*10.11.12.130  1.0.0.0  1  u   46   64   377   43.76  5.58   40000


How to resolve : vMotion fails with network errors

Tuesday, December 29, 2015 0
Network misconfiguration can cause random vMotion failure. Retrying the vMotion operation may be successful, then to isolate and correct the problem please check as suggested by VMware.

To resolve this issue:
  • Check for IP address conflicts on the vMotion network. Each host in the cluster should have a vMotion vmknic, assigned a unique IP address.
  • Check for packet loss over the vMotion network. Try having the source host ping (vmkping) the destination host's vMotion vmknic IP address for the duration of the vMotion.
  • Check for connectivity between the two hosts (use the same ping test as above).
  • Check for potential interaction with firewall hardware or software that prevents connectivity between the source and the destination TCP port 8000.
For the Connection refused error, after confirming a lack of IP address conflicts, check to see that the vmotionServer process is running. If it is running, it exists as a kernel process visible in the output of the ps or esxtop command.

Remediating an ESXi 5.x and 6.0 host with Update Manager fails with the error: There was an error checking file system on altbootbank

Tuesday, December 29, 2015 0
Whenever you find below Symptoms

You cannot remediate an ESXi 5.x and 6.0 host.
Remediation of an ESXi 5.x and 6.0 host using vCenter Update Manager fails.
You see the error:


The host returns esxupdate error code:15. The package manager transaction is not successful. Check the Update Manager log files and esxupdate log files for more details

In the /var/log/esxupdate.log file, you see entries similar to:

esxupdate: esxupdate: ERROR: InstallationError: ('', 'There was an error checking file system on altbootbank, please see log for detail.')

Then Resolution would be as follows

To resolve the issue, repair the altbootbank partition.

To repair the altbootbank partition:

    Run this command to determine the device for /altbootbank:

    vmkfstools -P /altbootbank

    You see output similar to:

mpx.vmhba32:C0:T0:L0:5


Run this command to repair the altbootbank filesystem:

dosfsck -a -w /dev/disks/device_name
   
#dosfsck -a -w /dev/disks/mpx.vmhba32:C0:T0:L0:5 


 If remediation fails at this stage, reboot the host.

Esxupdate error code:15. The package manager transaction is not successful error While Remediating an ESXi 5.x or 6.0 host

Tuesday, December 29, 2015 2
Whenever - You cannot remediate an ESXi 5.x or 6.0 host using vCenter Update Manager.

 Remediating ESXi 5.x or 6.0 hosts fails.


 A package is to be updated on the host, particularly when VMware_locker_tools-light* is corrupt.  


error code:15. The package manager transaction is not successful. Check the Update Manager log files and esxupdate log files for more details.

To resolve this issue

 Recreate the/locker/packages/version/ folder, where version is:
        ESXi 5.0 – /locker/packages/5.0.0/
        ESXi 5.1 – /locker/packages/5.1.0/
        ESXi 5.5 – /locker/packages/5.5.0/
        ESXi 6.0 – /locker/packages/6.0.0/

To verify the store folders contents and symbolic link:

 Connect to the ESXi host using an SSH session.
 Check for information in the /store folder by running this command:
        ls /store

This folder must contain packages and var folder.
Run this command to verify that the symbolic link is valid:
        ls -l /

The /store folder should be linked to /locker and appear as:
        locker  -> /store

If that link is not displayed, run this command to add the symbolic link:
        ln -s /store /locker

To recreate the/locker/packages/version/ folder:
 Put the host in the maintenance mode.
 Navigate to the /locker/packages/version/ folder on the host.
 Rename /locker/packages/version/ folder to /locker/packages/version.old.
 Remediate the host using Update Manager.

The /locker/packages/version/ folder is recreated and the remediation should now be successful.
 Note: Verify if you can change to the other folders in /locker/packages/version/. If not, rename all the three folders including floppies.

An alternative resolution for ESXi:
Put the host in the maintenance mode.
Navigate to the /locker/packages/version/ folder on the host.
Rename the folder to:
       /locker/packages/ version.old

Run this command as the root user to recreate the folder:
       mkdir / locker/packages/ version/

For ex:

In ESXi 5.0:
        mkdir / locker/packages/5.0.0/

In ESXi 5.1:
        mkdir / locker/packages/5.1.0/

 In ESXi 5.5:
        mkdir / locker/packages/5.5.0/

In ESXi 6.0:
        mkdir / locker/packages/6.0.0/


Use WinSCP to copy the folders and files from the / locker/packages/ version/ directory on a working host to the affected host.


If the preceding methods do not resolve the issue:
Verify and ensure that there is sufficient free space on root folder by running this command:
        vdf -h

Check the locker location by running this command:
        ls -ltr /

If the locker is not pointing to a datastore:
Rename the old locker file by running this command:
        mv /locker /locker.old

Recreate the symbolic link by running this command:
        ln -s /store /locker

Monday, December 28, 2015

Configuring Network Time Protocol (NTP) on ESX/ESXi hosts using the vSphere Client

Monday, December 28, 2015 0
This Blog  provides steps to enable Network Time Protocol  (NTP) on an ESX/ESXi host using the vSphere Client.

To configure NTP on ESX/ESXi 4.1 and ESXi 5.x hosts using the vSphere Client:

  • Connect to the ESX/ESXi host using the vSphere Client.
  • Select a host in the inventory.
  • Click the Configuration tab.

  • Click Time Configuration.
  • Click Properties.
  • Click Options.


  • Click NTP Settings.
  • Click Add.
  • Enter the NTP Server name. For example, pool.ntp.org.
    Note: When entering the multiple NTP Server names, use a comma (,) followed by a space ( ) between the entries.
  • Click OK.


  • Click the General tab.
  • Click Start automatically under Startup Policy.
    Note: It is recommended to set the time manually prior to starting the service.
  • Click Start and click OK.
  • Click OK to exit.

Monday, December 21, 2015

Install/Upgrade VMware Tools by Supressing Reboot

Monday, December 21, 2015 0
Using the vSphere Client

To update VMware Tools is via the vSphere Client. It’s simple and straightforward.

    Right click on a VM in the vSphere Client
    Choose Guest
    Choose Install/Upgrade VMware Tools

You will be prompted to choose how you would like the upgrade to take place, either Interactively or Automatically. Along with the Automatic option comes the ability to enter some arguments, listed as “advanced options” in the GUI, that will be passed to the install.


Upgrade VMware Tools without reboot

Monday, December 21, 2015 0
Upgrade VMware Tools, selected virtual machine:

Get-Cluster "Productie" | Get-VM "vmname" | Update-Tools –NoReboot

Get VMware-Tools versions:

Get-View -ViewType VirtualMachine | select Name, @{ Name=”ToolsVersion”;

Expression={$_.config.tools.toolsVersion}}

Troubleshooting Syslog Collector in VMWare vsphere

Monday, December 21, 2015 0
Whenever syslog files aren’t updating  in the repository from he vSphere Syslog Collector server.


Here are some basic steps that can be used to troubleshoot this problem.
VMware ESXi hosts

On the VMware ESXi hosts check the following settings:
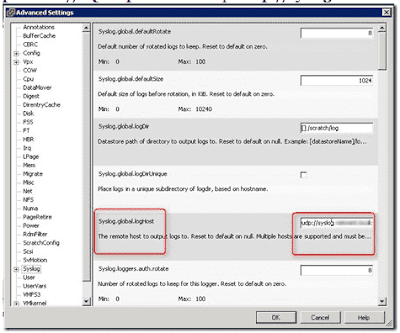
– Syslog destination. Open the vSphere Client. On the ESXi server, open the configuration tab and select advanced Settings. Check the Syslog.global.logHost value. The format is: protocol://FQDN:port . For example udp://syslog.beerens.local:514


– Is the ESXi firewall port open for syslog traffic. Open the vSphere Client, on the ESXi server, open the Configuration tab, select Security Profile, Firewall and select Properties. Check if the syslog service is enabled.


 vSphere Syslog Collector
On the vSphere Syslog Collector server check the following settings:
– Is the syslog port 514 (default) listening:


-  Reload and update the syslog configuration.  On the ESXi host use the following command:
esxcli system syslog reload
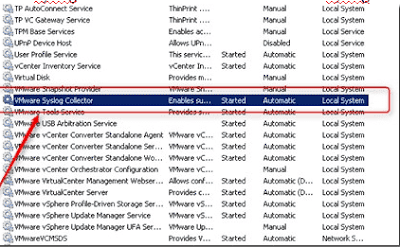
– Is the Syslog Collector service started. Restart the Syslog Collector service if needed 


After the reloading the syslog settings and restarting the Syslog Collector service the files begun to update again in the repository.

How to Enable Execute Disable/No Execute CPU feature at ESXI

Monday, December 21, 2015 0

ESXi requires the Execute Disable/No Execute CPU feature to be enabled

Restart the host, enter in(press F9) to boot in BIOS mode.

Advanced Options --> Processor Options --> No-Execute Memory Protection, then configure: Enabled


image


Hope it helps.

VMware: How to rollback ESXi 5.1 to 5.0

Monday, December 21, 2015 0
Whenever you find issues after upgrading  to esxi 5.1 from 5.0 , rollback is as simple as below.

Reboot the host and press R to start the Recovery Mode..
Installed hypervisors:
HYPERVISOR1: 5.0.0-623860
HYPERVISOR2: 5.1.0-799733 (Default)
CURRENT DEFAULT HYPERVISOR WILL BE REPLACED PERMANENTLY
DO YOU REALLY WANT TO ROLL BACK?

Press Y to start the roll back

image

Result:
image
The host is downgraded and back online again with VMware vSphere ESXi 5.0.0

How to Disable the interrupt remapping on ESXi

Monday, December 21, 2015 0
 ESXi/ESX 4.1

To disable interrupt remapping on ESXi/ESX 4.1, perform one of these options:

    Run this command from a console or SSH session to disable interrupt mapping:

    # esxcfg-advcfg -k TRUE iovDisableIR

    To back up the current configuration, run this command twice:

    # auto-backup.sh

    Note: It must be run twice to save the change.

    Reboot the ESXi/ESX host:

    # reboot

    To check if interrupt mapping is set after the reboot, run the command:

    # esxcfg-advcfg -j iovDisableIR

    iovDisableIR=TRUE
    In the vSphere Client:
        Click Configuration > (Software) Advanced Settings > VMkernel.
        Click VMkernel.Boot.iovDisableIR, then click OK.
        Reboot the ESXi/ESX host.

ESXi 5.x and ESXi 6.0.x

ESXi 5.x and ESXi 6.0.x does not provide this parameter as a GUI client configurable option. It can only be changed using the esxcli command or via the PowerCLI.


    To set the interrupt mapping using the esxcli command:

    List the current setting by running the command:

    # esxcli system settings kernel list -o iovDisableIR

    The output is similar to:

    Name          Type  Description                              Configured  Runtime  Default
    ------------  ----  ---------------------------------------  ----------  -------  -------
    iovDisableIR  Bool  Disable Interrupt Routing in the IOMMU   FALSE        FALSE    FALSE

    Disable interrupt mapping on the host using this command:

    # esxcli system settings kernel set --setting=iovDisableIR -v TRUE

    Reboot the host after running the command.

    Note: If the hostd service fails or is not running, the esxcli command does not work. In such cases, you may have to use the localcli instead. However, the changes made using localcli do not persist across reboots. Therefore, ensure that you repeat the configuration changes using the esxcli command after the host reboots and the hostd service starts responding. This ensures that the configuration changes persist across reboots.
    To set the interrupt mapping through PowerCLI:

    Note: The PowerCLI commands do not work with ESXi 5.1. You must use the esxcli commands as detailed above.

    PowerCLI> Connect-VIServer -Server 10.21.69.233 -User Administrator -Password passwd
    PowerCLI> $myesxcli = Get-EsxCli -VMHost 10.21.69.111
    PowerCLI> $myesxcli.system.settings.kernel.list("iovDisableIR")

    Configured  : FALSEDefault     : FALSE
    Description : Disable Interrrupt Routing in the IOMMU
    Name        : iovDisableIR
    Runtime     : FALSE
    Type        : Bool

    PowerCLI> $myesxcli.system.settings.kernel.set("iovDisableIR","TRUE")
    true

    PowerCLI> $myesxcli.system.settings.kernel.list("iovDisableIR")

    Configured  : TRUEDefault     : FALSE
    Description : Disable Interrrupt Routing in the IOMMU
    Name        : iovDisableIR
    Runtime     : FALSE
    Type        : Bool
    After the host has finished booting, you see this entry in the /var/log/boot.gz log file confirming that interrupt mapping has been disabled:

    TSC: 543432 cpu0:0)BootConfig: 419: iovDisableIR = TRUE

How to resolve - vCenter Server task migration fails with the error: Failed to create journal file provider, Failed to open for write

Monday, December 21, 2015 0
For vCenter Server

The journal files for vCenter Server on Windows are located at:

    Windows 2003 and earlier – %ALLUSERSPROFILE%\Application Data\VMware\VMware VirtualCenter\journal\
    Windows 2008 and later – %PROGRAMDATA%\VMware\VMware VirtualCenter\journal\

Whenever you..

    Cannot perform provisioning operations, such as vMotion, Clone, storage DRS
    Cannot create new virtual machines.
    Cannot add RDM disk to a virtual machine.
    Provisioning operations (such as vMotion, Clone, or Migrate) fail.
    vCenter Server task migration fails. You see the error:

    A general system error occurred: Failed to create journal file providerFailed to open "<filename>" for write   

Cause

This issue occurs if there is not enough free disk space to store the journal information. The management components in vCenter Server and ESX/ESXi record transactions to journal files when tracking long-running operations. The path and filename cited in the error message indicate the layer that failed to create a journal file.

The Resolution should be ..

Delete or archive the unnecessary files on this filesystem to free up disk space. Depending on your vCenter Server implementation, it is recommended to have a minimum of 40GB of disk space free on the system.


Explain about VSS writers in Virtual Machines and how to disable the specific VSS writers with VMware Tools

Monday, December 21, 2015 0
VMware products may require file systems within a guest operating system to be quiesced prior to a snapshot operation for the purposes of backup and data integrity.
VMware products which use quiesced snapshots include, but are not limited to, VMware Consolidated Backup and VMware Data Recovery.
As of ESX 3.5 Update 2, quiescing can be done by Microsoft Volume Shadow Copy Service (VSS), which is available in Windows Server 2003.


Operating systems which do not have VSS make use of the SYNC driver for quiescing operations. When VSS is invoked, all VSS providers must be running. If there is an issue with any third-party providers or the VSS service itself, the snapshot operation may fail.
Before verifying a VSS quiescing issue, ensure that you are able to create a manual non-quiesced snapshot using the vSphere Snapshot Manager.


With vSphere 4.0, VMware introduced the ability to disable specificVSS writers for the benefit of troubleshooting a specific VSS writer issue.

If you experience an issue backing up a specific virtual machine using snapshot technology and you have identified an issue with a specific VSS writer within the virtual machine, this blog  explains how to disable that VSS writer from being called during a snapshot operation.

To disable a specific VSS writer being called during a snapshot operation:

    Determine the name of the VSS writer that you want to exclude from the snapshot operation. Run this command from within Windows:
    vssadmin list writers
    Note: With Windows Vista, 7, and 2008 the command prompt may need to be run with administrator elevation.

    You see output similar to:

    Writer name: 'Task Scheduler Writer'
       Writer Id: {d61d61c8-d73a-4eee-8cdd-f6f9786b7124}
       Writer Instance Id: {1bddd48e-5052-49db-9b07-b96f96727e6b}
       State: [1] Stable
       Last error: No error
    Note: The name of the VSS Writer is highlighted.

    Create or edit the vmbackup.conf file which is located at %ALLUSERSPROFILE%\Application Data\VMware\VMware Tools\ .

    Note: If the vmbackup.conf file does not exist then create it.
    Place the name of the VSS writer you want to disable on a separate line. If you want to disable more than one VSS writer, ensure that you place each VSS writer name on a separate line. For example:
    Task Scheduler Writer
    NTDS
    SqlServerWriter
    Microsoft Exchange Replica Writer
    Microsoft Exchange Writer
    Restart the VMware Tools service.
    When the writer issue has been resolved, you can remove the offending writer from the vmbackup.conf file.

Note: VMware does not provide these VSS writers. Engage the provider of the VSS writer to troubleshoot the writer issue to ensure application consistency with the writer.

Wednesday, December 9, 2015

Explain about SysRq command and How to reboot the hanged physical Linux & Xen Linux VM Server

Wednesday, December 09, 2015 0
The magic SysRq key is a key combination in the Linux kernel which allows the user to perform various low level commands regardless of the system’s state.

It is often used to recover from freezes, or to reboot a computer without corrupting the filesystem. The key combination consists of Alt+SysRq+commandkey. In many systems the SysRq key is the printscreen key.

First, you need to enable the SysRq key, as shown below.

echo "1" > /proc/sys/kernel/sysrq

List of SysRq Command Keys

Following are the command keys available for Alt+SysRq+commandkey.

    ‘k’ – Kills all the process running on the current virtual console.
    ‘s’ – This will attempt to sync all the mounted file system.
    ‘b’ – Immediately reboot the system, without unmounting partitions or syncing.
    ‘e’ – Sends SIGTERM to all process except init.
    ‘m’ – Output current memory information to the console.
    ‘i’ – Send the SIGKILL signal to all processes except init
    ‘r’ – Switch the keyboard from raw mode (the mode used by programs such as X11), to XLATE mode.
    ‘s’ – sync all mounted file system.
    ‘t’ – Output a list of current tasks and their information to the console.
    ‘u’ – Remount all mounted filesystems in readonly mode.
    ‘o’ – Shutdown the system immediately.
    ‘p’ – Print the current registers and flags to the console.
    ‘0-9′ – Sets the console log level, controlling which kernel messages will be printed to your console.
    ‘f’ – Will call oom_kill to kill process which takes more memory.
    ‘h’ – Used to display the help. But any other keys than the above listed will print help.

Perform a Safe reboot of Linux

To perform a safe reboot of a Linux computer which hangs up, do the following. This will avoid the fsck during the next re-booting. i.e Press Alt+SysRq+letter highlighted below.

  •     unRaw (take control of keyboard back from X11,
  •     Terminate (send SIGTERM to all processes, allowing them to terminate gracefully),
  •     Kill (send SIGILL to all processes, forcing them to terminate immediately),
  •     Sync (flush data to disk),
  •     Unmount (remount all filesystems read-only),
  •     Reboot.
VM Server

 To perform a safe reboot of a Linux Xen Virtual Server which hangs up, do the following. This will avoid the fsck during the next re-booting.

Run the below command in Xen Dom0.

#xm sysrq <domainid> s
#xm sysrq <domainid> u
#xm sysrq <domainid> b


Thursday, December 3, 2015

What are the tools available to properly diagnose a network performance problem in Linux Server?

Thursday, December 03, 2015 0
Below listed Linux tools are used to diagnose the network performance in Linux server.

netstat

    A command-line utility that prints network connections, routing tables, interface statistics, masquerade connections and multicast memberships. It retrieves information about the networking subsystem from the /proc/net/ file system. These files include:

        /proc/net/dev (device information)
        /proc/net/tcp (TCP socket information)
        /proc/net/unix (Unix domain socket information)

    For more information about netstat and its referenced files from /proc/net/, refer to the netstat man page: man netstat.
dropwatch
    A monitoring utility that monitors packets dropped by the kernel. For more information, refer to the dropwatch man page: man dropwatch.

ip
    A utility for managing and monitoring routes, devices, policy routing, and tunnels.

ethtool
    A utility for displaying and changing NIC settings.

/proc/net/snmp
    A file that displays ASCII data needed for the IP, ICMP, TCP, and UDP management information bases for an snmp agent. It also displays real-time UDP-lite statistics.

Wednesday, December 2, 2015

Explain about Linux Memory Huge Pages & Transparent Huge Pages

Wednesday, December 02, 2015 0
1.       Memory is managed in blocks known as pages.
2.       A page is 4096 bytes.
3.       1MB of memory is equal to 256 pages;
4.       1GB of memory is equal to 256,000 pages, etc.
5.       CPUs have a built-in memory management unit that contains a list of these pages, with each page referenced through a page table entry

There are two ways to enable the system to manage large amounts of memory:

    Increase the number of page table entries in the hardware memory management unit
    Increase the page size

The first method is expensive, since the hardware memory management unit in a modern processor only supports hundreds or thousands of page table entries.

Red Hat Enterprise Linux 6 implements the second method

  • Simply put, huge pages are blocks of memory that come in 2MB and 1GB sizes.
  • The page tables used by the 2MB pages are suitable for managing multiple gigabytes of memory, whereas the page tables of 1GB pages are best for scaling to terabytes of memory.
  • Huge pages must be assigned at boot time.
  • They are also difficult to manage manually, and often require significant changes to code in order to be used effectively.

THP (transparent huge pages) is an abstraction layer that automates most aspects of creating, managing, and using huge pages.

  • THP hides much of the complexity in using huge pages from system administrators and developers.
  • As the goal of THP is improving performance, its developers (both from the community and Red Hat) have tested and optimized THP across a wide range of systems, configurations, applications, and workloads.
  • This allows the default settings of THP to improve the performance of most system configurations
  • THP is not recommended for database workloads.
  • THP can currently only map anonymous memory regions such as heap and stack space.