This Blog is to share our knowledge and expertise on Linux System Administration and VMware Administration

Wednesday, October 28, 2015

Brief about ESXi Log Files and Locations.

Wednesday, October 28, 2015 0
Working with ESX(i) log files is important when troubleshooting issues within the virtual environment. So sharing few important log files of ESXI as follows.
  • /var/log/auth.log: ESXi Shell authentication success and failure attempts.
  • /var/log/dhclient.log: DHCP client log.
  • /var/log/esxupdate.log: ESXi patch and update installation logs.
  • /var/log/hostd.log: Host management service logs, including virtual machine and host Task and Events, communication with the vSphere Client and vCenter Server vpxa agent, and SDK connections.
  • /var/log/shell.log: ESXi Shell usage logs, including enable/disable and every command entered.
  • /var/log/boot.gz: A compressed file that contains boot log information and can be read using zcat /var/log/boot.gz|more.
  • /var/log/syslog.log: Management service initialization, watchdogs, scheduled tasks and DCUI use.
  • /var/log/usb.log: USB device arbitration events, such as discovery and pass-through to virtual machines.
  • /var/log/vob.log: VMkernel Observation events, similar to vob.component.event.
  • /var/log/vmkernel.log: Core VMkernel logs, including device discovery, storage and networking device and driver events, and virtual machine startup.
  • /var/log/vmkwarning.log: A summary of Warning and Alert log messages excerpted from the VMkernel logs.
/var/log/vmksummary.log: A summary of ESXi host startup and shutdown, and an hourly heartbeat with uptime, number of virtual machines running, and service resource consumption.

How to check the ESXi logs via Web browser?

Wednesday, October 28, 2015 0
Start you web browser and connect to the host via:

http://IP_of_Your_ESXi/host

That’s it. The hyperlinks to the different log files are shown. If you scroll all the way down you can see vpxa.log which is a vcenter log file. Another important log file is fdm.log (fault domain manager agent log) which allows you to troubleshoot HA problems.


http://buildvirtual.net/wp-content/uploads/2013/09/log_files3.jpg

How to change the queue depth configuration of QLogic, Emulex and Brocade HBAs for various Vmware ESXi/ESX versions

Wednesday, October 28, 2015 0
ESXi 6.0

This table lists the default Queue Depth values for QLogic HBAs for various ESXi/ESX versions:


The default Queue Depth value for Emulex adapters has not changed for all versions of ESXi/ESX released to date. The Queue Depth is 32 by default, and because 2 buffers are reserved, 30 are available for I/O data.

The default Queue Depth value for Brocade adapters is 32.

To adjust the queue depth for an HBA:

    Verify which HBA module is currently loaded by entering one of these commands on the service console:
        For QLogic:

        # esxcli system module list | grep qln
        For Emulex:

        # esxcli system module list | grep lpfc
        For Brocade:

        # esxcli system module list | grep bfa
    Run one of these commands:

    Note: The examples show the QLogic and Emulex modules. Use the appropriate module based on the outcome of the previous step.
        For QLogic:

        # esxcli system module parameters set -p qlfxmaxqdepth=64 -m qlnativefc

        For Emulex:

        # esxcli system module parameters set -p lpfc0_lun_queue_depth=64 -m lpfc

        For Brocade:

        # esxcli system module parameters set -p bfa_lun_queue_depth=64 -m bfa

    Notes:
        In these commands, both qlfxmaxqdepth and lpfc0 use the lowercase letter L, "l", and not the numeric digit 1.
        In this case, the HBAs have their LUN queue depths set to 64.
        If all Emulex cards on the host must be updated, apply the global parameter, lpfc_lun_queue_depth instead.
    Reboot your host.
    Run this command to confirm that your changes have been applied:
    # esxcli system module parameters list -m driver

    Where driver is your QLogic, Emulex, or Brocade adapter driver module, such as lpfc, qlnativefc, or bfa.

    The output appears similar to:

    Name                        Type  Value  Description
    --------------------------  ----  -----  --------------------------------------------------
    .....
    ql2xmaxqdepth               int   64     Maximum queue depth to report for target devices.
    .....


ESXi 5.0, 5.1, and 5.5

To adjust the queue depth for an HBA:


    Verify which HBA module is currently loaded by entering one of these commands on the service console:
        For QLogic:

        # esxcli system module list | grep qla
        For ESXi 5.5 QLogic native drivers:

        # esxcli system module list | grep qln
        For Emulex:

        # esxcli system module list | grep lpfc
        For Brocade:

        # esxcli system module list | grep bfa
    Run one of these commands:

    Note: The examples show the QLogic qla2xxx and Emulex lpfc820 modules. Use the appropriate module based on the outcome of the previous step.
        For QLogic:

        # esxcli system module parameters set -p ql2xmaxqdepth=64 -m qla2xxx
        For ESXi 5.5 QLogic native drivers:

        # esxcli system module parameters set -p ql2xmaxqdepth=64 -m qlnativefc
        For Emulex:

        # esxcli system module parameters set -p lpfc0_lun_queue_depth=64 -m lpfc820

        For ESXi 5.5 Emulex native drivers:

        # esxcli system module parameters set -p lpfc0_lun_queue_depth=64 -m lpfc
        For Brocade:

        # esxcli system module parameters set -p bfa_lun_queue_depth=64 -m bfa
    Notes:
        In these commands, both ql2xmaxqdepth and lpfc0 use the lowercase letter L, "l", and not the numeric digit 1.
        In this case, the HBAs represented by ql2x and lpfc0 have their LUN queue depths set to 64.
        If all Emulex cards on the host must be updated, apply the global parameter, lpfc_lun_queue_depth instead.
    Reboot your host.
    Run this command to confirm that your changes have been applied:

    # esxcli system module parameters list -m driver

    Where driver is your QLogic, Emulex, or Brocade adapter driver module, such as lpfc820, qla2xxx, or bfa.

    The output appears similar to:

    Name                        Type  Value  Description
    --------------------------  ----  -----  --------------------------------------------------
    .....
    ql2xmaxqdepth               int   64     Maximum queue depth to report for target devices.
    .....


ESXi/ESX 4.x

To adjust the queue depth for an HBA:


    Verify which HBA module is currently loaded by entering one of these commands on the service console:
        For QLogic:

        # vmkload_mod -l | grep qla
        For Emulex:

        # vmkload_mod -l | grep lpfc
        For Brocade:

        # vmkload_mod -l | grep bfa
    Run one of these commands:

    Note: The examples show the QLogic qla2xxx and Emulex lpfc820 modules. Use the appropriate module based on the outcome of the previous step.
        For QLogic:

        # esxcfg-module -s ql2xmaxqdepth=64 qla2xxx
        For Emulex:

        # esxcfg-module -s 'lpfc0_lun_queue_depth=64' lpfc820
        For Brocade:

        # esxcfg-module -s 'bfa_lun_queue_depth=64' bfa

    In this case, the HBAs represented by ql2x and lpfc0 have their LUN queue depths set to 64.

    Note: For multiple instances of Emulex HBAs being presented to a system, use:

    # esxcfg-module -s 'lpfc0_lun_queue_depth=64 lpfc1_lun_queue_depth=64' lpfc820
    Reboot your host.
    Run this command to confirm if your changes are applied:

    # esxcfg-module -g driver

    Where driver is your QLogic, Emulex, or Brocade adapter driver module, such as lpfc820, qla2xxx, or bfa.

How to Get the ESXi Hosts along with Specific Version by using Powercli?

Wednesday, October 28, 2015 0
Use the below Powercli command to get the Esxi Hosts version. 

get-vmhost | where-object { $_.version -eq "4.1.0" } | select name,version

Monday, October 19, 2015

How to do KVM Clock Sync?

Monday, October 19, 2015 0
These are the instructions to fix a KVM guest that has its clock jumped ahead a few hours after it is created/started.
The clock will eventually get corrected after ntpd gets running, but the server may run up to 1/2 hour on skewed time. The skewed time may cause issues with scheduled jobs
Update the Virtual Guests clock setting. This will prevent the clock on the virtual guest from jumping forward.

FROM the DOM-0 (KVM Host Server)
#vi /Path/to/server/configuration_file.xml
replace line:
<clock offset='utc'/>
with:
<clock offset='localtime'/>

Thursday, October 15, 2015

What is a defunct process in Linux?

Thursday, October 15, 2015 0
  • These are also termed as zombie process.
  • These are those process who have completed their execution but still has an entry in the process table.
  • When a process ends, all of the memory and resources associated with it are de-allocated so they can be used by other processes.
  • After the zombie is removed, its process identifier (PID) and entry in the process table can then be reused.
  • Zombies can be identified in the output from the Unix ps command by the presence of a "Z" in the "STAT" column

What are the performance enhancements in GFS2 as compared to GFS?

Thursday, October 15, 2015 0
 GFS2 features  
  • Better performance for heavy usage in a single directory.
  • Faster synchronous I/O operations.
  • Faster cached reads (no locking overhead).
  • Faster direct I/O with preallocated files (provided I/O size is reasonably large, such   as     4M    blocks).
  • Faster I/O operations in general.
  • Faster Execution of the df command, because of faster statfs calls.
  • Improved atime mode to reduce the number of write I/O operations generated by atime.
  When compared with GFS GFS2 supports the following features.
  • Extended file attributes (xattr) the lsattr() and chattr() attribute settings via standard ioctl() calls nanosecond timestamps
  • GFS2 uses less kernel memory.
  • GFS2 requires no metadata generation numbers.
  • Allocating GFS2 metadata does not require reads. Copies of metadata blocks in multiple journals are managed by revoking blocks from the journal before lock release.
  • GFS2 includes a much simpler log manager that knows nothing about unlinked inodes or quota changes.
  • The gfs2_grow and gfs2_jadd commands use locking to prevent multiple instances running at the same time.
  • The ACL code has been simplified for calls like creat() and mkdir().
  • Unlinked inodes, quota changes, and statfs changes are recovered without remounting the journal

What is a Quorum Disk in cluster?

Thursday, October 15, 2015 0
Quorum Disk is a disk-based quorum daemon, qdiskd, that provides supplemental heuristics to determine node fitness.
With heuristics you can determine factors that are important to the operation of the node in the event of a network partition.


    For a 3 node cluster a quorum state is present untill 2 of the 3 nodes are active i.e. more than half. But what if due to some reasons the 2nd node also stops communicating with the the 3rd node? In that case under a normal architecture  the cluster would dissolve and stop working. 

But for mission critical environments and such scenarios we use quorum disk in which an additional disk is configured which is mounted on all the nodes with qdiskd service running and a vote value is assigned to it.

    So suppose in above case I have assigned 1 vote to qdisk so even after 2 nodes stops communicating with 3rd node, the cluster would have 2 votes (1 qdisk + 1 from 3rd node) which is still more than half of vote count for a 3 node cluster. Now both the inactive nodes would be fenced and your 3rd node would be still up and running being a part of the cluster.

What is split-brain condition in Red Hat Cluster?

Thursday, October 15, 2015
 We say a cluster has quorum if a majority of nodes are alive, communicating, and agree on the active cluster members.
    For example, in a thirteen-node cluster, quorum is only reached if seven or more nodes are communicating. If the seventh node dies, the cluster loses quorum and can no longer function.

  • A cluster must maintain quorum to prevent split-brain issues.
  • If quorum was not enforced, quorum, a communication error on that same thirteen-node cluster may cause a situation where six nodes are operating on the shared storage, while another six nodes are also operating on it, independently.
  • Because of the communication error, the two partial-clusters would overwrite areas of the disk and corrupt the file system.
  • With quorum rules enforced, only one of the partial clusters can use the shared storage, thus protecting data integrity.
  • Quorum doesn't prevent split-brain situations, but it does decide who is dominant and allowed to function in the cluster.
  • quorum can be determined by a combination of communicating messages via Ethernet and through a quorum disk.

What are Tie-breakers in Red Hat Cluster?

Thursday, October 15, 2015 0
Tie-breakers are additional heuristics that allow a cluster partition to decide whether or not it is quorate in the event of an even-split - prior to fencing.
  • With such a tie-breaker, nodes not only monitor each other, but also an upstream router that is on the same path as cluster communications.
  • If the two nodes lose contact with each other, the one that wins is the one that can still ping the upstream router.
  • That is why, even when using tie-breakers, it is important to ensure that fencing is configured correctly.CMAN has no internal tie-breakers for various reasons. However, tie-breakers can be implemented using the API

How to Increase Memory in Xen Vm

Thursday, October 15, 2015 0
For Example, Here you want to increase memory from 6GB to 12GB.

Login to the Xen Host as root user and check the VM maximum memory settings. If Maximum memory setting is not more than equal to Target memory follow the below steps.

[root@Xenhost ~]# virsh dumpxml xenvm100 | grep -i mem
  <memory>6291456</memory>    -----------------> Here Memory settings in KB
  <currentMemory>6291456</currentMemory>

This shows that it has 6 GB currently in use. And that max memory is set to 6GB. Therefore we need server downtime for increase to 12GB

So, the procedure will be:

1. virsh setmem xenvm100 12582912
2. vi /etc/xen/xenvm100
   2a. change "memory = 12288" to "memory = 12288"  ------> Here in MB
   2b. save config
 
Reboot the VM and check the memory.

Hope it will help.

Wednesday, October 14, 2015

How ro Recreate a missing Virtual machine disk descriptor file

Wednesday, October 14, 2015 0
Overview steps

Note: It would be advisable to attempt to restore the missing descriptor file from backups if possible. If this is not possible, proceed with recreating the virtual machine disk descriptor file.

To create a virtual machine disk descriptor file:

    Identify the size of the flat file in bytes.
    Create a new blank virtual disk that is the same size as the original. This serves as a baseline example that is modified in later steps.

    Note: This step is critical to assure proper disk geometry.
    Rename the descriptor file (also referred to as a header file) of the newly-created disk to match the name of the original virtual disk.
    Modify the contents of the renamed descriptor file to reference the flat file.
    Remove the leftover temporary flat file of the newly-created disk, as it is not required.

Note: This procedure will not work on virtual disks configured with a Para-virtualized SCSI controller in the virtual machine as the virtual machine may not boot. However, there are reports that if the Para-virtualized SCSI controller is used, the new descriptor file can also be updated with ddb.adapterType = pvscsi replacing ddb.adapterType = lsilogic in the descriptor file.

Detailed steps

To create a virtual machine disk:

    Log into the terminal of the ESXi/ESX host:
        For ESX 4.1 and earlier, see Connecting to an ESX host using a SSH client . Alternatively, access the system directly and press Alt+F1 to begin the login process. Log in as root .
        For ESXi 4.1 and 5.x, see Using Tech Support Mode in ESXi 4.1, ESXi 5.x, and ESXi 6.0 .
        For ESXi 4.0 and 3.5  Navigate to the directory that contains the virtual machine disk with the missing descriptor file using the command:

    # cd /vmfs/volumes/myvmfsvolume/mydir

    Notes:
        If you are using a version of ESXi, you can access and modify files and directories using the vSphere Client Datastore Browser or the vifs utility included with the vSphere CLI. For more information, see the section Performing File System Operations in the vSphere Command-Line Interface Documentation.
        If you are using VMware Fusion, the default location for the virtual machine files is the home/Documents/Virtual Machines.localized/virtual_machine/ folder, where home is your home folder, and virtual_machine is the name of the virtual machine.

    Identify the type of SCSI controller the virtual disk is using. You can do this by examining the virtual machine configuration file (.vmx ). The controller is identified by the line scsi#.virtualDev , where # is the controller number. There may be more than one controller and controller type attached to the virtual machine, such as lsisas1068 (which is the LSILogic SAS controller), lsilogic , or buslogic . This example uses lsilogic :

    scsi0.present = "true"
    scsi0.sharedBus = "none"
    scsi1.present = "true"
    scsi1.sharedBus = "virtual"
    scsi1.virtualDev = "lsilogic"
    Identify and record the exact size of the -flat file using a command similar to:

    # ls -l vmdisk0-flat.vmdk

    -rw------- 1 root root 4294967296 Oct 11 12:30 vmdisk0-flat.vmdk
    Use the vmkfstools command to create a new virtual disk:

    # vmkfstools -c 4294967296 -a lsilogic -d thin temp.vmdk

    The command uses these flags:
        -c size

        This is the size of the virtual disk.
        -a virtual_controller

        Whether the virtual disk was configured to work with BusLogic, LSILogic (for both lsilogic and lsilogic SAS), Paravirtual, or IDE:
        Use lsilogic for virtual disk type "lsilogic" and "lsisas1068"
        -d thin

        This creates the disk in thin-provisioned format.

    Note: To save disk space, we create the disk in thin-provisioned format using the type thin . The resulting flat file then consumes minimal amounts of space (1 MB) instead of immediately assuming the capacity specified with the -c switch. The only consequence, however, is the descriptor file contains an extra line that must be manually removed in a later step.

    The temp.vmdk and temp-flat.vmdk files are created as a result.
    Delete temp-flat.vmdk , as it is not needed. Run the command:

    # rm -i temp-flat.vmdk
    Rename temp.vmdk to the name that is required to match the orphaned .flat file (or vmdisk0.vmdk , in this example):

    # mv -i temp.vmdk vmdisk0.vmdk
    Edit the descriptor file using a text editor:
        Under the Extent Description section, change the name of the .flat file to match the orphaned .flat file you have.
        Find and remove the line ddb.thinProvisioned = "1" if the original .vmdk was not a thin disk. If it was, retain this line.

        # Disk DescriptorFile
        version=1
        CID=fb183c20
        parentCID=ffffffff
        createType="vmfs"

        # Extent description
        RW 8388608 VMFS "vmdisk0-flat.vmdk"

        # The Disk Data Base
        #DDB

        ddb.virtualHWVersion = "4"
        ddb.geometry.cylinders = "522"
        ddb.geometry.heads = "255"
        ddb.geometry.sectors = "63"
        ddb.adapterType = "lsilogic"
        ddb.thinProvisioned = "1"

        The virtual machine is now ready to power on. Verify your changes before starting the virtual machine.

        If powering on the virtual machine is not successful
    To check the disk chain for consistency, run this command against the disk descriptor file:

    For ESXi 6.0 and 5.x:
    # vmkfstools -e filename.vmdk

    For a complete chain, you see output similar to:
    Disk chain is consistent

    For a broken chain, you see a summary of the snapshot chain and then an output similar to:
    Disk chain is not consistent : The parent virtual disk has been modified since the child was created. The content ID of the parent virtual disk does not match the corresponding parent content ID in the child (18)

    For ESXi 3.5/4.x:
    # vmkfstools -q filename.vmdk

    For a complete chain, you see output similar to:
    filename.vmdk is not an rdm

    For a broken chain, you see output similar to:
    Failed to open 'test-000001.vmdk' : The parent virtual disk has been modified since the child was created (18)
    Note: The primary purpose of the vmkfstools -q command is(from the vmkfstools help page: vmkfstools -h ): -q --queryrdm .
    This command identify any issues with the snapshot chain, not its intended purpose, which is to identify if the vmdk disk is a raw device mapping.

    For more information on the vmkfstools command, see: vmkfstools - vSphere CLI for managing VMFS volumes

Understand the Hostd and Vpxa in VMWare

Wednesday, October 14, 2015 0
hostd is an app that runs in the Service Console that is responsible for managing most of the operations on the ESX machine.  It knows about all the VMs that are registered on that host, the luns/vmfs volumes visible by the host, what the VMs are doing, etc.  Most all commands or operations come down from VC through it.  i.e, powering on a VM, VM vMotion, VM creation, etc.

vpxa also runs on the Service Console and talks to VC.
Vmware hostd and vpxa on ESXi

HOSTD

The vmware-hostd management service is the main communication channel between ESX/ESXi hosts and VMkernel. If vmware-hostd fails, ESX/ESXi hosts disconnects from vCenter Server/VirtualCenter and cannot be managed, even if you try to connect to the ESX/ESXi host directly. It knows about all the VMs that are registered on that host, the luns/vmfs volumes visible by the host, what the VMs are doing, etc. Most all commands or operations come down from VC through it. i.e, powering on a VM, VM vMotion, VM creation, etc.

Restart the management agent /etc/init.d/hostd restart

VPXA

It acts as an intermediary between VC and hostd. The vCenter Server Agent, also referred to as vpxa or the vmware-vpxa service, is what allows a vCenter Server to connect to a ESX host. Specifically, vpxa is the communication conduit to the hostd, which in turn communicates to the ESX kernel. Restart the vpxa service

/etc/init.d/vpxa restart

hostd is the daemon for direct VIC connection (when you use Virtual Infra Client (VIC) to connect to your ESX).

Also,

    vpxa is the VC agent (ESX side)
    vpxd is the VC daemon (VC side)

How to Reinstall the VPXA or AAM agent

Wednesday, October 14, 2015 0
Reinstalling the vpxa or aam agent without losing the host record from the VMware vCenter Server database

Purpose

This article provides information on updating or reinstalling the vpxa or aam agent without removing the ESX host from vCenter Server. This procedure ensures that the host and virtual machine entries, performance history, and resource pool references in vCenter Server are not lost.

VMware recommends to use this method if you do not want to lose database records.

Note: This process does not impact virtual machines that are running.
Resolution

To update or reinstall the vpxa or aam agent in an ESX\ESXi host without removing it from vCenter Server:

    Disconnect the host from vCenter Server.
    Connect to the ESX\ESXi host using SSH.
    Remove the vpxuser:

 For ESX:

    userdel vpxuser

 For ESXi:

        Log in to ESXi using the vSphere Client.
        Click Local Users & Groups and click Users.
        Right-click vpxuser and click Remove.

        Note: Do not remove the root user for any reason.
    Run these commands to remove the vpxa or aam agent from an  ESX 3.5 or ESX 4.x server:

    For vpx agent:

    /bin/rpm -qa | grep vpx
    /bin/rpm -e output from previous command

    For aam agent:

    /bin/rpm -qa | grep aam

    Note: The output of this command has two entries.

    /bin/rpm -e output from previous command

    Run this command to remove the vpxa or aam agent from an ESX\ESXi server:

    For ESXi 3.5 and ESXi 4.x:

    /opt/vmware/uninstallers/VMware-vpxa-uninstall.sh
    /opt/vmware/uninstallers/VMware-aam-ha-uninstall.sh

    For ESXi 5.0.x, ESXi 5.1.x and ESXi 5.5.x:

    Note: This command uninstalls the HA agent (FDM) from ESXi 5.0 as aam functionality is no longer used for HA on vCenter Server 5.0. For further HA (Fault Domain Manager) troubleshooting steps, see Vmware Doc. In ESXi 5.x, vpxa is now a part of the esxi-base package.

    cp /opt/vmware/uninstallers/VMware-fdm-uninstall.sh /tmp
    chmod +x /tmp/VMware-fdm-uninstall.sh
    /tmp/VMware-fdm-uninstall.sh

    Reconnect the host to vCenter Server.

Note: When you reconnect the host to vCenter Server, vpxuser is automatically recreated.

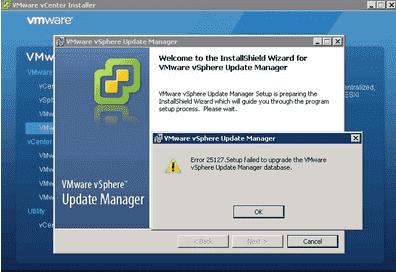
Issue when upgrading vCenter Server Update Manager – Error 25127

Wednesday, October 14, 2015 0
When we encountered with an error almost immediately.

 It is due  SQL Authentication account used to connect to the SQL Database had a recent password change.  In order to change the password for Update Manager, you need to go to a special utility called the VMware Update Manager Utility (VMwareUpdateManagerUtility.exe).  The utility is located within the Update Manager installation folder.  Launching the utility and using a windows account with vCenter Server privileges, will allow you to modify the database settings, including the SQL Authentication username and password. 


Once this password was changed, the utility will ask that you restart the Update Manager service.  Once that was done, the Update Manager application installed properly.
There are other reasons you might receive Error 25127 when upgrading Update Manager.  Some administrators encounter this error if the account used to connect to the Update Manager database does not have enough permissions on the SQL Server.  Giving the account dbowner will fix the problem.

Default route in Linux by command

Wednesday, October 14, 2015 0
By using below command we can add the default route -Temporarily.

#route add gw IP Address Netmask ethx up 

IP Address = Gateway IP Address of your network (ex 192.168.0.1)
Netmask = Your network mask (255.255.255.0)
ethx - Gateway Interface

# route add gw 192.168.0.1 255.255.255.0 eth1 up

How to find the older files & delete in Linux & Unix

Wednesday, October 14, 2015 0
If we have more files in a folder, the normal ls command will not work.

Below command is used to find out the old files.

List the files - 30 days before file

#find /location/to/find/files -type f -mtime +30 -user test -ls  

Delete the files

#find /location/to/find/files -type f -mtime +30 -user test -exec rm {} \

/location/to/find/files - which location you want to find the files
mtime - mention the days, command will find the files older than that days (here 30)
user - if we have more files, mention the user as well

How to replace the failed array disk on Software Raid

Wednesday, October 14, 2015 0
#Follow the below steps to configure and add the new disk to array.

#We can use this command to create the partitions from the other disk(sda) to (sdb):

(testvm:root)$sfdisk -d /dev/sda | sfdisk /dev/sdb
Checking that no-one is using this disk right now ...
OK

Disk /dev/sdb: 8924 cylinders, 255 heads, 63 sectors/track

sfdisk: ERROR: sector 0 does not have an msdos signature
 /dev/sdb: unrecognized partition table type
Old situation:
No partitions found
New situation:
Units = sectors of 512 bytes, counting from 0

   Device Boot    Start       End   #sectors  Id  System
/dev/sdb1   *        63    208844     208782  fd  Linux raid autodetect
/dev/sdb2        208845  62990864   62782020  fd  Linux raid autodetect
/dev/sdb3             0         -          0   0  Empty
/dev/sdb4             0         -          0   0  Empty
Successfully wrote the new partition table

Re-reading the partition table ...

If you created or changed a DOS partition, /dev/foo7, say, then use dd(1)
to zero the first 512 bytes:  dd if=/dev/zero of=/dev/foo7 bs=512 count=1
(See fdisk(8).)
(testvm:root)$

#We have to run the below command to check if both hard drives have the same partitions.

(testvm:root)$ /sbin/fdisk -l

Disk /dev/sda: 36.4 GB, 36401479680 bytes
255 heads, 63 sectors/track, 4425 cylinders
Units = cylinders of 16065 * 512 = 8225280 bytes

   Device Boot      Start         End      Blocks   Id  System
/dev/sda1   *           1          13      104391   fd  Linux raid autodetect
/dev/sda2              14        3921    31391010   fd  Linux raid autodetect

Disk /dev/sdb: 73.4 GB, 73407488000 bytes
255 heads, 63 sectors/track, 8924 cylinders
Units = cylinders of 16065 * 512 = 8225280 bytes

   Device Boot      Start         End      Blocks   Id  System
/dev/sdb1   *           1          13      104391   fd  Linux raid autodetect
/dev/sdb2              14        3921    31391010   fd  Linux raid autodetect

Disk /dev/md1: 32.1 GB, 32144293888 bytes
2 heads, 4 sectors/track, 7847728 cylinders
Units = cylinders of 8 * 512 = 4096 bytes

Disk /dev/md1 doesn't contain a valid partition table

Disk /dev/md0: 106 MB, 106823680 bytes
2 heads, 4 sectors/track, 26080 cylinders
Units = cylinders of 8 * 512 = 4096 bytes

Disk /dev/md0 doesn't contain a valid partition table
(testvm:root)$

#Next we should add /dev/sdb1 to /dev/md0 and /dev/sdb2 to /dev/md1 using below commands.

(testvm:root)$ mdadm --manage /dev/md0 --add /dev/sdb1
mdadm: added /dev/sdb1
(testvm:root)$ mdadm --manage /dev/md1 --add /dev/sdb2
mdadm: added /dev/sdb2
(testvm:root)$

#Now both arrays (/dev/md0 and /dev/md1) will start synchronizing.

#It will take longer time depending on amount of data to synchronize.

#output should be as below when its finished.


(testvm:root)$ cat /proc/mdstat
Personalities : [raid1]
md0 : active raid1 sdb1[1] sda1[0]
      104320 blocks [2/2] [UU]

md1 : active raid1 sdb2[1] sda2[0]
      31390912 blocks [2/2] [UU]

unused devices: <none>
(testvm:root)$


#Start the grub shell to add the grub bootblock to the replaced disk

#You can use the grub geometry command to view disk information:

(testvm:root)$ grub
Probing devices to guess BIOS drives. This may take a long time.


    GNU GRUB  version 0.97  (640K lower / 3072K upper memory)

 [ Minimal BASH-like line editing is supported.  For the first word, TAB
   lists possible command completions.  Anywhere else TAB lists the possible
   completions of a device/filename.]
grub> geometry (hd0)
geometry (hd0)
drive 0x80: C/H/S = 4425/255/63, The number of sectors = 71096640, /dev/sda
   Partition num: 0,  Filesystem type is ext2fs, partition type 0xfd
   Partition num: 1,  Filesystem type unknown, partition type 0xfd
grub> geometry (hd1)
geometry (hd1)
drive 0x81: C/H/S = 8924/255/63, The number of sectors = 143374000, /dev/sdb
   Partition num: 0,  Filesystem type is ext2fs, partition type 0xfd
   Partition num: 1,  Filesystem type unknown, partition type 0xfd

#Add the bootblock to /dev/sdb:

grub> device (hd1) /dev/sdb
device (hd1) /dev/sdb
grub> root (hd1,0)
root (hd1,0)
 Filesystem type is ext2fs, partition type 0xfd
grub> setup (hd1)
setup (hd1)
 Checking if "/boot/grub/stage1" exists... no
 Checking if "/grub/stage1" exists... yes
 Checking if "/grub/stage2" exists... yes
 Checking if "/grub/e2fs_stage1_5" exists... yes
 Running "embed /grub/e2fs_stage1_5 (hd1)"...  15 sectors are embedded.
succeeded
 Running "install /grub/stage1 (hd1) (hd1)1+15 p (hd1,0)/grub/stage2 /grub/grub.conf"... succeeded
Done.
grub> quit
quit
(testvm:root)$

#That's it, you have successfully replaced /dev/sdb!

How to change the active ethernet interface on Bond configuration

Wednesday, October 14, 2015 0
By Using the below command we can change the active ethernet interface settings on Bond configuration

#ifenslave -c bondx ethx

ethx - which interface you want to make an active
bondx - which bond configuration

HA Advanced Options

Wednesday, October 14, 2015 0
Offcourse, there are lot let me share few important and useful HA advance options.

     das.failuredetectiontime – This setting was introduced in VirtualCenter 2.0.2 to allow the default interval for HA detection to be changed. Previously this was hard-coded so that if a host did not respond in 15 seconds then it would be considered failed. This setting is in milliseconds and can be changed from the default of 15000 milliseconds. For example if you wanted to increase this to 60 seconds you would set it to 60000 milliseconds (don’t use commas in the number).

    das.poweroffonisolation – This setting is the default cluster setting for virtual machine isolation response that is set through the VI Client. The default is true which powers off virtual machines in case of an HA event. Setting this to false leaves the virtual machine still running on the isolated host when an HA event occurs.

    das.isolationaddress – This setting was introduced in VirtualCenter 2.0.2 and is the IP address that HA will ping to determine if a host is isolated from the network. If this option is not specified, the default gateway of the console network is used. This default gateway has to be some reliable address that is known to be available, so that the host can determine if it is isolated from the network. Using multiple isolation response addresses gives HA a potentially more accurate picture of the network connectivity of a host. There may be situations in which a single isolation address would indicate that a host is in a state of complete isolation from the network, but access to additional isolation addresses would show that only a partial network failure has occurred. You can have a total of 10 isolation addresses set using the following format das.isolationaddressX, where X is a number 1-10. If you use this setting you should change the default failure detection time (das.failuredetectiontime ) to 20 seconds or greater. In general the more isolation response addresses configured, the longer you should make the timeout to ensure that proper failure detection can occur.

    das.usedefaultisolationaddress – By default, HA uses the default gateway of the console network as an isolation address. This attribute specifies whether that should be used or not, the values are true or false. If you are using the das.isolationaddress setting then this should be set to false.

    das.isolationShutdownTimeout – The amount of time that HA waits to gracefully shutdown a VM if the “Shutdown VM” option is selected for isolation response. The default is 300 seconds.

    das.defaultfailoverhost – If this is set, HA will first try to fail over hosts to the host specified by this option. This is useful if you want to utilize one host as a spare failover host, but is not usually recommended, because HA tries to utilize all available spare capacity among all hosts in the cluster. If the specified host does not have enough spare capacity, VMware HA tries to fail over the virtual machine to any other host in the cluster that has enough capacity.

    das.failuredetectioninverval – This setting was introduced in vCenter Server 2.5 Update 2 and is the interval that is used for heartbeat detection amongst ESX hosts. The default is that a host will check for a heartbeat every second (1000 milliseconds), you may want to increase this if your hosts are on remote or high latency networks.

    das.allowVmotionNetworks – This setting was introduced in vCenter Server 2.5 Update 2 specifically for ESXi which does not utilize a vswif service console network like ESX hosts and instead uses a special management network and will allow a NIC that is used for VMotion networks to be used for HA also. This is to allow a host that has only has a single NIC configured for the both the service console and VMotion combined to be used for HA; by default VMotion networks are ignored.

    das.allowNetwork – This setting was introduced in vCenter Server 2.5 Update 2 and allows the use of port group names to control the networks used for HA. Starting with vCenter Server 2.5 Update 2, HA has an enhanced network compliance check to increase cluster reliability. This enhanced network compliance check helps to ensure correct cluster-wide heartbeat network paths. This also helps prevent delayed failure detection and “Split Brain” conditions in certain scenarios. When configured, the HA cluster only uses the specified networks for HA communication. You can set the value to be “Service Console 2″ or “Management Network” to use the networks associated with those port group names in the networking configuration. You can set this using the following format, das.allowNetworkX where X is a number starting with 0, i.e. das.allowNetwork0 = “Service Console” or daas.allowNetwork1 = “Service Console 2″. More detail on this setting can be found in the following VMware KB articles: http://kb.vmware.com/kb/1006606 and http://kb.vmware.com/kb/1006541

    das.vmMemoryMinMB – Specifies the minimum amount of memory (in megabytes) sufficient for any virtual machine in the cluster to be usable. This value is used only if the memory reservation is not specified for the virtual machine and is used for HA admission control and calculating the current failover level. If no value is specified, the default is 256MB, reducing this can help prevent the warning about insufficient resources and the red exclamation mark that indicates a cluster does not have sufficient failover capacity.

    das.vmCpuMinMHz – Specifies the minimum amount of CPU (in megahertz) sufficient for any virtual machine in the cluster to be usable. This value is used only if the CPU reservation is not specified for the virtual machine and is used for HA admission control and calculating the current failover level. If no value is specified, the default is 256MHz, reducing this can help prevent the warning about insufficient resources and the red exclamation mark that indicates a cluster does not have sufficient failover capacity.

    das.bypassNetCompatCheck – This setting was introduced in vCenter Server Update 3 to provide the ability to disable the HA enhanced network compliance check that was introduced in vCenter Server 2.5 Update 2. The enhanced network compliance check helps to ensure correct cluster-wide heartbeat network paths. This setting allows you to bypass this check to prevent HA configuration problems. To bypass the check, add das.bypassNetCompatCheck=true to the HA advanced settings.
    das.iostatsInterval – Used for virtual machine monitoring, occasionally virtual machines that are still functioning properly stop sending heart-beats. To avoid unnecessarily resetting such virtual machines, the VM Monitoring service also monitors a virtual machine’s I/O activity. If no heartbeats are received within the failure interval, the I/O stats interval (a cluster-level attribute) is checked. The I/O stats interval determines if any disk or network activity has occurred for the virtual machine during the previous two minutes (120 seconds). If not, the virtual machine is reset. This default value (120 seconds) can be changed using this setting.

To configure HA with any of these advanced settings just follow the below steps:

  •     Select your cluster in the VI Client and right-click on it and select “Edit Settings”.
  •     Select VMware HA in the left hand pane.
  •     In the right hand pane click the “Advanced Options” button.
  •     When the Advanced Options window is display double-click on one of the blank fields under the Options column to edit it.
  •     Enter an option name (i.e. das.failuredetectiontime) and hit Enter.
  •     Double-click on the field next to it in the Value column and edit a value (i.e. 60000) and hit Enter.
  •     Repeat this procedure for any additional options that you want to add and click the OK button.

Overview of VMware Tools

Wednesday, October 14, 2015 0
VMware Tools is a suite of utilities that enhances the performance of the virtual machines guest operating system and improves management of the virtual machine. Without VMware Tools installed in your guest operating system, guest performance lacks important functionality. Installing VMware Tools eliminates or improves these issues:

    Low video resolution
    Inadequate color depth
    Incorrect display of network speed
    Restricted movement of the mouse
    Inability to copy and paste and drag-and-drop files
    Missing sound
    Provides the ability to take quiesced snapshots of the guest OS
    Synchronizes the time in the guest operating system with the time on the host
    Provides support for guest-bound calls created with the VMware VIX API

VMware Tools includes these components:

    VMware Tools service
    VMware device drivers
    VMware user process
    VMware Tools control panel

VMware Tools is provided in these formats:

    ISOs (contain .tar files): These are packaged with the product and are installed in a number of ways, depending upon the VMware product and the guest operating system installed in the virtual machine. For more information, see the Installing VMware Tools section. VMware Tools provides a different ISO file for each type of supported guest operating system: Windows, Linux, NetWare, Solaris, and FreeBSD.
    Operating System Specific Packages (OSPs): These are downloaded and installed from the command line on an ESXi/ESX host. VMware Tools is available as separate downloadable, light-weight packages that are specific to each supported Linux operating system and VMware product. OSPs are an alternative to the existing mechanism for installing VMware Tools and only support Linux systems running on ESXi/ESX. To download OSPs and to find important information and instructions.

Installing VMware Tools

The steps to install VMware Tools vary depending on your VMware product and the guest operating system you have installed.

For specific instructions to install, upgrade, and configure VMware Tools, see one of these documents on the VMware Documentation

    VMware Workstation User's Manual
    VMware ESX Basic System Administration guide
    VMware Server User’s Guide
    VMware Player in-product help

    Note: Select Help > Help Topics from the VMware Player product interface to access the online help.

Tuesday, October 13, 2015

Single line Powercli command to find whether SSH service Running or not in all your ESXI ...

Tuesday, October 13, 2015 0
Powercli command to find whether SSH service is Running on ESXI.

Get-VMHost | Get-VMHostService | Where { $_.Key -eq "TSM-SSH" } |select VMHost, Label, Running

or


Get-VMHost | Foreach {
  Start-VMHostService -HostService ($_ | Get-VMHostService | Where { $_.Key -eq "TSM-SSH"} )
}

Hope it is useful !

Powercli command for Changing networkadapter of required vms at time

Tuesday, October 13, 2015 0
#  Create a text file with list of vms that you want to change network adapter

$VMlist = Get-content C:\Users\ap_vn1651\Documents\VMlist.txt
Get-VM $VMlist | Get-NetworkAdapter | set-networkadapter -type vmxnet3 -confirm:$false

VMware PowerCli Script which will list all snapshots over some days old

Tuesday, October 13, 2015 0
Connect-VIServer MYVISERVER

 Get-VM | Get-Snapshot | Where { $_.Created -lt (Get-Date).AddDays(-15)}

Just  replace 15 days with your requirement ( n days)

Powercli command to do snapshot consolidation in vsphere 5.x

Tuesday, October 13, 2015 0
Command to do snapshot consolidation in vsphere 5.x
 
Get-VM | Where-Object {$_.Extensiondata.Runtime.ConsolidationNeeded} | ForEach-Object {  $_.ExtensionData.ConsolidateVMDisks()}

Monday, October 12, 2015

How to Kill a VM from command line?

Monday, October 12, 2015 0
If you want to power off or kill a virtual machine running on an ESXi host you can do this using the following esxcli command:
  • connect a console to your ESXi host (eg. SSH or ESXi Shell)
To get a list of all VMs running on the host use this command:
esxcli vm process list
The list contains: World ID, Process ID, VMX Cartel ID, UUID, display name and the path to the vmx config file:
kill_vm

To kill / power off the virtual machine use the following command:
esxcli vm process kill -type=xxxx – world-id=yyyyy
for -type=xxxx use: soft, hard or force
for world-id=yyyy use the World ID listed in the command above (eg. World ID 39731 for the example VM „Cold“)

Some information about the three possible shutdown methods:
soft = prefer this if you want to shut down „softly“
hard = equal to an immediate shutdown
force = hard kill of the VM


How to restart the management agents on ESXi 6.x

Monday, October 12, 2015 0
ESXi 6.x

Log in to SSH or Local console as root.
Run these commands:
/etc/init.d/hostd restart
/etc/init.d/vpxa restart
Or also (alternative way)
To reset the management network on a specific VMkernel interface, by default vmk0, run the command:
esxcli network ip interface set -e false -i vmk0; esxcli network ip interface set -e true -i vmk0
Note: Using a semicolon (;) between the two commands ensures the VMkernel interface is disabled and then re-enabled in succession. If the management interface is not running on vmk0, change the above command according to the VMkernel interface used.
To restart all management agents on the host, run the command:

Note: Using a semicolon (;) between the two commands ensures the VMkernel interface is disabled and then re-enabled in succession. If the management interface is not running on vmk0, change the above command according to the VMkernel interface used.

To restart all management agents on the host, run the command:
services.sh restart

How to Restart the Management agents on an ESXi or ESX host

Monday, October 12, 2015 0
Restarting the Management agents on ESXi

To restart the management agents on ESXi:

From the Direct Console User Interface (DCUI):

    Connect to the console of your ESXi host.
    Press F2 to customize the system.
    Log in as root.
    Use the Up/Down arrows to navigate to Restart Management Agents.

    Note: In ESXi 4.1 and ESXi 5.0, 5.1, 5.5 and 6.0 this option is available under Troubleshooting Options.
    Press Enter.
    Press F11 to restart the services.
    When the service restarts, press Enter.
    Press Esc to log out of the system.

From the Local Console or SSH:

    Log in to SSH or Local console as root.
    Run these commands:

    /etc/init.d/hostd restart
    /etc/init.d/vpxa restart

    Note: In ESXi 4.x, run this command to restart the vpxa agent:

    service vmware-vpxa restart

Friday, October 9, 2015

Step-By-Step Configuration Guide for NAT with IPTABLES

Friday, October 09, 2015 0
This guide shows how to set up network-address-translation (NAT) on a Linux system with iptables so that the system can act as a gateway and provide internet access to multiple hosts on a local are network using a single public IP address. This is achieved by rewriting the source and/or destination addresses of IP packets as they pass through the NAT system.

Assuming that you have:

OS - Any Linux distribution
Software - Iptables
Network Interface Cards: 2

WAN = eth0 with public IP xx.xx.xx.xx (Replace xx.xx.xx.xx with your WAN IP)
LAN = eth1 with private IP yy.yy.yy.yy / 255.255.0.0 (Replace yy.yy.yy.yy with your LAN IP)

Step by Step Procedure:

Step #1. Configure eth0 for Internet with a Public ( IP External network or Internet)

vi /etc/sysconfig/network-scripts/ifcfg-eth0

Edit the following in that file.

IPADDR=xx.xx.xx.xx
NETMASK=255.255.255.0    # Provided by the ISP
GATEWAY=xx.xx.xx.1    # Provided by the ISP

Step #2. Configure eth1 for LAN with a Private IP (Internal Local Area network)

vi /etc/sysconfig/network-scripts/ifcfg-eth1

NETMASK=255.255.0.0        # Specify based on your requirement
IPADDR=192.168.2.1        # Gateway of the LAN

Step #3. Gateway Configuration

vi /etc/sysconfig/network
    NETWORKING=yes
    HOSTNAME=nat
    GATEWAY=xx.xx.xx.1    # Internet Gateway, provided by the ISP

Step #4. DNS Configuration

cat /etc/resolv.conf
    nameserver 4.2.2.2
    nameserver  8.8.8.8
   nameserver 202.56.250.5      

Step #5. NAT configuration with IP Tables

    # Delete and flush. Default table is "filter". Others like "nat" must be explicitly stated.
iptables --flush # Flush all the rules in filter and nat tables
iptables --table nat --flush
iptables --delete-chain
# Delete all chains that are not in default filter and nat table
iptables --table nat --delete-chain
# Set up IP FORWARDing and Masquerading
iptables --table nat --append POSTROUTING --out-interface eth0 -j MASQUERADE
iptables --append FORWARD --in-interface eth1 -j ACCEPTclip_image001
# Enables packet forwarding by kernel
echo 1 > /proc/sys/net/ipv4/ip_forward
#Apply the configuration
service iptables restart

Step #6. Configuring PCs on the network (Clients)

All PC's on the private office network should set their "gateway" to be the local private network IP address of the Linux gateway computer.
The DNS should be set to that of the ISP on the internet.

Step #7. Testing
# Ping the Gateway of the network and some website from the client system
ping 192.168.2.1
ping www.google.com

Thursday, October 8, 2015

KVM Virtualization in RHEL 7 - Detailed document

Thursday, October 08, 2015 0
Purpose of this document
 
This document describes how to quickly setup and manage a virtualized environment with KVM (Kernel-based Virtual Machine) in Red Hat Enterprise Linux 7. This is not an in-depth discussion of virtualization or KVM, but rather an easy-to-follow step-by-step description of how to install and manage Virtual Machines (VMs) on a physical server.

A very brief overview of KVM

KVM is a Linux kernel module that allows a user space program access to the hardware virtualization features of Intel and AMD processors. With the KVM kernel module, VMs run as ordinary user-space processes.

KVM uses QEMU for I/O hardware emulation. QEMU is a user-space emulator that can emulate a variety of guest processors on host processors with decent performance. Using the KVM kernel module allows it to approach native speeds.


KVM is managed via the libvirt API and tools. Some libvirt tools used in this article include virsh, virt-install and virt-clone.

Virtualization Technology

Verify that Virtualization Technology (VT) is enabled in your server’s BIOS.
Another item to check once your server boots up is whether your processors support VT. This is not a requirement but it will help a lot with performance, so you will be better off with processors that support VT. Check for these CPU extensions:


# grep -E 'svm|vmx' /proc/cpuinfo
- vmx is for Intel processors
- svm is for AMD processors


Required packages
 

There are several packages to install that are not part of the base RHEL 7 installation. Assuming that you have a yum repository already defined, install the following:

# yum install qemu-kvm libvirt libvirt-python libguestfs-tools virt-install

 
Enable and start the libvirtd service:


# systemctl enable libvirtd && systemctl start libvirtd

 
Verify the following kernel modules are loaded, and if not load manually:
kvm
kvm_intel (only on Intel-based systems)
OS Installation Source


You need to have an OS installation source ready for your VMs. You can either use an iso or a network installation source that can be accessed via http, ftp or nfs.

 
Disk Space

 
When a VM is created, image files are created in the default directory /var/lib/libvirt/images, but you can choose any directory you’d like. Regardless of what directory you choose, you will have to verify there is enough disk space available in that partition.  I use directory /vm-images.


KVM supports several types of VM image formats, which determine the amount of actual disk space each VM uses on the host. Here, we will only create VMs with raw file formats, which use the exact amount of disk space you specify. So for example if you specify that a VM will have 10 GB of disk space, the VM install tool will create a file image of exactly 10 GB on the host, regardless whether the VM uses all 10 GB or not.


Best practice here is to allocate more than enough disk space on the host to safely fit all your VMs. For example, if you want to create 4 VMs with 20 GB storage each, be sure you have at least 85-90 GB space available on your host
 

Networking
 
By default, VMs will only have network access to other VMs on the same server (and to the host itself) via private network 192.168.122.0. If you want the VMs to have access to your LAN, then you must create a network bridge on the host that is connected to the NIC that connects to your LAN. Follow these steps to create a network bridge:


1. We will create a bridge named ‘br0’. Add to your network controller configuration file (i.e. /etc/sysconfig/network-scripts/ifcfg-em1) this line:
BRIDGE=br0


2. Create /etc/sysconfig/network-scripts/ifcfg-br0 and add:
DEVICE="br0"
# BOOTPROTO is up to you. If you prefer “static”, you will need to
# specify the IP address, netmask, gateway and DNS information.
BOOTPROTO="dhcp"
IPV6INIT="yes"
IPV6_AUTOCONF="yes"
ONBOOT="yes"
TYPE="Bridge"
DELAY="0"


3. Enable network forwarding. Add to /etc/sysctl.conf:
net.ipv4.ip_forward = 1


And read the file:
# sysctl -p /etc/sysctl.conf

 
4. Restart the ‘NetworkManager’ service so that the bridge you just created can get an IP address:
# systemctl restart NetworkManager


Firewalld
In RHEL 6, the default packet filtering and forwarding service is ‘iptables’. In RHEL 7, the default service is ‘firewalld’, which provides the same packet filtering and forwarding capabilities as iptables, but implements rules dynamically and has additional features such as network zones, which give you added flexibility when managing different networks.
Please note that the iptables tool is still available in RHEL 7, and in fact it is used by firewalld to talk to the kernel packet filter (it is the iptables service that has been replaced by firewalld). If you prefer, you can install the iptables-service package to use the iptables service instead of firewalld.


SELinux
If you are using SELinux in Enforcing mode, then there are some things to consider. The most common issue is when you use a non-default directory for your VM images. If you use a directory other than /var/lib/libvirt/images, then you must change the security context for that directory. For example, let’s say you select /vm-images to place your VM images:


1. Create the directory:
# mkdir /vm-images


2. Install the policycoreutils-python package (which contains the semanage SELinux utility):
# yum -y install policycoreutils-python


3. Set the security context for the directory and everything under it:
# semanage fcontext --add -t virt_image_t '/vm-images(/.*)?'


Verify it:

# semanage fcontext -l | grep virt_image_t
/var/lib/imagefactory/images(/.*)? all files system_u:object_r:virt_image_t:s0
/var/lib/libvirt/images(/.*)? all files system_u:object_r:virt_image_t:s0
/vm-images(/.*)? all files system_u:object_r:virt_image_t:s0


4. Restore the security context. This will effectively change the context to virt_image_t:
# restorecon -R -v /vm-images
Verify that the context was changed:
# ls –aZ /vm-images
drwxr-xr-x. root root system_u:object_r:virt_image_t:s0 .
dr-xr-xr-x. root root system_u:object_r:root_t:s0 ..


5. If you are going to export the directory /vm-images as a samba or NFS share, there are SELinux Booleans that need to be set as well:
# setsebool -P virt_use_samba 1
# setsebool -P virt_use_nfs 1


Creating VMs

 
Installation of VMs using the virt-install tool is very straight-forward. This tool can run in interactive or non-interactive mode. Let’s use virt-install in non-interactive mode to create a RHEL 7 x64 VM named vm1 with one virtual CPU, 1 GB memory and 10 GB of disk space:
# virt-install \
--network bridge:br0 \
--name vm1 \
--ram=1024 \
--vcpus=1 \
--disk path=/vm-images/vm1.img,size=10 \
--graphics none \
--location=http://my.server.com/pub/rhel7/install-x86_64/ \
--extra-args="console=tty0 console=ttyS0,115200"
    --network bridge:br0


If you created a network bridge (as specified in Chapter I, steps 6-10) and want to use it for full inbound and outbound connectivity, then you must specify it.
     --name vm1
No big mystery here, this is the name of the VM
     --ram=1024
This is the amount of memory in the VM in MBs
    --vcpus=1
You guessed it, this is the number of virtual CPUs
     --disk path=/vm-images/vm1.img,size=10
This is the image file for the VM, the size is specified in GBs.
     --graphics none


This tells the installer not to launch a VNC window to access the VM’s main console. Instead, it will use a text console on the VM’s serial port. If you rather use an X window with graphics to install the OS on the VM, omit this parameter.
     --location=http://my.server.com/pub/rhel7/install-x86_64/


This is the location of the RHEL 7 x64 installation directory, which of course will be different for you. If you don’t have a remote installation location for the OS, you can install from an iso instead. Instead of using the location parameter, use the cdrom parameter:
    --cdrom /root/RHEL-7.0-20140507.0-Server-x86_64-dvd1.iso
     --extra-args="console=tty0 console=ttyS0,115200"


The extra-args parameter is used to pass kernel boot parameters to the OS installer. In this case, since we are connecting to the VM’s serial port, we must use the proper kernel parameters to set it up, just like we would on any server, virtual or not.
The extra-args parameter can also be used to specify a kickstart file for non-interactive installations. So if we had a kickstart file we would use:


    --extra-args="ks=http://my.server.com/pub/ks.cfg console=tty0 console=ttyS0,115200”
The OS installation on the VM proceeds as with a physical server, where you provide information such as disk partitions, time zone, root password, etc.


Here is another example: Install a RHEL 7 x86 VM with 2 VCPUs, 2GB of memory, 15GB disk space, using the default network (private VM network), install from a local iso on the host and use VNC to interact with the VM (must have an X server running):
# virt-install \
--name vm1 \
--ram=2048 \
--vcpus=2 \
--disk path=/vm-images/vm1.img,size=15 \
--cdrom /root/RHEL-7.0-20140507.0-Server-x86_64-dvd1.iso


For more information on all virt-install parameters, refer to the virt-install man page
Cloning VMs


If you want several VMs with the same OS and same configuration, I recommend cloning existing VMs rather than installing the OS on each one, which can quickly become a time-consuming & tedious task. In this example, we clone vm1 to create a new VM clone called vm1-clone:


1. Suspend the VM to be cloned. This is a requirement since it ensures that all data and network I/O on the VM is stopped.
# virsh suspend vm1


2. Run the virt-clone command:
# virt-clone \
--connect qemu:///system \
--original vm1 \
--name vm1-clone \
--file /vm-images/vm1-clone.img
This operation will take 2-3 minutes, depending on the size of the VM.


3. When done, you can resume the original VM:
# virsh resume vm1


4. The cloned VM is placed in shutdown mode. To start it:
# virsh start vm1-clone


The cloned VM is an exact copy of the original VM, all VM properties (VCPUs, memory, disk space) and disk contents will be the same. The virt-clone command takes care to generate a new MAC address for the VM clone and updates the proper network controller configuration file (i.e. /etc/sysconfig/network-scripts/ifcfg-em1), thus avoiding duplicate MAC addresses.


These are some of the commands I use to administer my VMs. As always, for a list of all available commands, your best bet is the virsh man page


List all VMs on a host, running or otherwise:


# virsh list --all
Show VM information:


# virsh dominfo vm1
Show VCPU/memory usage for all running VMs:


# virt-top
Show VM disk partitions (will take a few moments):


# virt-df vm1
Stop a VM (shutdown the OS):


# virsh shutdown vm1
Start VM:


# virsh start vm1
Mark VM for autostart (VM will start automatically after host reboots):


# virsh autostart vm1
Mark VM for manual start (VM will not start automatically after host reboots):
# virsh autostart –disable vm1


Getting access to a VM’s console

 
If you do not have an X server running on your host, connecting to a VMs serial console might be the only way to login to a VM if networking is not available. Setting up access to a VM’s console is no different than in a physical server, where you simply add the proper kernel boot parameters to the VM. For example, for a RHEL VM, append the following parameters to the kernel boot line in /etc/grub.conf and then reboot the VM:
console=tty0 console=ttyS0,115200


Then, after the VM boots, run in the host:
# virsh console vm1


Attaching storage device to a VM
Say you have files in a USB key that you want to copy to your VM. Rather than copying the files to your VM via the network, you can directly attach the USB key (or any storage device other than USB)


to your VM, which will then appear as an additional storage device on your VM. First identify the device name of your storage device after you plug it in on the host. In this example, it will be /dev/sdb:


# virsh attach-disk vm1 /dev/sdb vdb --driver qemu --mode shareable
     vdb is the device name you want to map to inside the VM
     you can mount your device to more than one VM at a time, but be careful as there is no write access control here.


You can now access the storage device directly from your VM at /dev/vdb. When you are done with it, simply detach it from your VM:
# virsh detach-disk vm1 vdb


GUI Tools


Up until now we’ve been working only with the CLI, but there are a couple of GUI tools that can be very useful when managing and interacting with VMs.


     virt-viewer – Launches a VNC window that gives you access to a VMs main console.
     virt-manager – Launches a window where you can manage all your VMs. Among other things, you can start, pause & shutdown VMs, display VM details (VCPUs, memory, disk space), add devices to VMs and even create new VMs. I don’t cover virt-manager here, but it is rather intuitive to use.
To install these tools, run:
# yum install virt-manager virt-viewer


Changing VM parameters


You can easily change VM parameters after creating them, such as memory, VCPUs and disk space


Memory

 
You can dynamically change the memory in a VM up to what its maximum memory setting is. Note that by default the maximum memory setting in a VM will always equal the amount of memory you specified when you created the VM with the ram parameter in virt-install.
For example if you created a VM with 1 GB of memory, you can dynamically reduce this amount without having to shut down the VM. If you want to increase the memory above 1 GB, you will have to first increase its maximum memory setting which requires shutting down the VM first.


In our first example, let’s reduce the amount of memory in vm1 from 1 GB to 512 MB


1. View the VM’s current memory settings:
# virsh dominfo vm1 | grep memory
Max memory: 1048576 kB
Used memory: 1048576 kB


2. To dynamically set to 512 MB, run:
# virsh setmem vm1 524288
Value must be specified in KB, so 512 MB x 1024 = 524288 KB


3. View memory settings:
# virsh dominfo vm1 | grep memory
Max memory: 1048576 kB
Used memory: 524288 kB


In our second example, let’s increase the amount of memory in vm1 above from 512 MB to 2 GB:


1. In this case we will first need to increase the maximum memory setting. The best way to do it is by editing the VM’s configuration file. Shutdown the VM or you might see unexpected results:
# virsh shutdown vm1


2. Edit the VM’s configuration file:
# virsh edit vm1
Change the value in the memory tab (value is in KB):
<memory>2097152</memory>


3. Restart the VM from its updated configuration file:
# virsh create /etc/libvirt/qemu/vm1.xml


4. View memory settings:
# virsh dominfo vm1 | grep memory
Max memory: 2097152 kB
Used memory: 524288 kB


5. Now you can dynamically change the memory:
# virsh setmem vm1 2097152
Verify:
# virsh dominfo vm1 | grep memory
Max memory: 2097152 kB
Used memory: 2097152 kB


VCPUs

 
To change the number of virtual CPUs in a VM, change the number in the vcpu tag in the VM’s configuration file. For example, let’s change the number of virtual CPUs to 2:


# virsh shutdown vm1
# virsh edit vm1
<vcpu>2</vcpu>
# virsh create /etc/libvirt/qemu/vm1.xml


Disk capacity

 
You can always add additional ‘disks’ to your VMs by attaching additional file images. Say that you want to add an additional 10 GB of disk space in your VM, here is what you do:


1. Create a 10-GB non-sparse file:
# dd if=/dev/zero of=/vm-images/vm1-add.img bs=1M count=10240


2. Shutdown the VM:
# virsh shutdown vm1


3. Add an extra entry for ‘disk’ in the VM's XML file in /etc/libvirt/qemu. You can look copy & paste the entry for your mail storage device and just change the target and address tags. 


For example:
# virsh edit vm1
<disk type='file' device='disk'>
<driver name='qemu' type='raw' cache='none' io='threads'/>
<source file='/vm-images/vm1.img'/>
<target dev='vda' bus='virtio'/>
<address type='pci' domain='0x0000' bus='0x00' slot='0x04' function='0x0'/>
</disk>
Add:
<disk type='file' device='disk'>
<driver name='qemu' type='raw' cache='none' io='threads'/>
<source file='/vm-images/vm1-add.img'/>
<target dev='vdb' bus='virtio'/>
<address type='pci' domain='0x0000' bus='0x00' slot='0x06' function='0x0'/>
    </disk> make sure that the name of the device (i.e. vdb) follows the first one in sequential order
    in the address tag, use a unique slot address (check the address tag of ALL devices, not just storage devices) 


4. Restart the VM from the updated XML configuration file:
# virsh create /etc/libvirt/qemu/vm1.xml


Deleting VMs


When you no longer need a VM, it is best practice to remove it to free up its resources. A VM that is shutdown is not taking up a VCPU or memory, but its image file is still taking up disk space.


Deleting a VM is a lot faster than creating one, just a few quick commands. Let’s delete vm1-clone:


1. First, shutdown the VM:
# virsh shutdown vm1-clone
If the VM is not responding or fails to shut down, shut it down forcefully:
# virsh destroy vm1-clone
2. Undefine the VMs configuration:
# virsh undefine vm1-clone
3. Finally, remove the VM’s image file:
# rm /vm-images/vm1-clone.img