This Blog is to share our knowledge and expertise on Linux System Administration and VMware Administration

Showing posts with label Linux General. Show all posts

Monday, January 8, 2018

lsblk command in Linux

Monday, January 08, 2018 0
NAME
       lsblk - list block devices

lsblk lists information about all available or the specified block devices.  The lsblk command reads the sysfs filesystem to gather information. The command prints all block devices (except RAM disks) in a tree-like format by default

[root@nsk postfix]# lsblk
NAME                           MAJ:MIN RM  SIZE    RO TYPE MOUNTPOINT
sda                                     8:0       0      20G     0    disk
├─sda1                              8:1       0        1G     0    part /boot
└─sda2                              8:2       0      19G     0    part
  ├─centos-root              253:0       0      17G     0    lvm  /
  └─centos-swap            253:1       0        2G     0    lvm  [SWAP]
sr0                                     11:0       1  1024M     0     rom

The  default  output, as well as the default output from options like --fs and --topology, is subject to change.

[root@nsk postfix]# lsblk --fs
NAME               FSTYPE           LABEL UUID                                          MOUNTPOINT
sda
├─sda1              xfs                    7b4cffc6-3fe2-4ad9-9be9-ea83e11532fc           /boot
└─sda2              LVM2_member DQjmHN-fso4-Mu4t-3l1V-Yogj-ksTH-ROFiK7
  ├─centos-root  xfs                    4d056c54-3e98-4bbd-953d-ad49d24e89a3       /
  └─centos-swap swap               e97f5f2c-66b2-42c6-9baf-544123ee9abf          [SWAP]
sr0

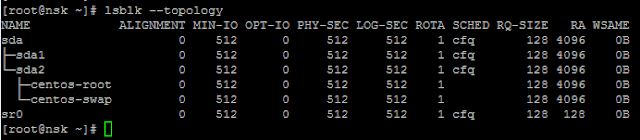
[root@nsk postfix]# lsblk --topology


 For mre help, please refer man pages

Saturday, January 6, 2018

Tee command in Linux

Saturday, January 06, 2018 0
NAME
       tee - read from standard input and write to standard output and files
   
Copy standard input to each FILE, and also to standard output

options:
-a, --append  - append to the given FILEs, do not overwrite
-i, --ignore-interrupts - ignore interrupt signals
Ex : 
    [root@nsk postfix]# cat main.cf | egrep -v "^#|^$" |tee -a main.cf_catoutput

Here,
Tee command will read the output of cat command & write the standard output to a specified file.

Friday, January 5, 2018

Single command to take the backup and removes the commented and blank lines in a file

Friday, January 05, 2018 0
We can achieve by using 2 ways in Linux.

SED Command:

Normally, we will take back up and tidy the most of the configuration file. There is a tendency for many software packages to over comment their configurations. This can cause issues where you think that you have implemented a change; however, it was also set later on and you may not have noticed it.
Postfix, main.cf configuration file having 679 lines. We will back up the file so that we do not lose comments and documentations, but we will also have a new working file with less than 10 percent of the number of lines. The following command shows how this is done
[root@nsk etc]# cat /etc/postfix/main.cf | wc -l
679

[root@nsk etc]# sudo sed -i.bak '/^#/d;/^$/d' /etc/postfix/main.cf
Here:
#/d   - Remove the commented line
^$   - Remove the blank line

[root@nsk etc]# cat postfix/main.cf | wc -l
25
Above sed command reduces the file from 679 lines to 25 lines and is far easier to work with. We can now edit this file without any distractions. We will add two new lines and edit two existing lines to the /etc/postfix/main.cf file. This will need to be edited as root.

CAT Command:

We can use below command also to achieve the above output. 

[root@nsk etc]# [root@nsk postfix]# cat main.cf.bak | egrep -v "^#|^$" |tee -a main.cf_catoutput
[root@nsk postfix]# cat main.cf_catoutput | wc -l
25


Sed command will take the backup of existing file & the output will be saved in existing name. Here Cat command output will be saved in different name.

Thursday, January 4, 2018

find: paths must precede expression: SOLVED

Thursday, January 04, 2018 0

While running find command, we are getting the message "find: paths must precede expression:"

[root@testserver emd]# find /oem1/agent12c/odcagent/agent_inst/sysman/emd/ -mtime +10 -mtime -30 -type f -name core.* -exec ls -al {} \;
find: paths must precede expression: core.java.11182
Usage: find [-H] [-L] [-P] [-Olevel] [-D help|tree|search|stat|rates|opt|exec] [path...] [expression]

Solution: 
While running find command, name field should be covered with ' ' notation.
[root@testserver emd]# find /oem1/agent12c/odcagent/agent_inst/sysman/emd/ -mtime +6 -mtime -30 -type f -name 'core.*'  -exec ls -al {} \;
-rw------- 1 odcagent dba 869224448 Dec 25 13:19 /oem1/agent12c/odcagent/agent_inst/sysman/emd/core.java.56825
-rw------- 1 odcagent dba 869380096 Dec 23 19:39 /oem1/agent12c/odcagent/agent_inst/sysman/emd/core.java.1860

Tuesday, January 2, 2018

Configuring SMTP in RHEL 7

Tuesday, January 02, 2018 0

Configuring Simple Mail Transfer Protocol in RHEL 7

Many programs use  SMTP to send messages about their status and so on. By default, postfix is configured to deliver all messages locally and not respond to incoming mails. If you have an environment of multiple servers, this can become quite tedious to log on to each server to check for new mail. This document will show you how to relay messages to a central mail relay or message store that also uses SMTP.

Postfix is installed by default on RHEL 7.

In this document, we'll combine several options:
We'll allow the server to accept incoming mails
We'll only allow the server to relay messages from recipients in the testdomain.local domain
We'll forward all mails to the mailhost.testdomain.local mailserver

To complete this document, perform the following steps:
Edit /etc/postfix/main.cf with your favorite editor.
Modify inet_interface to accept mails on any interface through the following command:
      inet_interface = all
Add the smtpd_recipient_restrictions directive to only allow incoming mails from the testdomain.local domain, as follows:
     smtpd_recipient_restrictions =
     check_sender_access hash:/etc/postfix/sender_access, 
      reject
As you can see, the last two lines are indented. The postfix considers this block as one line instead of three separate lines.
Add the relayhost directive to point to mailhost.testdomain.local, as follows:
      relayhost = mailhost.testdomain.local
Now, save the postfix file.
Create /etc/postfix/sender_access with the following contents:
       testdomain.local   OK
Next, hash the /etc/postfix/access file using the following command:
       #postmap /etc/postfix/access
Finally, restart postfix, as follows:
       # systemctl restart postfix

To monitor your mail queue on the system, execute the following:
       # postqueue -p
Whenever your mail relay cannot forward mails, it stores them locally and tries to resend them at a later time. When you restore the mailflow, you can flush the queue and attempt delivery by executing the following:
       # postqueue -f
The kind of setup presented in this recipe is quite simple and assumes that you don't have malicious users on your network. There are software that allow you to mitigate spam and viruses. Popular solutions for this are spamassassin and amavis.

Sunday, December 31, 2017

Configuring logrotate in RHEL7

Sunday, December 31, 2017 0

Configuring logrotate in RHEL7

The logrotate tool allows you to rotate the logs that are generated by applications and scripts
It keeps your log directories clutter-free and minimizes disk usage when correctly configured.

The logrotate tool is installed by default.This document will show you how to rotate logs for rsyslog. We will rotate the logs everyday, add an extension based on the date, compress them with a one-day delay, and keep them for 365 days. Perform the following steps:
First, to check logrotate is installed, perform the following command:
[root@nsk ~]# rpm -qa | grep -i logrotate
logrotate-3.8.6-14.el7.x86_64

Ensure that it's enabled through the following:
[root@nsk ~]# systemctl restart crond

Open /etc/logrotate.d/syslog with your favorite editor. The contents of this file are the following, by default:
/var/log/cron
/var/log/maillog
/var/log/messages
/var/log/secure
/var/log/spooler
{
    missingok
    sharedscripts
    postrotate
        /bin/kill -HUP `cat /var/run/syslogd.pid 2> /dev/null` 2> /dev/null || true
    endscript
}

Now, replace this with the following code:
/var/log/cron
/var/log/maillog
/var/log/messages
/var/log/secure
/var/log/spooler
{
    compress
    daily
    delaycompress
    dateext
    missingok
    rotate 365
    sharedscripts
    postrotate
        /bin/kill -HUP `cat /var/run/syslogd.pid 2> /dev/null` 2> /dev/null || true
    endscript
}
Finally, save the file.

The logrotate tool is a script that is launched by cron everyday.
The directives added to the default logrotate definition are compress, daily, delaycompress, dateext, missingok, and rotate.

The compress directive compresses old versions of the log files with gzip. This behavior is somewhat changed by specifying delaycompress. This causes us to always have the most recently rotated log file available uncompressed.

The daily directive makes logrotate execute the definition every day. The rotate directive only keeps x rotated log files before deleting the oldest. In this case, we have specified this to be 365, which means that while rotating daily, the logs are kept for 365 days.
The missingok directive makes it alright for syslog to not create a file, which, however unlikely, is possible.

The dateext directive appends a date to the rotated file in the form of yyyymmdd instead of a number, which is the default.

The /etc/logrotate.conf file contains the defaults directives for all definitions. If you don't specifically use a directive within a definition for a file, the values in this file will be used if specified.

Yum, for instance, doesn't generate a lot of messages, and it keeps this log file readable for much longer than your syslog files. This, by the way, is reflected in the definition for yum.
If you want to debug your new configuration, this can be achieved by executing the following to test just one configuration:

# /usr/sbin/logrotate -v /etc/logrotate.d/<config file>

[root@nsk ~]# /usr/sbin/logrotate -v /etc/logrotate.d/syslog
reading config file /etc/logrotate.d/syslog
Allocating hash table for state file, size 15360 B

Handling 1 logs

rotating pattern: /var/log/cron
/var/log/maillog
/var/log/messages
/var/log/secure
/var/log/spooler
....
....
renaming /var/log/spooler to /var/log/spooler-20171231
disposeName will be /var/log/spooler-20171231.gz
running postrotate script
removing old log /var/log/cron-20171231.gz
error: error opening /var/log/cron-20171231.gz: No such file or directory
set default create context
[root@nsk ~]#

Alternatively, you can use the following to test everything:

[root@nsk ~]# /usr/sbin/logrotate -v /etc/logrotate.conf
reading config file /etc/logrotate.conf
including /etc/logrotate.d
reading config file bootlog
reading config file chrony
reading config file numad
reading config file syslog
reading config file wpa_supplicant
reading config file yum
reading config file yum_24dec2017
error: yum_24dec2017:1 duplicate log entry for /var/log/yum.log
....
..

  rotating pattern: /var/log/btmp  monthly (1 rotations)
empty log files are rotated, old logs are removed
considering log /var/log/btmp
  log does not need rotating (log has been rotated at 2017-12-14 11:40, that is not month ago yet)
set default create context
[root@nsk ~]#

Tuesday, December 26, 2017

Configuring the systemd journal for persistence in RHEL7

Tuesday, December 26, 2017 0

Configuring the systemd journal for persistence in RHEL7

By default, the journal doesn't store log files on disk, only in memory or the /run/log/journal directory. This is sufficient for the recent log history (with the journal) but not for long-term log retention should you decide to go with journal only and not with any other syslog solution.

Configuring journald to keep more logs than memory allows is fairly simple, as follows:
Open /etc/systemd/journald.conf with your favorite text editor with root permissions by executing the following command:
vim /etc/systemd/journald.conf

Ensure that the line containing Storage is either remarked or set to auto or persistent and save it, as follows:

[root@nsk ~]# vim /etc/systemd/journald.conf
#  This file is part of systemd.
...
..
[Journal]
Storage=auto

If you select auto, the journal directory needs to be manually created. The following command would be useful for this:

[root@nsk ~]# mkdir -p /var/log/journal
[root@nsk ~]#

Now, restart the journal service by executing the following command:

[root@nsk ~]# systemctl restart systemd-journald

There are many other options that can be set for the journal daemon.
By default, all the data stored by journald is compressed, but you could disable this using Compress=no.
It is recommended to limit the size of the journal files by either specifying a maximum retention age (MaxRetentionSec), a global maximum size usage (SystemMaxUse), or a maximum size usage per file (SystemMaxFileSize).


Monday, December 25, 2017

Screen command in Linux

Monday, December 25, 2017 0

Screen command in Linux


NAME
       screen - screen manager with VT100/ANSI terminal emulation

Screen  is  a full-screen window manager that multiplexes a physical terminal between several processes. When screen is called, it creates a single window with a shell in it (or the specified command) and then gets out of your way so that you can  use the  program  as  you  normally  would.  Then,  at any time, you can create new (full-screen) windows with other programs in them (including more shells), kill existing windows, view a list of windows, turn output logging on and off, copy-and-paste text between windows, view  the  scrollback history,  switch  between  windows in whatever manner you wish, etc. All windows run their programs completely independent of each other. Programs continue to run when their window is currently not visible and even when the whole screen session is detached from the user’s  terminal.   When  a program  terminates,  screen  (per default) kills the window that contained it.  If this window was in the foreground, the display switches to the previous window; if none are left, screen exits.

#screen -h 2000 -t SERVER_UPDATE -S SERVER_UPDATE

Here
  -h  num - Specifies the history scrollback buffer to be num lines high.
  -t  name - sets the title for the default shell or specified program. 
  -S  sessionname  -  When  creating  a  new  session,  this  option can be used to specify a meaningful name for the session. This name identifies the session for
            "screen -list" and "screen -r" actions. It substitutes the default [tty.host] suffix.

Prints a list of screen session
#screen -ls
There is a screen on:
        27137.pts-1.testserver       (Attached)
1 Socket in /var/run/screen/S-root.

Detach the screen session
#screen -D 27137.pts-1.testserver
[27137.pts-1.testserver power detached.]

Attach the screen session
#screen -r 27137.pts-1.testserver

Please check man screen page for more options.

Sunday, December 24, 2017

Configuring logrotate for yum in RHEL7

Sunday, December 24, 2017 0

Configuring logrotate for yum in RHEL7


Every time you use yum to install and/or update packages, it logs to /var/log/yum.log. 

I do recommend keeping your complete yum history as it doesn't grow a lot, unless you reinstall packages a lot.

For a rich interface to your yum history, I suggest you use yum history.

By default, your yum log file is rotated yearly, and even then, it only rotates if the size of your log file exceeds 30 KB, and your logs are only kept for 4 years. 

virtual servers have the potential to stay "alive" beyond these 3-4 years.

How to do it…
Modify /etc/logrotate.d/yum to the following:

/var/log/yum.log {
    missingok
    notifempty
    size 30k
    rotate 100
    yearly
    create 0600 root root
}

How it works…
This configuration will only rotate the yum log when it exceeds 30 KB in size on a yearly basis, and it will keep 100 rotated logs, which is basically log files for 100 years!

Sunday, December 17, 2017

How to monitor the permission change and ownership change of a particular directory or file in Linux Server

Sunday, December 17, 2017 0

Monitoring the permission change and ownership change of a particular directory or file in Linux Server

1. Use the audit package to accomplish this task.2. Ensure the auditd service is running, and set to start on boot chkconfig auditd on3. Set a watch on the required file to be monitored by using the auditctl command:

# auditctl -w /etc/passwd -p war -k monitor-passwd

here:
    auditctl   :the command used to add entries to the audit database.
    -w            :Insert a watch for the file system object at path, i.e. /etc/shadow.
    -p             :Set permissions filter for a file system watch. r=read, w=write, x=execute, a=attribute change.
    -k             : Set a filter key on an audit rule. The filter key is an arbitrary string of text that can be up to 31 bytes long. 

It can uniquely identify the audit records produced by a rule.

Note that you must add the rule to /etc/audit/audit.rules on RHEL5 or RHEL6  in order for them to persist after reboot.
    You can place the watch rule in the /etc/audit/audit.rules file to set permanently:
-w /etc/passwd -p a -k monitor-passwd
       Check auditd service and if it is stopped, start it.

# service auditd status
# chkconfig --list auditd
# chkconfig auditd on

In this example, a watch is placed on the /etc/passwd file for any syscalls which perform a write, read, or attribute change
    (-p war). This is logged with the key monitor-passwd. This key can be used to search through the audit logs to find these actions, 
 using the ausearch command:

# ausearch -ts today -k monitor-passwd
----
time->Sat May  3 07:32:20 2009
type=PATH msg=audit(117045140.872:34): item=0 name="/etc/passwd" inode=1308742 dev=fd:00 mode=0100644 ouid=0 ogid=0 rdev=00:00 obj=system_u:object_r:etc_t:s0
type=CWD msg=audit(117045140.872:34): cwd="/root"
type=SYSCALL msg=audit(117045140.872:34): arch=40000003 syscall=226 success=yes exit=0 a0=867c4b8 a1=458bcc4f a2=8686800 a3=1c
items=1 ppid=3544 pid=3558 auid=0 uid=0 gid=0 euid=0 suid=0 fsuid=0 egid=0 sgid=0 fsgid=0 tty=pts0 comm="vim" exe="/usr/bin/vim"
subj=root:system_r:unconfined_t:s0-s0:c0.c1023 key="monitor-passwd"

    From this trace, it can be seen that the file /etc/resolve.conf was edited using the /usr/bin/vim command. The user that ran the  command was running with the root:system_r:unconfined_t:s0-s0:c0.c1023 SELinux context. And, the timestamp can be converted into readable form.

# date -d @117045140
Sat May  3 05:32:20 CST 2009

    You can search for an event based on the given key string
# ausearch -k monitor-passwd
    For a clearly view, you can generate report base on audit rule keys
# aureport -k

Friday, December 15, 2017

Identify the differentiation between Oracle Enterprise Linux from Redhat Enterprise Linux

Friday, December 15, 2017 0

Identify the differentiation between Oracle Enterprise Linux from Redhat Enterprise Linux

We can differentiate the OEL from RHEL by checking below things

1. Kernel  - uname -mrs command

RHEL runs with normal Redhat Kernel
[root@nsk ~]# uname -mrs
Linux 3.10.0-693.5.2.el7.x86_64 x86_64

OEL runs with Unbreakable Enterprise Kernel
[root@testserver ~]# uname -mrs
Linux 3.8.13-118.16.2.el6uek.x86_64 x86_64

2.  Yum repositiry

RHEL points to  RHEL repo name (only 3)
ex: RHEL-7 - Base 
      RHEL-7 - Extras
      RHEL-7 - Updates

OEL points to Oracle repo name ( customized many repo)
ex: Oracle Linux 6Server Latest (x86_64)
      OL 6Server - x86_64

3. MTA

RHEL: comes with sendmail and postfix
OEL : supports sendmail as a preferred MTA

4. Patching

RHEL gets update from  RHN satellite server
OEL gets update from  Oracle Spacewalk server

5. Linux Standard Base (lsb_release -a)
RHEL
Distributor ID : RHEL
Description    : RHEL Linux release 7.4.1708 (Core)
Codename     : Core
LSB Version   : core-4.1-amd64:core-4.1-noarch

OEL
Distributor ID : OracleServer
Description    : Oracle Linux Server release 6.8
Codename    : n/a
LSB Version:  :base-4.0-amd64:base-4.0-noarch:core-4.0-amd64:core-4.0-noarch:graphics-4.0-amd64:graphics-4.0-noarch:printing-4.0-amd64:printing-4.0-noarch

6. Linux Release by version

[root@nsk ~]# cat /proc/version
Linux version 3.10.0-693.5.2.el7.x86_64 (brewbuilder@xx-xx.build.redhat.com) (gcc version 4.8.5 20150623 (Red Hat 4.8.5-16) (GCC) ) #1 SMP Fri Oct 20 20:32:50 UTC 2017

[root@testserver ~]# cat /proc/version
Linux version 3.8.13-118.16.2.el6uek.x86_64 (mockbuild@x86-ol6-builder-04) (gcc version 4.4.7 20120313 (Red Hat 4.4.7-16) (GCC) ) #2 SMP Wed Jan 11 17:19:24 PST 2017

Wednesday, December 13, 2017

Unable to switch to root using sudo su – effective uid is not 0, is sudo installed setuid root

Wednesday, December 13, 2017 0

Unable to switch to root using sudo su –  effective uid is not 0, is sudo installed setuid root 

Error – While switching to root using sudo su - , throwing the below Error.

[root@test ~]# ssh testserver.local.com -l nsk
nsk@testserver.local.com's password:
Last login: Tue Dec 12 09:24:48 2017 from 10.0.0.16
-bash-3.2$ sudo su -
sudo: effective uid is not 0, is sudo installed setuid root?

Reason:
/usr/bin/sudo executable don’t have the setuid permission 

Solution:
Set the setuid permission for /usr/bin/sudo command. #chmod u+s /usr/bin/sudo

Example:-
[root@testserver ~]# ls -al /usr/bin/sudo
-rwxr-xr-x 1 root root 697605 Mar  5  2014 /usr/bin/sudo
[root@testserver ~]# chmod u+s /usr/bin/sudo
[root@testserver ~]# ls -al /usr/bin/sudo
-rwsr-xr-x 1 root root 697605 Mar  5  2014 /usr/bin/sudo

Monday, December 11, 2017

How to set password non-expiry for user in linux

Monday, December 11, 2017 0

Set up password non-expiry for user in linux

NAME

       chage - change user password expiry information    

The chage command changes the number of days between password changes and the date of the last password change. This information is used by the system to determine when a user must change their password.

Below command is used to set non-expiry for testuser
   
#chage -I -1 -m 0 -M 4294967295 -E -1 testuser

[root@nsk-linux home]# chage -I -1 -m 0 -M 4294967295 -E -1 testuser1
[root@nsk-linux home]#
[root@nsk-linux home]# chage -l testuser1
Last password change                                    : Dec 10, 2017
Password expires                                        : never
Password inactive                                       : never
Account expires                                         : never
Minimum number of days between password change          : 0
Maximum number of days between password change          : 4294967295
Number of days of warning before password expires       : 7

Here
-I  Set the number of days of inactivity after a password has expired before the account is locked
-m  --mindays. Minimum number of days between password changes. A value of zero for this field indicates that the user may change their pssword at any time
-M  --maxdays. Maximum number of days during which a password is valid
-E  --expiredate. Set the date

Friday, December 8, 2017

Tree command in Linux Brief Explaination

Friday, December 08, 2017 0

Tree command is used to recursively check the number of files in folder.

tree - list contents of directories in a tree-like format

Tree is a recursive directory listing program that produces a depth indented listing of files. With no arguments, tree lists the files in the current directory.  When directory arguments are given, tree lists all the files and/or directories found in the given directories each in turn.  Upon completion of  listing all files/directories found, tree returns the total number of files and/or directories listed.

[root@testserver nsk]# tree -iLf 1 /home/nsk/
/home/nsk/
/home/nsk//audit.txt
/home/nsk//audit1.txt
/home/nsk//auditprod.txt
/home/nsk//auditprod1.txt
/home/nsk//dom
/home/nsk//ser.txt
/home/nsk//serv.txt
/home/nsk//serv1.txt
/home/nsk//server.txt
/home/nsk//umount
/home/nsk//umount-ser
/home/nsk//umount-ser1

0 directories, 12 files

Where:
    -i   Makes tree not print the indentation lines, useful when used in conjunction with the -f option.
    -L level Max display depth of the directory tree.

Thursday, December 7, 2017

OpenLdap user login issue asking to enter password again and again

Thursday, December 07, 2017 0
Situation:

              Openldap user is having issue while login to the server, it is asking password again and again.


Solution:

             Restart nslcd service. 

[root@testserver~]# /etc/init.d/nslcd restart
Stopping nslcd:                                            [  OK  ]
Starting nslcd:                                              [  OK  ]

NAME
       nslcd - local LDAP name service daemon. nslcd is a daemon that will do LDAP queries for local processes based on a simple configuration file.

Home directory Error oddjob-mkhomedir not working

Thursday, December 07, 2017 0

Home directory Error oddjob-mkhomedir not working

Situation:
While login as user, getting Error  oddjob-mkhomedir not working 

Solution:
1. yum install dbus oddjob oddjob-mkhomedir
2. service restart messagebus
3. service restart oddjob
4. Add the line "session required pam_oddjob_mkhomedir.so" to /etc/pam.d/sshd  file
5. Delete a users home directory (rm -rf /home/nskselvan)
6. Disable and enable the "Use LDAP Authentication" in authconfig-tui (authconfig-tui - an interface for configuring system authentication resources)
7. Log in using ssh as this user.

[root@testserver ~]# yum install dbus oddjob oddjob-mkhomedir
Setting up Install Process
Package 1:dbus-1.2.24-8.0.1.el6_6.x86_64 already installed and latest version
Package oddjob-0.30-5.el6.x86_64 already installed and latest version
Package oddjob-mkhomedir-0.30-5.el6.x86_64 already installed and latest version
Nothing to do

[root@testserver ~]# service  messagebus restart
Stopping system message bus:                               [  OK  ]
Starting system message bus:                                 [  OK  ]
[root@testserver ~]# chkconfig messagebus on
[root@testserver ~]# /etc/init.d/oddjobd status
oddjobd is stopped
[root@testserver ~]# /etc/init.d/oddjobd restart
Shutting down oddjobd:                                           [FAILED]
Starting oddjobd:                                                       [  OK  ]
[root@testserver ~]# /etc/init.d/oddjobd restart
Shutting down oddjobd:                                            [  OK  ]
Starting oddjobd:                                                       [  OK  ]
[root@testserver ~]# chkconfig oddjobd on

[root@testserver ~]# cat /etc/pam.d/sshd |  grep -i pam_oddjob_mkhomedir.so
#%PAM-1.0
session    required     pam_oddjob_mkhomedir.so

[root@testserver ~]# authconfig-tui
Here, disable (unselect)  the Use LDAP Authentication and save

[root@testserver ~]# authconfig-tui
Here, Enable (Select) the Use LDAP authentication and save. The result will be like below.
Starting nscd:                                             [  OK  ]
Starting nslcd:                                            [  OK  ]

Tuesday, December 5, 2017

How do you findout the Hardware and CPU Architecture BIT value in Linux

Tuesday, December 05, 2017 0

Findout the Hardware and CPU Architecture BIT value in Linux 

We can check the Hardware and CPU Supporting architecture by using below commands in Linux.

lscpu - display information about the CPU architecture
[root@testserver ~]# lscpu | egrep -i "CPU|Arch"
Architecture:                 x86_64
CPU op-mode(s):        32-bit, 64-bit
[root@testserver ~]#

[root@testserver ~]# file /sbin/init
/sbin/init: ELF 64-bit LSB shared object, x86-64, version 1 (SYSV), dynamically linked (uses shared libs), for GNU/Linux 2.6.18, stripped

 Print machine architecture.
[root@testserver ~]# arch
x86_64

uname - print system information
 -m, --machine    print the machine hardware name
[root@testserver ~]# uname -m
x86_64

-p, --processor   print the processor type or "unknown"
[root@testserver ~]# uname -p
x86_64

-i, --hardware-platform   print the hardware platform or "unknown"
[root@testserver ~]# uname -i
x86_64

getconf - get configuration values
[root@testserver ~]# getconf LONG_BIT
64

Monday, December 4, 2017

SSH password less authentication between inux server by using ssh keygen

Monday, December 04, 2017 0
ssh (SSH client) is a program for logging into a remote machine and for executing commands on a remote machine.  It is intended to replace rlogin and rsh, and provide secure encrypted communications between two untrusted hosts over an insecure network.

SSH server : 10.0.0.35
SSH Remote server : 10.0.0.40

Here we are going to setup password less authentication from SSH server to SSH Remote Server.

SSH KEYGEN: ssh-keygen generates, manages and converts authentication keys for ssh.  The type of key to be generated is specified with the -t option.  If invoked without any arguments, ssh-keygen will generate an RSA key for use in SSH protocol 2      connections.

Genarate Keys on Server 10.0.0.35

[linvirtshell@nsk ~]$ ssh-keygen
Generating public/private rsa key pair.
Enter file in which to save the key (/home/linvirtshell/.ssh/id_rsa):
Created directory '/home/linvirtshell/.ssh'.
Enter passphrase (empty for no passphrase):
Enter same passphrase again:
Your identification has been saved in /home/linvirtshell/.ssh/id_rsa.
Your public key has been saved in /home/linvirtshell/.ssh/id_rsa.pub.
The key fingerprint is:
SHA256:8fcOx3W45JXn3651mNDK+YvL0b3jn8382MhXRFiUQ44 linvirtshell@nsk
The key's randomart image is:
+---[RSA 2048]----+
|              .=+|
|              +o.|
|        .    E o.|
|         o   . .o|
|        S . o +o=|
|           o X O+|
|            * X *|
|           . O OO|
|            +.XO#|
+----[SHA256]-----+
[linvirtshell@nsk ~]$

Create .ssh directory on Remote Server (10.0.0.40)

Login to the server 10.0.0.40 and create .ssh directory under /home/nsk
[nsk@nsk .ssh]$ mkdir .ssh
[nsk@nsk .ssh]$ ls -al | grep -i .ssh
drwx------. 2 nsk nsk  6 Dec  4 11:25 .ssh

Here .ssh should be 0700 permission, under .ssh create authorized_keys file, it should be 0600 permission.

Now copy the id_rsa.pub key  from 10.0.0.35 and paste the same in authorized_keys  file in 10.0.0.40.

Now login from server 10.0.0.35 to 10.0.0.40 as user nsk

[linvirtshell@nsk ~]$ ssh nsk@10.0.0.40
Last login: Mon Dec  4 11:39:20 2017 from nsk
[nsk@nsk ~]$

Sunday, December 3, 2017

Linux server manual patching by using yum step by step

Sunday, December 03, 2017 0

Linux server manual patching by using yum  step by step

Follow the below steps to complete the manual patching of Linux server.

$ yum -y update yum >/dev/null 2>&1
$ yum -y update libstdc++ >/dev/null 2>&1
$ yum -y update kernel glibc >/dev/null 2>&1
$ yum -y update >/dev/null 2>&1

>       - redirect
/dev/null -  black hole where any data sent, will be discarded
2    - file descriptor for Standard Error
>    - redirect
&    - symbol for file descriptor (without it, the following 1 would be considered a filename)
1    - file descriptor for Standard Out

So  >/dev/null 2>&1 is redirect the output of your program to /dev/null. Include both the Standard Error and Standard Out. For more info refer Linux I/O redirection.

Friday, December 1, 2017

SSH Key Gen & SSH Keys on windows system to Linux Server

Friday, December 01, 2017 0

SSH Key Gen & SSH Keys on windows system to Linux Server 

NAME
     ssh-keygen - authentication key generation, management and conversion


ssh-keygen generates, manages and converts authentication keys for ssh.  ssh-keygen can create RSA keys for use by SSH protocol version 1 and DSA, ECDSA or RSA keys for use by SSH protocol version 2. The type of key to be generated is specified with the -t option.  If invoked without any arguments, ssh-keygen will generate an RSA key for use in SSH protocol 2 connections.

SSH Key Generation:

[nsk@nsk-linux ~]$ ssh-keygen
Generating public/private rsa key pair.
Enter file in which to save the key (/home/nsk/.ssh/id_rsa):      - Just give enter
Enter passphrase (empty for no passphrase):                           - Dont give passphrase
Enter same passphrase again:               
Your identification has been saved in /home/nsk/.ssh/id_rsa.
Your public key has been saved in /home/nsk/.ssh/id_rsa.pub.
The key fingerprint is:
ae:67:71:78:9e:b5:31:1e:bb:7b:c7:0a:3b:18:0b:c8 nsk@nsk-linux
The key's randomart image is:
+--[ RSA 2048]----+
|                 |
|                 |
|                 |
|                 |
|     . .S.       |
|      E.+ + =    |
|        .* B.* . |
|       .o = =o. o|
|      .o    +=.o |
+-----------------+

[nsk@nsk-linux ~]$ cd .ssh/
[nsk@nsk-linux .ssh]$ ls -al
total 48
drwx------  2  nsk  nsk  4096 Dec  1  10:08 .
drwx------ 37 nsk  nsk  4096 Nov 26 09:51 ..
-rw-------  1   nsk  nsk  1675 Dec  1  10:08 id_rsa
-rw-r--r--  1   nsk  nsk   395 Dec  1   10:08 id_rsa.pub
-rw-------  1   nsk  nsk  8594 Nov  7   08:23 known_hosts


We need to convert id_rsa key (windows to linux) for successful password less authentication from windows system

1. Save the id_rsa key in Windows system
2. Use Putty Key Generator tool & click the conversions
3. Click Import Key & Browse the id_rsa key
                                      click_conversion_select_key
Once_loaded_click_save_private_key_popup_yes
4. Click Save Private Key. Once pop up comes, click save the key without a passphrase on local system.
save_key_in_local_system

5. Copy  id_rsa.pub key to /home/nsk/.ssh/authorized_keys  (change the user home directory)
[nsk@nsk-linux .ssh]$ cat id_rsa.pub >> /home/nsk/.ssh/authorized_keys
[nsk@nsk-linux .ssh]$ cat authorized_keys
ssh-rsa AAAAB3NzaC1yc2EAAAABIwAAAQEAv4ZERTCXFpGZLrNKBOQfiTE5SEQYvtiolNt8KnMVY9bxwEUMyPUX9EwmJxW51BY8I9Xq6VGoU2nskS0GrTgqjAOeptTRia0ws7inkc9oHVHryqJdgvhYvpVj2lLsnRTO9Lv4P6Pkycvg5xioAKRTdL8EffPxWtu8x1iL6aYsHThxsrpmXzK0LrkHLnGsJT5nRtNOWlUJW9npNPRBSqRmPjFCRpWb2kgn7MUKJnr5rXA2kgrULCvx97EFDxA/HYAxFgld7yGdnPjdZWyrkXK/FsFmsU4xoGoSNVKG1Vq1R18rc/cNjtVPME9TBxD8OBB8FQYiyHLYWLF+x9EbGsY+lQ== nsk@nsk-linux


6.  Here .ssh should be 0700 permission and authorized_keys should be 0600 permisssion.


7.  Open putty tool - Enter the Server IP in session ==> expand the SSH ==> select AUTH and browse the key ==> Select the key


session_ip_ssh_AUTH_select_key
8. Give username & enter. Here Putty session wont ask password.
ssh_with_key_authentication


Hope it helps.