This Blog is to share our knowledge and expertise on Linux System Administration and VMware Administration

Showing posts with label Linux General. Show all posts

Sunday, November 26, 2017

Ignore first 4 lines of cat command output and display first word of remaining lines Unix

Sunday, November 26, 2017 0

Below awk command is very useful to run small scripts in Unix.

Ignore first 4 lines of cat command output and display first word of remaining lines  Unix

Purpose Ignore first 4 lines of cat command output and display first word of remaining lines.

[root@nsk-linux tmp]# cat test.txt
Public cloud is future
Automation never ends
Infra as a Service
Private Cloud
Baremetal Cloud Service
Amazon Cloud service

[root@nsk-linux tmp]# cat test.txt |  awk '{if(NR>4)print $1}'
Baremetal
Amazon

Here, as per our need we can change the value.

Thursday, November 23, 2017

for loop command for grep the particular file system from list of servers.

Thursday, November 23, 2017 0

Double For loop command for grep the particular file system (mount point) from list of servers.

Here,
 servers       -  contains server list
 fmount        -  mount point

Run the below command. It will login to the list of server and search the mount point and print the output.

#for j in `cat servers`; do for i in `cat fmount`; do echo $j; ssh $j df -hP | grep -i $i; done; done

Modify the variable as per your needs.

Openldap user password reset by using Phpldapadmin

Thursday, November 23, 2017 0
Follow the below steps to Reset Openldap User password by using Phpldapadmin

Login to phpldapadmin admin console by using Admin id & password.

Explore the ldap directory & search the user in left side
Select the user and click
Right side we can see the user property.


Update the password directly here.

Finally update the object.

Monday, November 20, 2017

lsof command with example - Linvirtshell

Monday, November 20, 2017 0

The lsof is an excellent utility that can be used to identify process or user that is locking system resource such as file or network socket.

Basically, the /etc/services system files is usually used to map a numeric port number to a descriptive port name defined by user.

In the absence of any options, lsof lists all open files belonging to all active processes.

NAME

       lsof - list open files

To report all processes that are accessing the TCP sockets found on the system
#lsof -i TCP

To find out what process is holding TCP port 22
#lsof -i tcp:22

To show all resources that are being held by process id 2057
#lsof -p 2057

To find out what are the resources held by all cron processes. 
#lsof -o crond

To confirm resources that are being held by user id user linuser
#lsof -u linuser| more

To find out what are the processes that are locking the specify file /usr/sbin/anacron
# lsof /usr/sbin/anacron

Listing the files, any of whose IPv4 & IPv6 Internet address matches
# lsof -i4 -i6

Checking the count of open files
# lsof | wc -l

Listing of NFS files
#lsof -N

Hope it helps

Thursday, November 16, 2017

How to add temporary & permanent route in Linux box?

Thursday, November 16, 2017 0

Follow the below steps for adding the route as  temporary or permanent . 

Temporary Route

We just need to add the ip route add command in command line. like below

[root@testserver ~]#ip route add 10.217.156.0/25 via 10.194.32.1 dev eth0

[root@testserver ~]# route -n | grep -i 10.217.156.0

10.217.156.0    10.194.32.1     255.255.255.128 UG    0      0        0 eth0

Above route entry will be invicible post reboot the linux box.

Permanent Route

We need to create a file route-eth0 (since it is pointing eth0 device) under /etc/sysconfig/network-scripts/ path & add the below entry.

[root@testserver network-scripts]# cat route-eth0
10.217.156.0/25 via 10.194.32.1 dev eth0

save & exit.

Route will be persistent after every reboot of the Linux box.


Note : Permanent route need  network interface.reload for immediate effect.

Hope it helps.


Tuesday, November 14, 2017

What is NUMA (Non-Uniform Memory Access)?

Tuesday, November 14, 2017 0
NUMA stands for Non-Uniform Memory Access,describes a system with more than one system bus. CPU resources and memory resources are grouped together into a “NUMA node.

The memory in a NUMA node is thus much more easily accessed by an associated CPU. A CPU that needs to access memory in a different node (“Remote Access”) will experience much higher latency, and thus reduced application performance. 


NUMA is, in short, an alternative approach to server architecture that links several small, high-performing nodes together inside a single server case.  


So long as the memory and CPU being used falls within the bounds of the NUMA node, local communication within a NUMA node allows a CPU much faster access to memory than in an ordinary system layout. This is especially important in the multi-GHz era of today, when CPUs operate significantly faster than the memory they are using. NUMA helps keep CPUs from entering a stalled state, waiting for data, by allowing the fastest possible access to memory. 


 Numactl is a Linux tool that you can use to view NUMA topology on Linux.


numactl -- hardware

[root@nsk ~]# numactl --hardware
available: 1 nodes (0)
node 0 cpus: 0
node 0 size: 2047 MB
node 0 free: 1454 MB
node distances:
node   0
  0:  10

numactl -- show


[root@nsk ~]# numactl --show
policy: default
preferred node: current
physcpubind: 0
cpubind: 0
nodebind: 0
membind: 0
 

Friday, November 10, 2017

Time command in Linux Server - Brief explanation

Friday, November 10, 2017
NAME
       time - time a simple command or give resource usage
      
Format
       time [options] command [arguments...]

The time command runs the specified program command with the given arguments.  When command finishes, time writes a message to standard error giving timing statistics about this program run.  These statistics consist of 


(i) the elapsed real time between invocation and termination,
(ii) the user  CPU time (the sum of the tms_utime and tms_cutime values in a struct tms as returned by times.
(iii) the system CPU time (the sum of the tms_stime and tms_cstime values in a struct tms as returned by times.

real %e
user %U
sys %S

%e - Elapsed real time (in seconds).
%U - Total number of CPU-seconds that the process spent in user mode.
%S - Total number of CPU-seconds that the process spent in kernel mode.

Ex:

[root@nsk-linux ~]# time route -n
Kernel IP routing table
Destination     Gateway         Genmask         Flags Metric Ref    Use Iface
10.0.2.0        0.0.0.0         255.255.255.0   U     1      0        0 eth4
0.0.0.0         10.0.2.2        0.0.0.0         UG    0      0        0 eth4

real    0m0.001s
user    0m0.000s
sys     0m0.001s

[root@nsk-linux ~]# time uptime

 08:34:58 up 57 min,  2 users,  load average: 0.04, 0.12, 0.08

real    0m0.003s
user    0m0.002s
sys     0m0.001s

For more option, please read man time.

Thursday, November 9, 2017

How to find the file in between some days & delete the same?

Thursday, November 09, 2017
Follow the below steps to find out the particular modified file in between 20 to 30 days & delete the same.

Command to find and list the file

#find / -mtime +20 -mtime -30 -type f -name test.* -exec ls -al {} \;   

Command to delete the listed file.

#find / -mtime +20 -mtime -30 -type f -name test.* -exec rm {} \;

As per your needs, change the file name.

Hope it helps.

Monday, November 6, 2017

How to Rebuild initramfs (initrd) on RHEL6?

Monday, November 06, 2017
 The mkinitrd command was used to rebuild the initial ramdisk on prior versions of RHEL . This has been replaced in RHEL6 with dracut.

The equivalent command to rebuild the initramfs for the running kernel on RHEL6 is:
 

$dracut -f /boot/initramfs-$(uname -r).img $(uname -r)

Hope it helps.

Sunday, November 5, 2017

Single command to list the software packages (RPMs) by install date in Linux Server

Sunday, November 05, 2017
Occasionally one needs to get a list of all software packages (rpm's) installed on a RHEL host, sorted by their install date. While there are many ways to do this

# rpm -qa --last


Linvirtshell.com


or

 copy and paste the following scriptlet into a shell command line:

#rpm -qa --queryformat="%{INSTALLTIME} %{NAME}\n" | sort -n | while read rpm_line; do rpm_date=$( date -d @$(echo $rpm_line | awk '{print $1}')); rpm=$( echo $rpm_line | awk '{print $2}'); printf '%-50s %s\n' "$rpm" "$rpm_date"; done

Linvirtshell.com
  
Hope it helps

Friday, November 3, 2017

Changing the Auto logout Timeout in SSH

Friday, November 03, 2017 0

The ssh "timed out waiting for input: auto-logout" messages is generated by ssh upon reaching a auto-logout after an inactivity time specified by the TMOUT environment variable. If this variable is not set your session will not be auto-logged out due to inactivity. If the environment variable is set, your session will be automatically closed/logged out after the amount of seconds specified by the TMOUT variable.


To see if your auto-logout variable is set and/or see what it is set to issue the following command:

[root@localhost ~]# timed out waiting for input: auto-logout

[root@localhost ~]# echo $TMOUT
120


Often this value is defined in /etc/profile (globally) or your user's profile (~/.profile or ~/.bash_profile).


To alter the auto-logout amount, set the TMOUT environment variable accordingly:


* TMOUT=120   #set an auto-logout timeout for  2 minutes

* TMOUT=1200  #set an auto-logout timeout for 20 minutes


* TMOUT=   #turn off auto-logout (user session will not auto-logout due to session inactivity)


This value can be set globally (e.g. TMOUT=1200) in the /etc/profile file; however, each user can override the value by setting the TMOUT variable in their personal profile file (~/.profile or ~/.bash_profile). To do this simply set the TMOUT variable as you like in your profile file.


Dont forget to source the file you changed to get the settings to take effect immediately or log out and log back in.


I hope the article was useful.

Tuesday, October 31, 2017

Different types of Kernel packages in Red Hat Enterprise Linux?

Tuesday, October 31, 2017

Red Hat Enterprise Linux contains the following kernel packages (some may not apply to your architecture, and not all are available in all major releases):

    Kernel - contains the Kernel and following key features:
        Uniprocessor support (will utilize a single processor on multi-processor systems) (RHEL3,4,5)
        Multi-processor support for Intel EM64T systems (RHEL 3 only)
        4GB RAM support on Intel and AMD x86 systems (1)
    Kernel-BOOT contains the installation Kernel (x86 only)  Uniprocessor support
    Kernel-{*-}devel (RHEL 4 and ongoing) - contains kernel header files replaces Kernel-source
    Kernel-debug - contains the same kernel as kernel but with debugging options enabled (RHEL 5 only)
    Kernel-doc - contains kernel documentation previously found in /usr/src/linux{-*}/Documentation
    Kernel-hugemem (i686 only) - in addition to the options of kernel-smp :
        4GB/4GB split - ~4GB of virtual address space for kernel resources and ~4GB for each user processor  Should be utilized on systems/loads where more addressable kernel resources are required including greater than 16GB systems isn't shipped in RHEL5 and above.

    Kernel-kdump (RHEL 6 only; POWER and s390x architectures only) - secondary Kernel for Kernel crash dump capture;
    Kernel-largesmp (RHEL 4 only; 64-bit architectures only) - similar to kernel-smp, but with support for higher numbers of CPU on x86_64, Itanium2 and POWER;
    Kernel-PAE (RHEL 5 only; x86 only) - kernel with support for up to 16 Gb of RAM;
    Kernel-rt-* (Red Hat Enterprise MRG Realtime) - realtime kernels, discussed in the section of the MRG Realtime Installation Guide.
    Kernel-smp - in addition to the options of kernel (not shipped with RHEL6 and above:
        multi-processor support (all architectures)
    Kernel-PAE - Physical Address Extension (Intel x86 only) upto 16GB RAM (2)
    Kernel-pcmcia-cs (RHEL 3 only) - contains support for PCMCIA cards
    Kernel-source (RHEL 3 only) - contains complete source code for the Linux Kernel
    Kernel-utils - contains utilities that can be used to control the kernel or system hardware
    Kernel-xenU - kernel used by paravirtualised guests (RHEL 4.5+)

    Kernel-xen - kernel which runs in Xen VM (RHEL 5 only)
    * for X86 only
    * supports up to 16 Gb of RAM in all installs if the processor allows it.
    * supports a maximum of 16 CPUs
        for AMD64 and Intel 64
            supports up to 1TB of RAM
            on RHEL5.0 and 5.1, supports up to 32 CPUs
            on RHEL5.2 supports up to 64 CPUs
            on RHEL5.3 supports up to 126 CPUs
            on RHEL5.4 and 5.5 supports up to 192 CPUs
        for Intel Itanium
            supports up to 32 CPUs
            
    Kernel-{*-}unsupported (RHEL 3 only/some architectures) - contains modules not supported by Red Hat, Inc. in any SLA  is not installed during installation updates and fixes may not be provided over time

(1) Refer to the Red Hat Enterprise Linux product pages, in particular for other configuration limits.

(2) Kernel-hugemem is required if system memory is greater than 16GB on x86 machines. x86_64 and AMD64 architectures support 64GB and EM64T supports 6GB.

Thursday, October 26, 2017

How to Covert the Time Zone in Linux Server?

Thursday, October 26, 2017 0
Below steps are used to Covert the GMT time zone UTC time zone.

1. Check the current Time zone.

[root@testserver ~]# date
Tue Feb  7 07:51:59 GMT+6 2017

2. List the available Time zone (Check the UTC is abavilable or not)

[root@testserver ~]# ls /usr/share/zoneinfo/Etc/

Linvirtshell.com

3. Copy the UTC Time Zone file to /etc/localtime & run the date command to verify.

[root@testserver ~]# cp /usr/share/zoneinfo/Etc/UTC /etc/localtime
cp: overwrite `/etc/localtime'? y
[root@testserver ~]#
[root@testserver ~]# date -u
Tue Feb  7 13:52:32 UTC 2017
[root@testserver ~]# date
Tue Feb  7 13:52:33 UTC 2017


Some special case (RHEL 6.9), need to update the /etc/sysconfig/clock file as well.

[root@testserver ~]#cat  /etc/sysconfig/clock
ZONE="Asia/Kuala_Lumpur"

Hope it helps

Wednesday, October 25, 2017

How to get the huge files size & name with single command in Linux Server?

Wednesday, October 25, 2017 0

Use the below command to get the huge file size and name.

root@testserver:~# /usr/bin/find / -xdev -type f -size +1024 -ls | awk '{print $7,"",$11}' |sort -m | awk '{print $1/1024/1024,"","MB","",$2}' |sort -rn -k 1

45.284  MB  /var/cache/apt/pkgcache.bin
45.264  MB  /var/cache/apt/srcpkgcache.bin
39.8765  MB  /var/lib/apt/lists/in.archive.ubuntu.com_ubuntu_dists_xenial_universe_binary-amd64_Packages
39.7197  MB  /var/lib/apt/lists/in.archive.ubuntu.com_ubuntu_dists_xenial_universe_binary-i386_Packages
26.518  MB  /var/cache/apt/archives/libpython2.7-dev_2.7.12-1ubuntu0~16.04.1_amd64.deb
24.7127  MB  /usr/lib/x86_64-linux-gnu/libicudata.so.55.1
22.3409  MB  /var/lib/apt/lists/in.archive.ubuntu.com_ubuntu_dists_xenial_universe_i18n_Translation-en
21.4124  MB  /usr/lib/gcc/x86_64-linux-gnu/5/cc1plus
19.9162  MB  /usr/lib/gcc/x86_64-linux-gnu/5/cc1
19.4404  MB  /usr/lib/python2.7/config-x86_64-linux-gnu/libpython2.7.a
19.1068  MB  /usr/lib/gcc/x86_64-linux-gnu/5/lto1
18.8433  MB  /usr/lib/python2.7/config-x86_64-linux-gnu/libpython2.7-pic.a
18.7048  MB  /usr/lib/snapd/snapd
14.6835  MB  /usr/bin/snap

....
...
..
.
Hope it helps.

Saturday, October 21, 2017

How to limit yum so that it lists or installs only Security Updates in Linux Server?

Saturday, October 21, 2017
Install the yum-security plugin

It is now possible to limit yum to install only security updates  using Red Hat Enterprise Linux 5,6, and 7. To do so, simply install the yum-security plugin:

For Red Hat Enterprise Linux 7

The plugin is already a part of yum itself, no need to install anything.

For Red Hat Enterprise Linux 6

# yum install yum-plugin-security

For Red Hat Enterprise Linux 5

# yum install yum-security

Alternatively, download the yum-security package from the Red Hat Network (RHN) and manually install it on the system.

For Red Hat Enterprise Linux 6 and 7

Using yum-security plugin

To list all available erratas without installing them, run:

# yum updateinfo list available

To list all available security updates without installing them, run:

# yum updateinfo list security all
# yum updateinfo list sec


To get a list of the currently installed security updates this command can be used:

# yum updateinfo list security installed

For Red Hat Enterprise Linux 5

Using yum-security plugin

To list all available erratas without installing them, run:

# yum list-sec

To list all available security updates without installing them, run:

# yum list-security --security

For both Red Hat Enterprise Linux 5, 6, and 7

To list all available security updates with verbose descriptions of the issues they apply to:

# yum info-sec

Run the following command to download and apply all available security updates from Red Hat Network hosted or Red Hat  Network Satellite:

# yum -y update --security

NOTE: It will install the last version available of any package with at least one security errata thus can install non-security erratas if they provide a more updated version of the package.

To only install the packages that have a security errata use
# yum update-minimal --security -y

yum-security also allows installing security updates based on the CVE reference of the issue. To install a security update  using a CVE reference run:

# yum update --cve <CVE>

e.g.

# yum update --cve CVE-2008-0947


Viewing available advisories by severities:

# yum updateinfo list

This system is receiving updates from RHN Classic or RHN Satellite.
RHSA-2014:0159 Important/Sec. kernel-headers-2.6.32-431.5.1.el6.x86_64
RHSA-2014:0164 Moderate/Sec.  mysql-5.1.73-3.el6_5.x86_64
RHSA-2014:0164 Moderate/Sec.  mysql-devel-5.1.73-3.el6_5.x86_64
RHSA-2014:0164 Moderate/Sec.  mysql-libs-5.1.73-3.el6_5.x86_64
RHSA-2014:0164 Moderate/Sec.  mysql-server-5.1.73-3.el6_5.x86_64
RHBA-2014:0158 bugfix         nss-sysinit-3.15.3-6.el6_5.x86_64
RHBA-2014:0158 bugfix         nss-tools-3.15.3-6.el6_5.x86_64

If you want to apply only one specific advisory:

# yum update --advisory=RHSA-2014:0159

However, if you would like to know more information about this advisory before to apply it:

# yum updateinfo RHSA-2014:0159

For more commands consult the manual pages of yum-security with

# man yum-security

If you face any missing dependency issue while applying security patches on system then refer to yum update --security fails with missing dependency errors.

Friday, October 20, 2017

How to enable log for chroot sftp users in Linux Server?

Friday, October 20, 2017 0
Follow the below steps to enable logs for chroot sftp users

1. Take the backup of /etc/ssh/sshd_config

2. Add the below settings to sshd_config

Subsystem       sftp   internal-sftp  -f LOCAL6 -l INFO

  Match group sftpgroup
  ChrootDirectory /home/%u
  KbdInteractiveAuthentication no
  PasswordAuthentication no
  AllowTCPForwarding no
  X11Forwarding no
  Subsystem       sftp  internal-sftp -f LOCAL6 -l INFO

Save & Exit the sshd configuration.

3. Take the back of /etc/sysconfig/rsyslog & add the below entry.

SYSLOGD_OPTIONS="-m 0 -a /home/sftpuser/dev/log"

4. Create sftp.log file under /etc/rsyslog.d & add the below entry (This is used for create sockets)

# create additional sockets for the sftp chrooted users
module(load="imuxsock")
input(type="imuxsock" Socket="/path/to/somedirectory/dev/log" CreatePath="on")
input(type="imuxsock" Socket="/path/to/anotherdirectory/dev/log" CreatePath="on")

# log internal-sftp activity to sftp.log
if $programname == 'internal-sftp' then /var/log/sftp/sftp.log
& stop

5. Create dev directory under /home/sftpuser user

6. Now restart both sshd & rsyslog service

7. Now chroot sftp users activity logs are enabled & available under /var/log/sftp/

Hope it helps.

Thursday, October 19, 2017

How to Activate the Logical Volumes on Individual Cluster Member Nodes in a RHEL Cluster?

Thursday, October 19, 2017 0
If you have LVM installed in a cluster environment, you may at times need to activate logical volumes exclusively on one node.

To activate logical volumes exclusively on one node, use the lvchange -aey command. Alternatively, you can use lvchange -aly command to activate logical volumes only on the local node but not exclusively.


You can later activate them on additional nodes concurrently.

Monday, October 16, 2017

How to check the UDP port is listening on Remote host?

Monday, October 16, 2017 0
The nc (or netcat) utility is used for just about anything under the sun involving TCP or UDP.  It can open TCP connections, send UDP packets, lis-ten on arbitrary TCP and UDP ports, do port scanning, and deal with both IPv4 and IPv6.
  
NAME

     nc - arbitrary TCP and UDP connections and listens

[root@nsk-linux ~]# nc -v -u -z -w 3 10.0.2.15 1-1024
Connection to 10.0.2.15 68 port [udp/bootpc] succeeded!
Connection to 10.0.2.15 631 port [udp/ipp] succeeded!


10.0.2.15= Server IP (chane as per your needs)
1-1024    = Range of UDP ports

Saturday, October 14, 2017

How to roll back an update in Linux Server?

Saturday, October 14, 2017 0

Roll back packages by using yum in linux


Downgrading a system to minor version (ex: RHEL6.8 to RHEL6.7) is not recommended as this might leave the system in broken state where libgcc and other libraries won't rollback as expected. Use the history option for small update rollbacks.

Roll back of some package to older version is not supported & it makes server crash or installed application will not work properly.

We can use yum history command to rollback.

Please find the below example.

[root@nsklinux ~]# yum install dovecot

Loaded plugins: fastestmirror, security
Setting up Install Process
Loading mirror speeds from cached hostfile
 * base: mirror.vbctv.in
 * extras: centos-hn.viettelidc.com.vn
 * updates: centos-hn.viettelidc.com.vn
Resolving Dependencies
--> Running transaction check
---> Package dovecot.x86_64 1:2.0.9-22.el6 will be installed
--> Finished Dependency Resolution

Dependencies Resolved


===============================================================

 Package                         Arch       Version           Repository          Size
===============================================================
Installing:                                                             
 dovecot                         x86_64     1:2.0.9-22.el6    base               1.9 M
                                                                        
Transaction Summary                                                     
===============================================================
Install       1 Package(s)

Total download size: 1.9 M

Installed size: 5.7 M
Is this ok [y/N]: y
Downloading Packages:
dovecot-2.0.9-22.el6.x86_64.rpm              | 1.9 MB     00:00
Running rpm_check_debug
Running Transaction Test
Transaction Test Succeeded
Running Transaction
  Installing : 1:dovecot-2.0.9-22.el6.x86_64       1/1
  Verifying  : 1:dovecot-2.0.9-22.el6.x86_64       1/1

Installed:

  dovecot.x86_64 1:2.0.9-22.el6

Complete!

[root@nsklinux ~]#
[root@nsklinux ~]#


[root@nsklinux ~]# yum history

Loaded plugins: fastestmirror, security
ID     | Login user               | Date and time    | Action(s)      | Altered
-------------------------------------------------------------------------------
     5 | root <root>              | 2017-10-14 08:01 | Install        |    1
     4 | root <root>              | 2017-10-14 07:52 | I, O, U       |  506 EE
     3 | root <root>              | 2017-10-14 07:27 | Update      |    2
     2 | root <root>              | 2017-10-14 07:17 | I, O            |     3
     1 | System <unset>      | 2017-10-14 07:07 | Install        |  610
history list


[root@nsklinux ~]# yum history undo 5

Loaded plugins: fastestmirror, security
Undoing transaction 5, from Sat Oct 14 08:01:55 2017
    Install dovecot-1:2.0.9-22.el6.x86_64 @base
Resolving Dependencies
--> Running transaction check
---> Package dovecot.x86_64 1:2.0.9-22.el6 will be erased
--> Finished Dependency Resolution

Dependencies Resolved


=============================================================

 Package                       Arch         Version           Repository    Size
=============================================================
Removing:                                                               
 dovecot                       x86_64       1:2.0.9-22.el6    @base        5.7 M
                                                                        
Transaction Summary                                                     
=============================================================
Remove        1 Package(s)

Installed size: 5.7 M

Is this ok [y/N]: y
Downloading Packages:
Running rpm_check_debug
Running Transaction Test
Transaction Test Succeeded
Running Transaction
  Erasing    : 1:dovecot-2.0.9-22.el6.x86_64      1/1
  Verifying  : 1:dovecot-2.0.9-22.el6.x86_64     1/1

Removed:

  dovecot.x86_64 1:2.0.9-22.el6

Complete!

[root@nsklinux ~]# rpm -qa | grep -i dovecot
[root@nsklinux ~]#

Linux NFS share on Windows 2012 server & Visible for all Windows user

Saturday, October 14, 2017 0

Linux NFS share on Windows 2012 server & Visible for all Windows user

Normally Linux - Linux, we can easily mount the NFS share. But mounting Linux NFS share on Windows server need to follow below steps & Also that share should be visible on all Windows user.

Situation :
NFS Server : Linux Server
NFS Client : Windows2012 server
NFS Share name : u01
Windows mount drive : Z


The following steps are for Windows 2012 Server.

1.  Ensure that you are logged into the Windows server as an administrator.
2.  Start the command console as the administrator (Click Start > All Programs >  Accessories > Windows Powershell or Command Prompt)
3.  Right-click the Windows Powershell or Command Prompt, and select Run as administrator.
4.  Run the following command to install FS-NFS-Services:
5.  servermanagercmd.exe -install FS-NFS-Services or follow below GUI
6.  Note: To Windows Server 2012 Datacenter/Standard/Essentials Edition, you can run the command through

powerscript:

    Import-Module ServerManager
    Install-WindowsFeature -Name FS-NFS-Service
    Install-WindowsFeature NFS-Client

Linvirtshell.com


In GUI

a.  Run servermanager.exe.
b.  From the Add Roles and Features Wizard, under Server Roles, select File and Storage Services if it has not been installed.
c.  Under File and iSCSI Services, select File Server and Server for NFS. Click Add Features to select Client for NFS.

7.  Run
    nfsadmin client stop

Linvirtshell.com


8.  Open Regedit and navigate to the following branch:
    HKEY_LOCAL_MACHINE\SOFTWARE\Microsoft\ClientForNFS\CurrentVersion\Default
9.  In the main window, right-click and select New > DWORD 32-bit Value. Set the name as AnonymousGID.
10. Right-click and select New > DWORD 32-bit Value again. Set the name as AnonymousUID.
11. Double-click on AnonymousGID and AnonymousUID, set the value as 0 and the base as Decimal respectively.  


Linvirtshell.com


Click OK.
Close Regedit.

12. In the command prompt, run:
    nfsadmin client start

Linvirtshell.com


13. Close the Windows Powershell Console.
14. Open a command prompt.
15. Run the following command in a command prompt (not Powershell) to set the NFS configuration:
    nfsadmin client localhost config fileaccess=755 SecFlavors=+sys -krb5 -krb5i

Linvirtshell.com


16. Run the following commands to mount the share:
    mount -o mtype=soft retry=10 timeout=6 casesensitive=yes anon nfsservername:/u01  Z:

Linvirtshell.com


Linvirtshell.com


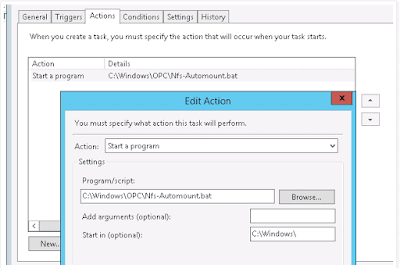
Mount the share automatically with windows restart


1. Create a batch file, for example, c:\windows\OPC\Autonfsmount.bat, and type:
    mount -o mtype=soft retry=10 timeout=6 casesensitive=yes anon nfsservername:/u01 Z:
2. Click Start > Administrative Tools > Task Scheduler.
3. Click Create Task in Task Scheduler (Local).
4. Click General, and type nfs_auto_mount for Name. In Security options, click Change User or Group > Advanced > Find Now, and select SYSTEM. Select Run whether user

    is logged on or not Select, along with Do not store password, and then select Run with highest privileges. Finally click OK.    
 
Linvirtshell.com


5. Click Triggers > New, select At startup for Begin the task. Click OK

Linvirtshell.com


 6. Click Actions > New > Browse, select c:\windows\OPC\Autonfsmount.bat and click OK

Linvirtshell.com


Linvirtshell.com


7. Click OK

8. Restart the machine.
9. The client mounted points will be displayed in Windows explorer as Disconnected Network drivers, and this is the expected normal status. This will ensure the scheduled task is working, as well as causing the drives to be mounted as SYSTEM, which is necessary for the install procedure.

Hope it helps