This Blog is to share our knowledge and expertise on Linux System Administration and VMware Administration

Tuesday, December 29, 2015

Remediating an ESXi 5.x and 6.0 host with Update Manager fails with the error: There was an error checking file system on altbootbank

Tuesday, December 29, 2015 0
Whenever you find below Symptoms

You cannot remediate an ESXi 5.x and 6.0 host.
Remediation of an ESXi 5.x and 6.0 host using vCenter Update Manager fails.
You see the error:


The host returns esxupdate error code:15. The package manager transaction is not successful. Check the Update Manager log files and esxupdate log files for more details

In the /var/log/esxupdate.log file, you see entries similar to:

esxupdate: esxupdate: ERROR: InstallationError: ('', 'There was an error checking file system on altbootbank, please see log for detail.')

Then Resolution would be as follows

To resolve the issue, repair the altbootbank partition.

To repair the altbootbank partition:

    Run this command to determine the device for /altbootbank:

    vmkfstools -P /altbootbank

    You see output similar to:

mpx.vmhba32:C0:T0:L0:5


Run this command to repair the altbootbank filesystem:

dosfsck -a -w /dev/disks/device_name
   
#dosfsck -a -w /dev/disks/mpx.vmhba32:C0:T0:L0:5 


 If remediation fails at this stage, reboot the host.

Esxupdate error code:15. The package manager transaction is not successful error While Remediating an ESXi 5.x or 6.0 host

Tuesday, December 29, 2015 2
Whenever - You cannot remediate an ESXi 5.x or 6.0 host using vCenter Update Manager.

 Remediating ESXi 5.x or 6.0 hosts fails.


 A package is to be updated on the host, particularly when VMware_locker_tools-light* is corrupt.  


error code:15. The package manager transaction is not successful. Check the Update Manager log files and esxupdate log files for more details.

To resolve this issue

 Recreate the/locker/packages/version/ folder, where version is:
        ESXi 5.0 – /locker/packages/5.0.0/
        ESXi 5.1 – /locker/packages/5.1.0/
        ESXi 5.5 – /locker/packages/5.5.0/
        ESXi 6.0 – /locker/packages/6.0.0/

To verify the store folders contents and symbolic link:

 Connect to the ESXi host using an SSH session.
 Check for information in the /store folder by running this command:
        ls /store

This folder must contain packages and var folder.
Run this command to verify that the symbolic link is valid:
        ls -l /

The /store folder should be linked to /locker and appear as:
        locker  -> /store

If that link is not displayed, run this command to add the symbolic link:
        ln -s /store /locker

To recreate the/locker/packages/version/ folder:
 Put the host in the maintenance mode.
 Navigate to the /locker/packages/version/ folder on the host.
 Rename /locker/packages/version/ folder to /locker/packages/version.old.
 Remediate the host using Update Manager.

The /locker/packages/version/ folder is recreated and the remediation should now be successful.
 Note: Verify if you can change to the other folders in /locker/packages/version/. If not, rename all the three folders including floppies.

An alternative resolution for ESXi:
Put the host in the maintenance mode.
Navigate to the /locker/packages/version/ folder on the host.
Rename the folder to:
       /locker/packages/ version.old

Run this command as the root user to recreate the folder:
       mkdir / locker/packages/ version/

For ex:

In ESXi 5.0:
        mkdir / locker/packages/5.0.0/

In ESXi 5.1:
        mkdir / locker/packages/5.1.0/

 In ESXi 5.5:
        mkdir / locker/packages/5.5.0/

In ESXi 6.0:
        mkdir / locker/packages/6.0.0/


Use WinSCP to copy the folders and files from the / locker/packages/ version/ directory on a working host to the affected host.


If the preceding methods do not resolve the issue:
Verify and ensure that there is sufficient free space on root folder by running this command:
        vdf -h

Check the locker location by running this command:
        ls -ltr /

If the locker is not pointing to a datastore:
Rename the old locker file by running this command:
        mv /locker /locker.old

Recreate the symbolic link by running this command:
        ln -s /store /locker

Monday, December 28, 2015

Configuring Network Time Protocol (NTP) on ESX/ESXi hosts using the vSphere Client

Monday, December 28, 2015 0
This Blog  provides steps to enable Network Time Protocol  (NTP) on an ESX/ESXi host using the vSphere Client.

To configure NTP on ESX/ESXi 4.1 and ESXi 5.x hosts using the vSphere Client:

  • Connect to the ESX/ESXi host using the vSphere Client.
  • Select a host in the inventory.
  • Click the Configuration tab.

  • Click Time Configuration.
  • Click Properties.
  • Click Options.


  • Click NTP Settings.
  • Click Add.
  • Enter the NTP Server name. For example, pool.ntp.org.
    Note: When entering the multiple NTP Server names, use a comma (,) followed by a space ( ) between the entries.
  • Click OK.


  • Click the General tab.
  • Click Start automatically under Startup Policy.
    Note: It is recommended to set the time manually prior to starting the service.
  • Click Start and click OK.
  • Click OK to exit.

Monday, December 21, 2015

Install/Upgrade VMware Tools by Supressing Reboot

Monday, December 21, 2015 0
Using the vSphere Client

To update VMware Tools is via the vSphere Client. It’s simple and straightforward.

    Right click on a VM in the vSphere Client
    Choose Guest
    Choose Install/Upgrade VMware Tools

You will be prompted to choose how you would like the upgrade to take place, either Interactively or Automatically. Along with the Automatic option comes the ability to enter some arguments, listed as “advanced options” in the GUI, that will be passed to the install.


Upgrade VMware Tools without reboot

Monday, December 21, 2015 0
Upgrade VMware Tools, selected virtual machine:

Get-Cluster "Productie" | Get-VM "vmname" | Update-Tools –NoReboot

Get VMware-Tools versions:

Get-View -ViewType VirtualMachine | select Name, @{ Name=”ToolsVersion”;

Expression={$_.config.tools.toolsVersion}}

Troubleshooting Syslog Collector in VMWare vsphere

Monday, December 21, 2015 0
Whenever syslog files aren’t updating  in the repository from he vSphere Syslog Collector server.


Here are some basic steps that can be used to troubleshoot this problem.
VMware ESXi hosts

On the VMware ESXi hosts check the following settings:
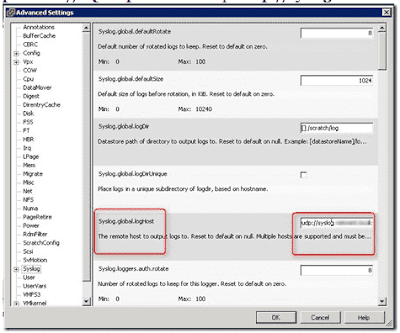
– Syslog destination. Open the vSphere Client. On the ESXi server, open the configuration tab and select advanced Settings. Check the Syslog.global.logHost value. The format is: protocol://FQDN:port . For example udp://syslog.beerens.local:514


– Is the ESXi firewall port open for syslog traffic. Open the vSphere Client, on the ESXi server, open the Configuration tab, select Security Profile, Firewall and select Properties. Check if the syslog service is enabled.


 vSphere Syslog Collector
On the vSphere Syslog Collector server check the following settings:
– Is the syslog port 514 (default) listening:


-  Reload and update the syslog configuration.  On the ESXi host use the following command:
esxcli system syslog reload
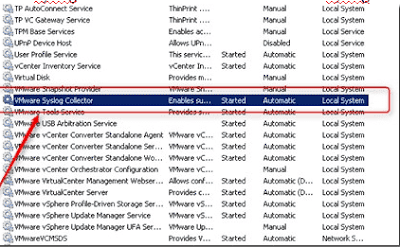
– Is the Syslog Collector service started. Restart the Syslog Collector service if needed 


After the reloading the syslog settings and restarting the Syslog Collector service the files begun to update again in the repository.

How to Enable Execute Disable/No Execute CPU feature at ESXI

Monday, December 21, 2015 0

ESXi requires the Execute Disable/No Execute CPU feature to be enabled

Restart the host, enter in(press F9) to boot in BIOS mode.

Advanced Options --> Processor Options --> No-Execute Memory Protection, then configure: Enabled


image


Hope it helps.