This Blog is to share our knowledge and expertise on Linux System Administration and VMware Administration

Showing posts with label VMware. Show all posts

Friday, November 24, 2017

Update or Recover root password using Host Profiles VMware

Friday, November 24, 2017 0
VMware Update or Recover root password using Host Profiles.
Create the Host Profile


1. Right click any host in your inventory (it doesn’t matter which), choose Host Profile, then Create Profile from Host.
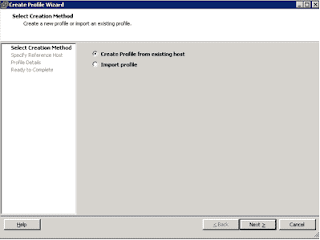

2. Name the Host Profile and give it a description. Click Next.
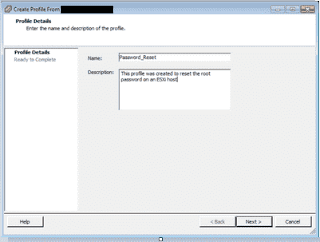
3. Click Finish to create the Host Profile.
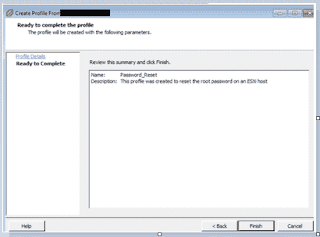
Configure the Host Profile
I. Open Host Profiles.


II. Right-click the Host Profile and choose Edit Profile.
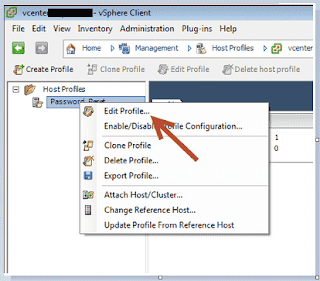
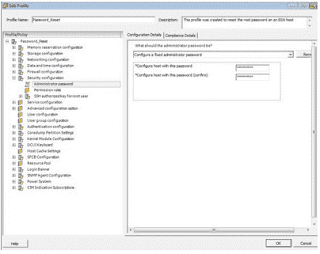
III. Expand Security Configuration, choose Administrator password
    Choose Configure a fixed administrator password, type in the password twice, then click OK.

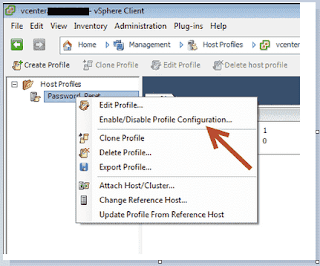
IV. Right-click the Host Profile and choose Enable/Disable Profile Configuration.
V. Uncheck everything in the Host Profile configuration except the Security Configuration, click OK.

a. Apply the Host Profile to the ESXi Host (or vSphere Cluster)
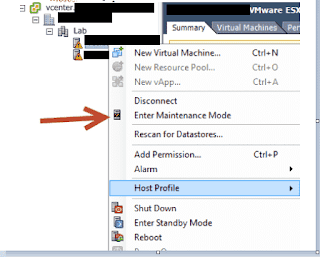
b. Right click any host in your inventory, choose Host Profile, then Manage Profile.

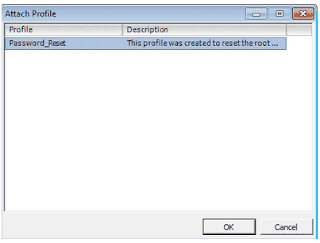
c. Choose the Password_Reset Host Profile, click OK.
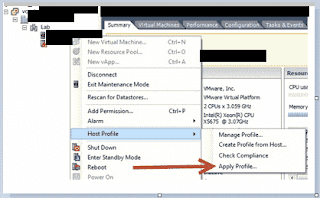
d. Right click any host in your inventory, choose Host Profile, then Apply Profile.
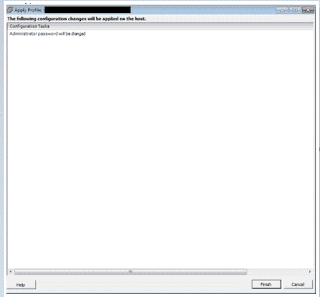
e. Recheck the changes to be applied, click Finish
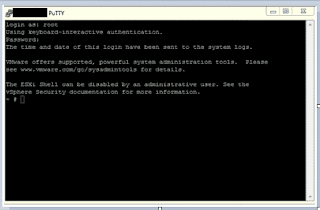
Log In
     Log in with the new password. If the setting has been changed successfully, you should be able to log in with the new password immediately.

Sunday, November 12, 2017

Performance collection tools to gather data for fault analysis in VMware

Sunday, November 12, 2017
This article explains how to use performance collection tools to gather data for analysis of faults such as:
    Unresponsive ESX hosts
    Unresponsive virtual machines
    ESX host purple diagnostic screens

Why gather performance data for a fault?

If the diagnostic logs do not help you determine the cause of a fault, you may need to use performance collection tools to gather further data for analysis. Set up performance collections tools to gather data about faults that may occur.

Performance gathering tools

VMware recommends the following tools for gathering performance data: 

top
The top utility provides a list of CPU-intensive tasks for the ESX host Service Console.
Use top in batch mode for Fault troubleshooting by directing the output to a file so that it can be reviewed after a recurrence.


Note: The top command is not available for ESXi.
To run the top utility, run the command:


# top –bc –d <delay in seconds> [–n <iterations>] > output-perf-stats-file.txt

 
Use the information in the output file to identify any trends before the fault. 


esxtop
The esxtop tool provides performance statistics for the entire ESX/ESXi host. It provides details of network, storage, CPU, and memory load from the VMkernel perspective. It provides details on a VMkernel world basis.
esxtop
To collect the data over long periods of time, run esxtop in batch mode. Direct the output to a file so that it can be reviewed after the fault.


To run the esxtop tool, run the command:


# esxtop –b –d <delay in seconds> [-n <iterations>] > output-perf-statistics-file.csv

 
Like esxtop, the resxtop tool provides performance statistics for a specified ESX host in the network. It provides the same performance information as esxtop and may be used either after deploying the VMware vSphere Management Assistant (vMA) virtual appliance or installing the VMware Command-Line Interface (vCLI). 


To run the resxtop tool and collect batch performance data, log into the vMA or open the vCLI, and execute the command:


# resxtop [server] [vihost] [portnumber] [username] -b -d <delay in seconds> [-n <interations>] > output-perf-statistics-file.csv


vm-support -s

 
Use the vm-support command with the -s parameter to collect performance statistics, system configuration information, and logging. Submit the file generated by this command to VMware Support for further assistance, if required. 


Performance Monitor (PERFMON.EXE)

 
Microsoft's Performance Monitor is a utility that comes with every Microsoft Windows NT-based Operating System. This utility can be used to monitor local and remote Microsoft Windows machines. It can log performance data and display data from logs or real-time data.


This utility is useful when reviewing data collected from the esxtop tool and for troubleshooting virtual machine unresponsiveness. When using Performance Monitor for virtual machine unresponsiveness, collect the data remotely from another Microsoft Windows machine so that the utility does not affect the data being gathered.
For more information about Performance Monitor on your specific version of Windows, refer to Microsoft support sites.

Thursday, November 9, 2017

Default Queue Depth values for QLogic HBAs for various ESXi/ESX versions

Thursday, November 09, 2017
This table lists the default Queue Depth values for QLogic HBAs for various ESXi/ESX versions:


The default Queue Depth value for Emulex adapters has not changed for all versions of ESXi/ESX released to date. The Queue Depth is 32 by default, and because 2 buffers are reserved, 30 are available for I/O data.

The default Queue Depth value for Brocade adapters is 32.

Wednesday, November 1, 2017

Extracting the log file after an ESX or ESXi host fails with a purple screen error

Wednesday, November 01, 2017 0
To resolve this issue, extract the log file from a vmkernel-zdump file using a command line utility on the ESX or ESXi host. This utility differs for different versions of ESX or ESXi.
  • For ESX 3.x use the vmkdump utility:

    # vmkdump -l vmkernel-zdump-filename
  • For ESXi 3.5, ESXi/ESX 4.x and ESXi 5.x, use the esxcfg-dumppart utility:

    # esxcfg-dumppart -L vmkernel-zdump-filename
To extract the log file from a vmkernel-zdump file:
  1. Find the vmkernel-zdump file in the /root/ or /var/core/ directory:

    # ls /root/vmkernel* /var/core/vmkernel*
    /var/core/vmkernel-zdump-073108.09.16.1
  2. Use the vmkdump or esxcfg-dumppart utility to extract the log. For example:

    # vmkdump -l /var/core/vmkernel-zdump-073108.09.16.1
    created file vmkernel-log.1


    # esxcfg-dumppart -L /var/core/vmkernel-zdump-073108.09.16.1
    created file vmkernel-log.1
  3. The vmkernel-log.1 file is plain text, though may start with null characters. Focus on the end of the log, which is similar to:

    VMware ESX Server [Releasebuild-98103]
    PCPU 1 locked up. Failed to ack TLB invalidate.
    frame=0x3a37d98 ip=0x625e94 cr2=0x0 cr3=0x40c66000 cr4=0x16c
    es=0xffffffff ds=0xffffffff fs=0xffffffff gs=0xffffffff
    eax=0xffffffff ebx=0xffffffff ecx=0xffffffff edx=0xffffffff

    ...
  4. For troubleshooting the cause of the purple diagnostic screen, see Vmware articles.
Note: The file name created for the log in this example is vmkernel-log.1. If another file with the same name already exists, the new file is created with the number suffix incremented.

How to collect Diagnostic information for VMware Data Protection?

Wednesday, November 01, 2017 0


Purpose
VMware Technical Support routinely requests diagnostic information from you when a support request is handled. This diagnostic information contains product specific logs and configuration files from the host on which the product is run. The information is gathered using a specific script or tool for each product.

This article provides procedures for obtaining diagnostic information for VMware Data Protection (VDP)..
Resolution
To gather the VDP 5.1 logs:
  1. Open a supported browser and type:

    https://IP_addressVDP_Appliance:8543/vdp-configure/
  2. Log in with the VDP user name and password.
  3. Click the Status tab.
  4. In the Log Collector section, click Collect logs. A Save as dialogue appears that allows you to download the log bundle to the file system of the machine in which your web browser is running. The default location is the current download directory of your browser.
Note: By default the log bundle is named as LogBundle.zip, but ensure to give a unique name.
To gather the VDP 5.5.x logs:
  1. Open a web browser and type:

    https://IP_address_VDP_Appliance:8543/vdp-configure/
  2. Log in with the VDP user name and password.
  3. Click the Status tab.
  4. Depending on the type of log information you want to collect, download one of these files:
    • Log bundle:
      • Click Collect all logs to download a zip file that contains all logs from VDP services. A Save as dialog appears that allows you to download the log bundle to the file system of the machine in which your web browser is running. The default location is the current download directory of your browser.

        Note: By default, the log bundle is named as
        LogBundle.zip, but ensure to give a unique name.
    • Client logs:
      • Click Collect client logs to download an aggregated text file that contains all client failure logs.
To gather the VDP 5.8 logs:
  1. Open a web browser and type:

    https://IP_address_VDP_Appliance:8543/vdp-configure/
  2. Log in with the VDP user name and password.
  3. Click the Log collector tab.
  4. Depending on the type of log information you want to collect, download one of these files:
    • Log bundle:
      • Click All VDP Appliance logs to download a zip file that contains all logs from VDP services. A Save as dialog appears that allows you to download the log bundle to the file system of the machine in which your web browser is running. The default location is the current download directory of your browser.

        Note: By default, the log bundle is named
        LogBundle.zip, but ensure to give a unique name.
    • Client logs:
      • Click Collect client logs to download an aggregated text file that contains all client failure logs.
    • External proxy logs:
      • Click Collect external proxy logs to download an aggregated .zip file that contains all external proxy logs.

To gather the VDP 6.0 logs:
  1. Open a web browser and type:

    https://IP_address_VDP_Appliance:8543/vdp-configure/
  2. Log in with the VDP username and password.
  3. Click the Log Collector tab.
  4. Select one or more checkboxes to download log files:
    • To download all log files to a zip file, select All VDP Appliance Logs and click Download to save all log files from VDP services to a .zip file.
      The Select location for download dialog box appears.By default, the log bundle is named
      LogBundle.zip. Rename the file to a unique name.
    • To download all logs under a specific heading, select a checkbox next to a heading, and then click Download:
      • Core VDP Service
      • Management Service
      • File System Service
      • File Level Restore Service
      • Replication
      • Image Backup and Restore
    • To download log files listed under multiple headings, select the checkbox next to one of more log files, and then click Download.
    • In the Client Logs group box, click Download to download an aggregated text file which contains all client failure logs.
    • In the Configurations group box, click Download to download only VDP configuration file information.

Thursday, October 19, 2017

How to Power on a virtual machine from the command line?

Thursday, October 19, 2017 0
ESXi 4.x, 5.x and 6.0

To power on a virtual machine from the command line:

    List the inventory ID of the virtual machine with the command:

    vim-cmd vmsvc/getallvms |grep <vm name>Note: The first column of the output shows the vmid.   

    Check the power state of the virtual machine with the command:

    vim-cmd vmsvc/power.getstate <vmid>   

    Power-on the virtual machine with the command:

    vim-cmd vmsvc/power.on <vmid>


ESX 4.0 and ESX 4.1

To power on a virtual machine from the command line:

    To list the path of all the virtual machines on the host:

    vmware-cmd -l   

    Get the state of the virtual machine with the command:

    vmware-cmd <path to the VMX file> getstate

    Power on the virtual machine with the command:

    vmware-cmd <path to the VMX file> start

ESXi 3.5

To power on a virtual machine from the command line:

    List the inventory ID of the virtual machine with the command:

    vim-cmd vmsvc/getallvms |grep <vm name>

    Check the power state of the virtual machine with the command:

    vim-cmd vmsvc/power.getstate <vmid>

    Power on the virtual machine with the command:

    vim-cmd vmsvc/power.on <vmid>

ESX 3.5
To power on a virtual machine from the command line:

    To list the path of all the virtual machines on the host:

    vmware-cmd -l

    Get the state of the virtual machine with the command:

    vmware-cmd <path to the VMX file> getstate

    Power on the virtual machine with the command:

    vmware-cmd <path to the VMX file> start

Wednesday, October 18, 2017

How to solve "Cannot vMotion virtual machines with physical mode RDM"

Wednesday, October 18, 2017 0

1.  Open the vSphere PowerCLI command-line.

2.  Run the command:

Get-VM | Get-HardDisk -DiskType "RawPhysical","RawVirtual" | Select Parent,Name,DiskType,ScsiCanonicalName,DeviceName | fl

This command produces a list of virtual machines with RDMs, along with the backing SCSI device for the RDMs.

    An output looks similar to:

    Parent              Virtual Machine Display Name
    Name                Hard Disk n
    DiskType            RawVirtual
    ScsiCanonicalNamenaa.60123456789abcdef0123456789abcde
    DeviceName            vml.020000000060123456789abcdef0123456789abcde1234567890ab

    If you need to save the output to a file the command can be modified:

Get-VM | Get-HardDisk -DiskType "RawPhysical","RawVirtual" | Select Parent,Name,DiskType,ScsiCanonicalName,DeviceName | fl | Out-File –FilePath RDM-list.txt
    
  3.  Identify the backing SCSI device from either the ScsiCanonicalName or DeviceName identifiers.

How to Identify Raw Device Mappings (RDMs) using the vSphere Client?

Wednesday, October 18, 2017 0

To identify RDMs using the vSphere Client:

1. Connect to vCenter Server or a host using the vSphere Client.
2. Select a virtual machine in the inventory.
3. Right-click the virtual machine and click Edit Settings.
4. Select each hard disk in the Virtual Hardware list with a summary Mapped Raw LUN. The path to the RDM virtual disk mapping file and the name of the backing SCSI device are listed.

Tuesday, October 17, 2017

How to check the vMotion Count by using PowerCLI

Tuesday, October 17, 2017 0

Below script can help you to get the count of all vMotion events that has happened in the past 24 hrs.

If you want to calculate the count for longer period then change the number AddDays.

Get-VIEvent -Entity (Get-VM -Location $_) -MaxSamples ([int]::MaxValue) -Start (Get-Date).AddDays(-1) |Where { $_.GetType().Name -eq “TaskEvent” -and $_.Info.DescriptionId -eq “VirtualMachine.migrate”} | Measure-Object | Select-Object -ExpandProperty Count

Monday, October 16, 2017

Brief explai about - Modes in esxtop - Vmware

Monday, October 16, 2017 0
ESXTOP

ESXTOP is the utility only for ESX host to examine real-time resource usage for ESX and resxtop for ESX & ESXi hosts.esxtop can only be used for the local ESX machine but resxtop can be used remotely to view the resource utilization of ESX/ESXi hosts from other ESX/ESXi servers or VMA.

There are 3 different types of Modes in esxtop/resxtop

Interactive Mode

Batch Mode

Replay Mode.

Interactive mode (the default mode) – All statistics are displayed  are in real time

Batch mode – Statistics can be collected so that the output can be saved in a file (csv) and can be viewed & analyzed using windows perfmon & other tools in later time.

Replay mode – It is similar to record and replay operation. Data that was collected by the vm-support command is interpreted and played back as esxtop statistics. We can view the captured performance information for a particular duration or time period as like real time to view what was happening during that time. It is perfectly used for the VMware support person to replay the stats to understand what was happening to the server during that time.


Thanks for reading!!!!


VMware Tools Installation for Linux Guests with the RPM installer and with the Tar Installer

Monday, October 16, 2017 0

TO INSTALL VMWARE TOOLS FROM X WITH THE RPM INSTALLER:

1. Choose VM > Install VMware Tools.

The guest operating system mounts the VMware Tools installation virtual CD.

2. Double-click the VMware Tools CD icon on the desktop.

Note: In some Linux distributions, the VMware Tools CD icon may fail to appear when you install VMware Tools within an X windows session on a guest. In this case, you should continue installing VMware Tools as described in Installing VMware Tools from the Command Line with the Tar Installer, beginning with step 3.

3. Double-click the RPM installer in the root of the CD-ROM.

4. Enter the root password.

5. Click Continue.

The installer prepares the packages.

6. Click Continue when the installer presents a dialog box saying Completed System Preparation.

A dialog appears for Updating system, with a progress bar. When the installer is done, VMware Tools are installed. There is no confirmation or finish button.

7. In an X terminal, as root (su -), configure VMware Tools.

vmware-config-tools.pl

Respond to the questions the installer displays on the screen. Press Enter to accept the default value.

Note: Be sure to respond yes when the installer offers to run the configuration program.

8. Launch the VMware Tools background application:

vmware-toolbox &

Note: Some guest operating systems require a reboot for full functionality.

INSTALLING VMWARE TOOLS FROM THE COMMAND LINE WITH THE TAR INSTALLER:


The first steps are performed on the host, within Workstation menus:

1. Power on the virtual machine.

2. After the guest operating system has started, prepare your virtual machine to install VMware Tools.

Choose VM > Install VMware Tools.

The remaining steps take place inside the virtual machine.

3. As root (su -), mount the VMware Tools virtual CD-ROM image, change to a working directory (for example, /tmp), uncompress the installer, then unmount the CD-ROM image.

Note: Some Linux distributions automatically mount CD-ROMs. If your distribution uses automounting, do not use the mount and umount commands below. You still must untar the VMware Tools installer to /tmp.

Some Linux distributions use different device names or organize the /dev directory differently. If your CD-ROM drive is not /dev/cdrom or if the mount point for a CD-ROM is not /mnt/cdrom, you must modify the following commands to reflect the conventions used by your distribution.

mount /dev/cdrom /mnt/cdrom

cd /tmp

Note: If you have a previous installation, delete the previous vmware-distrib directory before installing. The default location of this directory is

/tmp/vmware-tools-distrib.

4. Untar the VMware Tools tar file:

tar zxf /mnt/cdrom/VMwareTools-5.0.0-<xxxx>.tar.gz

umount /dev/cdrom

Where <xxxx> is the build/revision number of the VMware Workstation release.

Note: If you attempt to install a tar installation over an rpm installation — or the reverse — the installer detects the previous installation and must convert the installer database format before continuing.

5. Run the .tar VMware Tools installer:

cd vmware-tools-distrib

./vmware-install.pl

Respond to the configuration questions on the screen. Press Enter to accept the default value.

6. Log off of the root account.

exit

7. Start X and your graphical environment.

8. In an X terminal, launch the VMware Tools background application.

vmware-toolbox &

Note: You may run VMware Tools as root or as a normal user. To shrink virtual disks, you must run VMware Tools as root (su -).

INSTALLING VMWARE TOOLS FROM THE COMMAND LINE WITH THE RPM INSTALLER:

 The first steps are performed on the host, within Workstation menus:

1. Power on the virtual machine.

2. After the guest operating system has started, prepare your virtual machine to install VMware Tools.

Choose VM > Install VMware Tools.

The remaining steps take place inside the virtual machine.

3. As root (su -), mount the VMware Tools virtual CD-ROM image, change to a working directory (for example, /tmp), uncompress the installer, then unmount the CD-ROM image.

Note: Some Linux distributions automatically mount CD-ROMs. If your distribution uses automounting, do not use the mount and umount commands below. You still must untar the VMware Tools installer to /tmp.

Some Linux distributions use different device names or organize the /dev directory differently. If your CD-ROM drive is not /dev/cdrom or if the mount point for a CD-ROM is not /mnt/cdrom, you must modify the following commands to reflect the conventions used by your distribution.

mount /dev/cdrom /mnt/cdrom

cd /tmp

Note: If you have a previous installation, delete the previous vmware-distrib directory before installing. The default location of this directory is

/tmp/vmware-tools-distrib.

4. At the command prompt, enter:

rpm -Uhv /mnt/cdrom/VMwareTools-5.0.0-<xxxx>.i386.rpm

umount /dev/cdrom

Where <xxxx> is the build/revision number of the VMware Workstation release.

Note: If you attempt to install an rpm installation over a tar installation — or the reverse — the installer detects the previous installation and must convert the installer database format before continuing.

5. Configure VMware Tools:

vmware-config-tools.pl

Respond to the questions the installer displays on the screen. Press Enter to accept the default value.

6. Log off of the root account.

exit

7. Start X and your graphical environment.

8. In an X terminal, launch the VMware Tools background application.

vmware-toolbox &

Note: You may run VMware Tools as root or as a normal user. To shrink virtual disks, you must run VMware Tools as root (su -).

STARTING VMWARE TOOLS AUTOMATICALLY

You may find it helpful to configure your guest operating system so VMware Tools starts when you start your X server. The steps for doing so vary depending on your Linux distribution and your desktop environment. Check your operating system documentation for the appropriate steps to take.

For example, in a Red Hat Linux 7.1 guest using GNOME, follow these steps.

1. Open the Startup Programs panel in the GNOME Control Center.

Main Menu (click the foot icon in the lower left corner of the screen) > Programs > Settings > Session > Startup Programs

2. Click Add.

3. In the Startup Command field, enter vmware-toolbox.

4. Click OK, click OK again, then close the GNOME Control Center.

The next time you start X, VMware Tools starts automatically.

UNINSTALLING VMWARE TOOLS

To remove VMware Tools from your Linux guest operating system, log on as root (su -) and enter the following command:


From a tar install

vmware-uninstall-tools.pl


From an RPM install

rpm -e VMwareTools

Saturday, September 16, 2017

List all orphaned vmdk on all datastores in all VC's at a time by using script

Saturday, September 16, 2017 0
Use the below script to achieve :

# Just paste the code in text file and rename with .ps1
# Purpose : List all orphaned vmdk on all datastores in all VC's
#Here fwvc950","fwvc951","fwvc952","flsan01 are my vcentrer

$arrayVC = "fwvc950","fwvc951","fwvc952","flsan01"
$OutputFile = "C:\OrphanedVMDK.txt"

Foreach ($strVC in $arrayVC)

{
    Connect-VIServer $strVC
    $arrUsedDisks = Get-VM | Get-HardDisk | %{$_.filename}
    $arrDS = Get-Datastore
    Foreach ($strDatastore in $arrDS)
    {
       $strDatastoreName = $strDatastore.name
       Write-Host $strDatastoreName
       $ds = Get-Datastore -Name $strDatastoreName | %{Get-View $_.Id}
       $fileQueryFlags = New-Object VMware.Vim.FileQueryFlags
       $fileQueryFlags.FileSize = $true
       $fileQueryFlags.FileType = $true
       $fileQueryFlags.Modification = $true
       $searchSpec = New-Object VMware.Vim.HostDatastoreBrowserSearchSpec
       $searchSpec.details = $fileQueryFlags
       $searchSpec.sortFoldersFirst = $true
       $dsBrowser = Get-View $ds.browser
       $rootPath = "["+$ds.summary.Name+"]"
       $searchResult = $dsBrowser.SearchDatastoreSubFolders($rootPath, $searchSpec)
       $myCol = @()
       foreach ($folder in $searchResult)
       {
          foreach ($fileResult in $folder.File)
          {
             $file = "" | select Name, FullPath   

             $file.Name = $fileResult.Path

             $strFilename = $file.Name

             IF ($strFilename)

             {

             IF ($strFilename.Contains(".vmdk"))

             {

             IF (!$strFilename.Contains("-flat.vmdk"))

             {

             IF (!$strFilename.Contains("delta.vmdk"))         

             {

                $strCheckfile = "*"+$file.Name+"*"

             IF ($arrUsedDisks -Like $strCheckfile){}

             ELSE

             {            

             $strOutput = $strDatastoreName + " Orphaned VMDK Found: " + $strFilename

             $strOutput | Out-File $Outputfile -width 150 -Append

             }            

             }

             }         

             }

             }

          }

       }      

   }  

}