This Blog is to share our knowledge and expertise on Linux System Administration and VMware Administration

Wednesday, September 6, 2017

How to change the root password for all esxi hosts in a vcenter using script

Wednesday, September 06, 2017 0

The following script will change the root password for all esxi hosts in a vcenter. We should run the script using PowerCLI.

Before We  run the script you should create a scripts folder on the root of our C:\ drive and copy the script to there. We  need to have the current root password, the new root password and the name of the vCenter.

The script uses the Set-VMHostAccount cmdlet to change the root account password.

#Change Root Password Script for all hosts in a particular cluster

Copy the below code in a text file  and rename with passwd.ps1

#Prompt user for vCenter server and connect.
$vcenter = Read-Host "Enter vCenter Server: "
$vCenterUser = Read-Host "Enter your vCenter Username: "
$vCenterPw = Read-Host "Enter your vCenter Password: "

Connect-VIServer -Server $vcenter -User $vCenterUser -Password $vCenterPw

Write-Host "Connected to vCenter Server: $vcenter"

#Prompt user for datacenter and cluster
$datacenter = Read-Host "Enter Datacenter: "
$cluster = Read-Host "Enter Cluster: "
#Gather hosts from vCenter for chosen cluster

Write-Host "Getting hosts from datacenter..."

$MyVMHosts = Get-Datacenter $datacenter | Get-Cluster $cluster | Get-VMHost
# If we want to chnage for all ESXi hosts
# $MyVMHosts =Get-VMHost

#Disconnect from vCenter
Disconnect-VIServer -Confirm:$false
Write-Host "Got the hosts.  Next..."

#Prompt user for old root password and new password

$oldpassword = Read-Host "Enter onfiguration backup utility to download a backup of this to your management server. old root password: "
$newpassword = Read-Host "Enter new root password: "
$newpassword2 = Read-Host "Enter new root password again: "

#Connect to hosts and change root password, then disconnect.

if ($newpassword -eq $newpassword2){
    foreach ($line in $MyVMHosts) {
        Connect-VIServer -Server "$line" -User "root" -Password "$oldpassword" -WarningAction SilentlyContinue
        Set-VMHostAccount -UserAccount "root" -Password "$newpassword"
        Disconnect-VIServer -Confirm:$false
        Write-Host "$line...done."
}
}else{
 Write-Host "New passwords do not match!"
}

Tuesday, September 5, 2017

How to backup ESXi configuration using VMA

Tuesday, September 05, 2017 0
vMA -vSphere Management Assistant it’s free download and it comes with your VMware vSphere.

    First  we need to open a console session on vMA with vi-admin as a user.
    Then enter this command with an -s switch (S  is for save…)
    vicfg-cfgbackup -s -server 195.168.0.10 /tmp/esxi5

To restore the same its quite easy, we can use the same command with -l as a switch (jusyt like “load” configuration). The  ESXi server needs to reboot after the loading the configuration from backup and so we must reply YES to complete the command. The ESXi host will reboot.

vicfg-cfgbackup -l -server  195.168.0.10 /tmp/esxi5

After rebooting the ESXi server finds it’s configuration files restored.

ENABLE Copy Paste operation between a Virtual Machine and your local machine Via Powershell

Tuesday, September 05, 2017 0
Below steps allows you to ENABLE Copy Paste operation between a Virtual Machine and your local computer. 

However VMware does not recommend this manipulation to avoid and limit Exposure of Sensitive Data Copied to the Clipboard section.

Enable-VMCopyPaste function allows you to enable copy Paste operation between a Virtual Machine and your local machine.

When using PowerCli, this setting can be applied without powering off the VM. However you'll need to do a stun/unstun operation (i.e. power on/off, suspend/resume, create/delete snapshot/storage VMotion) to achieve the same thing.

Enable-VMCopyPaste -VM "test"

  This will enable the copy paste of the server/Computer name test.

Friday, October 21, 2016

Reset the Root Password of RHEL-7 - Linvirtshell

Friday, October 21, 2016 0
Here is the procedure of what needs to be done in order to recover a forgotten root password on Redhat 7 Linux:
  1. We need to edit GRUB2 boot menu and enter user single mode
  2. Next, we need to remount / partition to allow read and write
  3. Reset the actual root password
  4. Set entire system for SElinux relabeling after first reboot
  5. Reboot the system from a single mode
Now that we understand the procedure we can proceed with Redhat 7 password recovery.

1. Edit GRUB2 boot menu

Start your system and once you see your GRUB2 boot menu use e key to edit your default boot item. Usually it is the first line:
Edit boot menu to initiate RHEL7 root password recovery
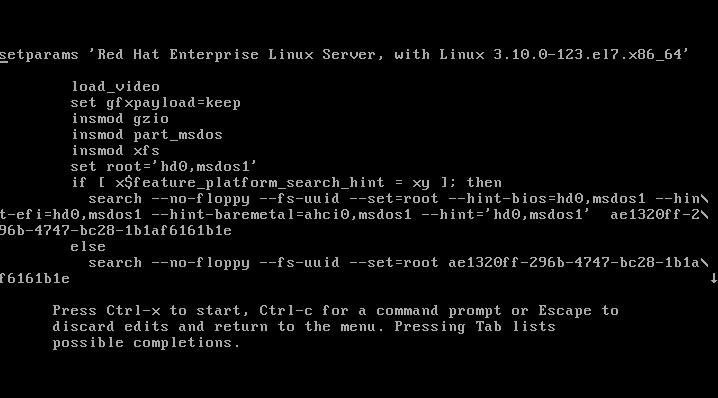
Once you hit e key you will see a screen similar to the one below:
Editing RHEL7 boot menu to enter single mode
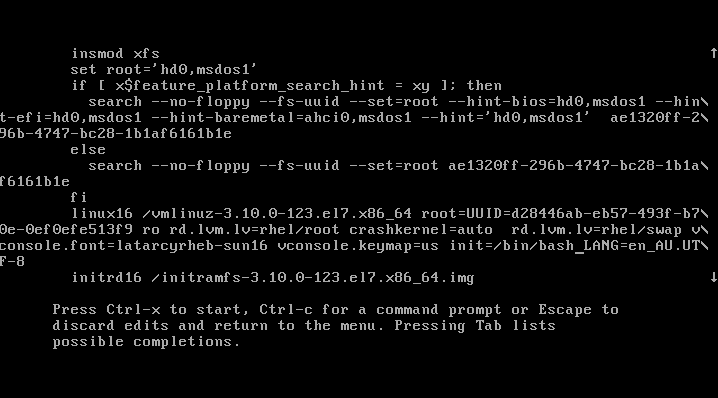
Depending on you terminal screen size you may see more or less information. In case you have a small terminal screen size note the little down pointing arrow on the right edge of your screen. The arrow means that more text is available when scrolling down. Scroll down and locate a line with rhgb quiet keywords:
RHEL 7 boot line locate - edit
Move your cursor ( HINT: move to end of the line with CTRL+E ) on rhgb quiet keywords and replace them with init=/bin/bash as show below:
Edit grub to enter single mode to reset root password Redhat 7
Once you edit the boot line as show above press CTRL + x to start booting your RHEL 7 system into a single mode. At the end of the system boot you will enter a single mode:
RHEL 7 - entering single mode after system reboot

2. Read&Write root partition remount

Once you enter a single your root partition is mounted as Read Only ro. You ca confirm it with the following command:
# mount | grep root
In order to mount our partition with Read/Write flag we use mount with a remount option as follows:
# mount -o remount,rw /
Next, confirm that the root file system is mounted Read/Write rw:
# mount | grep root
All the above steps are show below:
Remount root filesystem as read&write on redhat 7 Linux server

3. Change root's password

Still in the single mode we can proceed with the actual root password recovery. To do this we use passwd command:
# passwd
You will need to enter your password twice as shown below:
Recover a forgotten root password on RHEL7 linux server

4. SELinux relabeling

The additional step which needs to be taken on SELinux enables Linux system is to relabel SELinux context. If this step is ommited you will not be able to login with your new root password. The following command will ensure that the SELinux context for entire system is relabeled after reboot:
# touch /.autorelabel
SELinux relabel system after reboot - Redhat 7 Server

5. Reboot System

The final step when resetting your lost root password on RHEL 7 linux system is to reboot. This can be done with a following command:
# exec /sbin/init

After reboot you will be able to use your new root password.

Wednesday, June 15, 2016

Brief - multipath Command

Wednesday, June 15, 2016 0

Use the Linux multipath command to configure and manage multipathed devices.

General syntax for the multipath command:

multipath [-v verbosity] [-d] [-h|-l|-ll|-f|-F] [-p failover|multibus|group_by_serial|group_by_prio|group_by_node_name] 

Configure multipath devices

#multipath

Configure a specific multipath device

#multipath devicename

Replace devicename

 Replace devicename with the device node name such as /dev/sdb (as shown by udev in the $DEVNAME variable), or in the major:minor format.Selectively suppress a multipath map, and its device-mapped partitions:
#multipath -f

Display potential multipath devices

Display potential multipath devices, but do not create any devices and do not update device maps (dry run):
#multipath -d

Configure multipath devices and display multipath map information

#multipath -v2  
#multipath -v3

The -v2 option in multipath -v2 -d shows only local disks. Use the -v3 option to show the full path list.lliiFor example

#multipath -v3 -d

Display the status of all multipath devices, or a specified multipath device

#multipath -ll 
#multipath -ll 

Flush all unused multipath device maps 

Flush all unused multipath device maps (unresolves the multiple paths; it does not delete the device)

#multipath -F
#multipath -F  

Set the group policy

multipath -p [failover|multibus|group_by_serial|group_by_prio|group_by_node_name] 
Group Policy Options for the multipath -p Command

Policy Option             Description
failover                        One path per priority group. You can use only one path at a time.
multibus                       All paths in one priority group.
group_by_serial           One priority group per detected SCSI serial number 
group_by_prio              One priority group per path priority value. Paths with the same priority                          are in the same priority group. Priorities are determined by callout                                           programs specified as a global, per-controller, or per-multipath                                               option in  the /etc/multipath.conf configuration file.
group_by_node_          
name                           One priority group per target node name. Target node names are                                            fetched in the /sys/class/fc_transport/target*/node_name location.

How to fix the delay in SSH Login

Wednesday, June 15, 2016 0
Have you ever faced  login delays  when you tried to connect to the Linux systems, if yes this is happening due to  reverse DNS look-up  query that is been made to DNS Server.

We can fix this issue as mentioned below steps:

1) Take /etc/ssh/sshd_config  backup

# cp -p /etc/ssh/sshd_config /etc/ssh/sshd_config.`date '+%m-%d-%Y_%H:%M:%S'`

2) Edit  /etc/ssh/sshd_config  on sshd  Server

vi /etc/ssh/sshd_config

  And add this DNS option to the file:
  UseDNS no

3) Now add the following line to your /etc/resolv.conf

   options single-request-reopen

4) Restart ssh daemon

 service sshd restart

Sometimes adding the client's net address to the server's /etc/hosts can fix this issue  which is an alternative method.

Compressing files by using Linux commands

Wednesday, June 15, 2016 0
Compress Files


SyntaxDescriptionExample(s)
gzip {filename}Gzip compress the size of the given files using Lempel-Ziv coding (LZ77). Whenever possible, each file is replaced by one with the extension .gz.gzip mydata.doc
gzip *.jpg
ls -l
bzip2 {filename}bzip2 compresses files using the Burrows-Wheeler block sorting text compression algorithm, and Huffman coding. Compression is generally considerably better than that achieved by bzip command (LZ77/LZ78-based compressors). Whenever possible, each file is replaced by one with the extension .bz2.bzip2 mydata.doc
bzip2 *.jpg
ls -l
zip {.zip-filename} {filename-to-compress}zip is a compression and file packaging utility for Unix/Linux. Each file is stored in single .zip {.zip-filename} file with the extension .zip.zip mydata.zip mydata.doc
zip data.zip *.doc
ls -l
tar -zcvf {.tgz-file} {files}
tar -jcvf {.tbz2-file} {files}
The GNU tar is archiving utility but it can be use to compressing large file(s). GNU tar supports both archive compressing through gzip and bzip2. If you have more than 2 files then it is recommended to use tar instead of gzip or bzip2.
-z: use gzip compress
-j: use bzip2 compress
tar -zcvf data.tgz *.doc
tar -zcvf pics.tar.gz *.jpg *.png
tar -jcvf data.tbz2 *.doc
ls -l
De-Compressing File

SyntaxDescriptionExample(s)
gzip -d {.gz file}
gunzip {.gz file}
Decompressed a file that is created using gzipcommand. File is restored to their original form using this command.gzip -d mydata.doc.gz
gunzip mydata.doc.gz
bzip2 -d {.bz2-file}
bunzip2 {.bz2-file}
Decompressed a file that is created using bzip2command. File is restored to their original form using this command.bzip2 -d mydata.doc.bz2
gunzip mydata.doc.bz2
unzip {.zip file}Extract compressed files in a ZIP archive.unzip file.zip
unzip data.zip resume.doc
tar -zxvf {.tgz-file}
tar -jxvf {.tbz2-file}
Untar or decompressed a file(s) that is created using tar compressing through gzip and bzip2 filtertar -zxvf data.tgz
tar -zxvf pics.tar.gz *.jpg
tar -jxvf data.tbz2
 List the contents of an archive/compressed file

Some time you just wanted to look at files inside an archive or compressed file. Then all of the above command supports file list option.
SyntaxDescriptionExample(s)
gzip -l {.gz file}List files from a GZIP archivegzip -l mydata.doc.gz
unzip -l {.zip file}List files from a ZIP archiveunzip -l mydata.zip
tar -ztvf {.tar.gz}
tar -jtvf {.tbz2}
List files from a TAR archivetar -ztvf pics.tar.gz
tar -jtvf data.tbz2