This Blog is to share our knowledge and expertise on Linux System Administration and VMware Administration

Tuesday, December 29, 2015

Differences between upgraded and newly created VMFS-5 datastores:

Tuesday, December 29, 2015 0
Differences between upgraded and newly created VMFS-5 datastores:
  • VMFS-5 upgraded from VMFS-3 continues to use the previous file block size which may be larger than the unified 1MB file block size. Copy operations between datastores with different block sizes won’t be able to leverage VAAI.  This is the primary reason I would recommend the creation of new VMFS-5 datastores and migrating virtual machines to new VMFS-5 datastores rather than performing in place upgrades of VMFS-3 datastores.
  • VMFS-5 upgraded from VMFS-3 continues to use 64KB sub-blocks and not new 8K sub-blocks.
  • VMFS-5 upgraded from VMFS-3 continues to have a file limit of 30,720 rather than the new file limit of > 100,000 for newly created VMFS-5.
  • VMFS-5 upgraded from VMFS-3 continues to use MBR (Master Boot Record) partition type; when the VMFS-5 volume is grown above 2TB, it automatically switches from MBR to GPT (GUID Partition Table) without impact to the running VMs.
  • VMFS-5 upgraded from VMFS-3 will continue to have a partition starting on sector 128; newly created VMFS-5 partitions start at sector 2,048.

Based on the information above, the best approach to migrate to VMFS-5 is to create net new VMFS-5 datastores if you have the extra storage space, can afford the number of Storage vMotions required, and have a VAAI capable storage array holding existing datastores with 2, 4, or 8MB block sizes.

Difference between VMFS 3 and VMFS 5 -- Part1

Tuesday, December 29, 2015 0
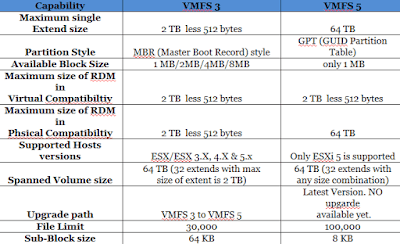
  • Explains you the major difference between VMFS 3 and VMFS 5. VM FS 5 is available as part of vSphere 5. VMFS 5 is introduced with lot of performance enhancements. 
  • Newly installed ESXi 5 will be formatted with VMFS 5 version but if you have upgraded the ESX 4 or ESX 4.1 to ESXi 5, then datastore version will be VMFS 3 only. 
  • You will able to upgrade the VMFS 3 to VMFS 5 via vSphere client once ESXi upgrade is Complete. This posts tells you some major differences between    VMFS 3 and VMFS 5


How to Identify the virtual machines with Raw Device Mappings (RDMs) using PowerCLI

Tuesday, December 29, 2015 0
Open the vSphere PowerCLI command-line.
Run the command:

Get-VM | Get-HardDisk -DiskType "RawPhysical","RawVirtual" | Select Parent,Name,DiskType,ScsiCanonicalName,DeviceName | fl

This command produces a list of virtual machines with RDMs, along with the backing SCSI device for the RDMs.

An output looks similar to:

Parent                      Virtual Machine Display Name
Name                       Hard Disk n
DiskType                  RawVirtual
ScsiCanonicalName naa.646892957789abcdef0892957789abcde
DeviceName            vml.020000000060912873645abcdef0123456789abcde9128736450ab

If you need to save the output to a file the command can be modified:

Get-VM | Get-HardDisk -DiskType "RawPhysical","RawVirtual" | Select Parent,Name,DiskType,ScsiCanonicalName,DeviceName | fl | Out-File –FilePath RDM-list.txt

Identify the backing SCSI device from either the ScsiCanonicalName or DeviceName identifiers.

Snapshot consolidation "error: maximum consolidate retries was exceeded for scsix:x"

Tuesday, December 29, 2015 0
Whenever you cannot perform snapshot consolidation in VMware ESXi 5.5 and ESXi 6.0.x.Performing a snapshot consolidation in ESXi 5.5 fails.

or

When attempting to consolidate snapshots using the vSphere Client, you see the error:

maximum consolidate retries was exceeded for scsix:x

Consolidate Disks message: The virtual machine has exceeded the maximum downtime of 12 seconds for disk consolidation.

 This issue occurs because ESXi 5.5 introduced a different behavior to prevent the virtual machine from being stunned for an extended period of time.

This message is reported if the virtual machine is powered on and the asynchronous consolidation fails after 10 iterations. An additional iteration is performed if the estimated stun time is over 12 seconds.This occurs when the virtual machine generates data faster than the consolidated rate.

To resolve this issue, turn off the snapshots consolidation enhancement in ESXi 5.5 and ESXi 6.0.x, so that it works like earlier versions of ESX/ESXi. This can be done by setting the snapshot.asyncConsolidate.forceSync to TRUE.

  Note: If the parameter is set to true, the virtual machine is stunned for long time to perform the snapshot consolidation, and it may not respond to ping during the consolidation.

To set the parameter snapshot.asyncConsolidate.forceSync to TRUE using the vSphere client:

Shut down the virtual machine.

Right-click the virtual machine and click Edit settings.

Click the Options tab.

Under Advanced, right-click General

Click Configuration Parameters, then click Add Row.

In the left pane, add this parameter:

snapshot.asyncConsolidate.forceSync

In the right pane, add this value:


TRUE

Click OK to save your change, and power on the virtual machine.

To set the parameter snapshot.asyncConsolidate.forceSync to TRUE without shutting down the virtual machine, run this Powercli command:

get-vm virtual_machine_name | New-AdvancedSetting -Name snapshot.asyncConsolidate.forceSync -Value TRUE -Confirm:$False

How to resolve : Cannot take a quiesced snapshot of Windows 2008 R2 virtual machine

Tuesday, December 29, 2015 0
When creating a snapshot on a Windows 2008 R2 virtual machine on ESXi/ESX 4.1 and later versions, you may experience these symptoms:
  • The snapshot operation fails to complete.
  • Unable to create a quiesced snapshot of the virtual machine.
  • Unable to back up the virtual machine.
  • Cloning a Windows 2008 R2 virtual machine fails.
  • In the Application section of the Event Viewer in virtual machine, Windows guest operating system reports an VSS error similar to:
           Volume Shadow Copy Service error: Unexpected error calling routine IOCTL_DISK_SET_SNAPSHOT_INFO(\\.\PHYSICALDRIVE1) fails with winerror 1168. hr = 0x80070490, Element not found.
  •  Any process that creates a quiesced snapshot fails.
  •  You see the error:
    Can not create a quiesced snapshot because the create snapshot operation exceeded the time limit for holding off I/O in the frozen virtual machine.

Backup applications, such as VMware Data Recovery, fails.You see the error:

  • Failed to create snapshot for vmname, error -3960 (cannot quiesce virtual machine)
  • This is a known issue with VSS application snapshots which is not caused by VMware software. It affects ESXi/ESX 4.1 and later versions.
  • Currently, there is no resolution.
  • To work around this issue, disable VSS quiesced application-based snapshots and revert to file system quiesced snapshots. You can disable VSS applications quiescing with either the VMware vSphere Client or with VMware Tools. Use one of these procedures:
 Disable VSS application quiescing using the vSphere Client:
  •  Power off the virtual machine.
  •  Log in to the vCenter Server or the ESXi/ESX host through the vSphere Client.
  •  Right-click the virtual machine and click Edit settings.
  •  Click the Options tab.
  •  Navigate to Advanced > General > Configuration Parameters.
  •  Add or modify the row disk.EnableUUID with the value FALSE.
  •  Click OK to save.
  •  Click OK to exit.
  •  Reboot the virtual machine for changes to take in effect.
Note: If this change is done through the command line using a text editor, the vim-cmd command to reload the vmx is enough to see the changes. For more information
Alternatively, un-register the virtual machine from the vCenter Server inventory. To un-register, right-click the virtual machine and click Remove from Inventory.
        Re-register the virtual machine back to the inventory.

Disable VSS application quiescing using VMware Tools:

  • Open the C:\ProgramData\VMware\VMware Tools\Tools.conf file in a text editor, such as Notepad. If the file does not exist, create it.
  • Add these lines to the file
            [vmbackup]
            vss.disableAppQuiescing = true
  • Save and close the file.
  • Restart the VMware Tools Service for the changes to take effect.
  • Click Start > Run, type services.msc, and click OK.
  • Right-click the VMware Tools Service and click Restart.

Taking a snapshot fails with the Error "Failed to take a memory snapshot, since the virtual machine is configured with independent disks"

Tuesday, December 29, 2015 0
When attempting to take a snapshot of a powered on virtual machine, you experience these symptoms:
You cannot take a snapshot with the Snapshot the virtual machine's memory option selected.

You see this error:

Failed to take a memory snapshot, since the virtual machine is configured with independent disks.

Resolution


This is an expected behavior, virtual machines with Independent disks cannot use memory or quiesced snapshots.

To resolve this issue, use one of these options:
When taking a snapshot of a virtual machine, deselect the Snapshot the virtual machine's memory and Quiesce Snapshot options.
Deselect the independent option in the virtual disk options.

To change the options for the virtual disk(s):

  • Open the vSphere Client.
  • Right-click the virtual machine and click Edit Settings.
  • Find the affected virtual disk(s) and deselect the Independent option.
  • Click OK to apply and save the changes to the virtual machine configuration.
 Note: This change requires the virtual machine to be powered off. If not, the option is grayed out.

How to Troubleshoot the NTP issue on ESX and ESXi 4.x / 5.x

Tuesday, December 29, 2015 0
Validate network connectivity between the ESXi/ESX host and the NTP server using the ping command.

Query ntpd service using ntpq

Use the NTP Query utility program ntpq to remotely query the ESXi/ESX host's ntpd service.
The ntpq utility is commonly installed on Linux clients and is also available in the ESX service console and the vSphere Management Assistant. For more information on the installation and use of the ntpq utility program on a given Linux distribution, see your Linux distribution's documentation.

For an ESXi 5.x host, the ntpq utility is included by default and does not need to be installed. It can be run locally from the ESXi 5.x host.


The ntpq utility is not available on ESXi 3.x/4.x. To query an ESXi host's NTP service ntpd, install ntpq on a remote Linux client and query the ESXi host's ntpd service from the Linux client.

To use the NTP Query utility ntpq to remotely query the ESX host's NTP service (ntpd) and determine whether it is successfully synchronizing with the upstream NTP server:

When using a Linux client, open a console session on the client where ntpq is installed.
Run this command:


When using an SSH shell or local console session on ESXi 5.5 and 5.1:
# "watch ntpq -p localhost_or_127.0.0.1"

When using a Linux client for ESXi/ESX 4.x:
# watch "ntpq -p ESX_host_IP_or_domain_name"

Monitor the output for 30 seconds and press Ctrl+C on your keyboard to stop the watch command.


Note: In ESXi 5.5 and 5.1, the output you see either localhost or loopback (127.0.0.1).

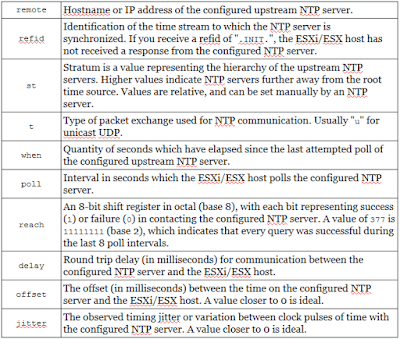
remote              refid    st  t  when poll reach delay  offset  jitter
======================================================
*10.11.12.130  1.0.0.0  1  u   46   64   377   43.76  5.58   40000