This Blog is to share our knowledge and expertise on Linux System Administration and VMware Administration

Thursday, October 15, 2015

What is a Quorum Disk in cluster?

Thursday, October 15, 2015 0
Quorum Disk is a disk-based quorum daemon, qdiskd, that provides supplemental heuristics to determine node fitness.
With heuristics you can determine factors that are important to the operation of the node in the event of a network partition.


    For a 3 node cluster a quorum state is present untill 2 of the 3 nodes are active i.e. more than half. But what if due to some reasons the 2nd node also stops communicating with the the 3rd node? In that case under a normal architecture  the cluster would dissolve and stop working. 

But for mission critical environments and such scenarios we use quorum disk in which an additional disk is configured which is mounted on all the nodes with qdiskd service running and a vote value is assigned to it.

    So suppose in above case I have assigned 1 vote to qdisk so even after 2 nodes stops communicating with 3rd node, the cluster would have 2 votes (1 qdisk + 1 from 3rd node) which is still more than half of vote count for a 3 node cluster. Now both the inactive nodes would be fenced and your 3rd node would be still up and running being a part of the cluster.
What is split-brain condition in Red Hat Cluster?

Thursday, October 15, 2015
 We say a cluster has quorum if a majority of nodes are alive, communicating, and agree on the active cluster members.
    For example, in a thirteen-node cluster, quorum is only reached if seven or more nodes are communicating. If the seventh node dies, the cluster loses quorum and can no longer function.

  • A cluster must maintain quorum to prevent split-brain issues.
  • If quorum was not enforced, quorum, a communication error on that same thirteen-node cluster may cause a situation where six nodes are operating on the shared storage, while another six nodes are also operating on it, independently.
  • Because of the communication error, the two partial-clusters would overwrite areas of the disk and corrupt the file system.
  • With quorum rules enforced, only one of the partial clusters can use the shared storage, thus protecting data integrity.
  • Quorum doesn't prevent split-brain situations, but it does decide who is dominant and allowed to function in the cluster.
  • quorum can be determined by a combination of communicating messages via Ethernet and through a quorum disk.

What are Tie-breakers in Red Hat Cluster?

Thursday, October 15, 2015 0
Tie-breakers are additional heuristics that allow a cluster partition to decide whether or not it is quorate in the event of an even-split - prior to fencing.
  • With such a tie-breaker, nodes not only monitor each other, but also an upstream router that is on the same path as cluster communications.
  • If the two nodes lose contact with each other, the one that wins is the one that can still ping the upstream router.
  • That is why, even when using tie-breakers, it is important to ensure that fencing is configured correctly.CMAN has no internal tie-breakers for various reasons. However, tie-breakers can be implemented using the API

How to Increase Memory in Xen Vm

Thursday, October 15, 2015 0
For Example, Here you want to increase memory from 6GB to 12GB.

Login to the Xen Host as root user and check the VM maximum memory settings. If Maximum memory setting is not more than equal to Target memory follow the below steps.

[root@Xenhost ~]# virsh dumpxml xenvm100 | grep -i mem
  <memory>6291456</memory>    -----------------> Here Memory settings in KB
  <currentMemory>6291456</currentMemory>

This shows that it has 6 GB currently in use. And that max memory is set to 6GB. Therefore we need server downtime for increase to 12GB

So, the procedure will be:

1. virsh setmem xenvm100 12582912
2. vi /etc/xen/xenvm100
   2a. change "memory = 12288" to "memory = 12288"  ------> Here in MB
   2b. save config
 
Reboot the VM and check the memory.

Hope it will help.

Wednesday, October 14, 2015

How ro Recreate a missing Virtual machine disk descriptor file

Wednesday, October 14, 2015 0
Overview steps

Note: It would be advisable to attempt to restore the missing descriptor file from backups if possible. If this is not possible, proceed with recreating the virtual machine disk descriptor file.

To create a virtual machine disk descriptor file:

    Identify the size of the flat file in bytes.
    Create a new blank virtual disk that is the same size as the original. This serves as a baseline example that is modified in later steps.

    Note: This step is critical to assure proper disk geometry.
    Rename the descriptor file (also referred to as a header file) of the newly-created disk to match the name of the original virtual disk.
    Modify the contents of the renamed descriptor file to reference the flat file.
    Remove the leftover temporary flat file of the newly-created disk, as it is not required.

Note: This procedure will not work on virtual disks configured with a Para-virtualized SCSI controller in the virtual machine as the virtual machine may not boot. However, there are reports that if the Para-virtualized SCSI controller is used, the new descriptor file can also be updated with ddb.adapterType = pvscsi replacing ddb.adapterType = lsilogic in the descriptor file.

Detailed steps

To create a virtual machine disk:

    Log into the terminal of the ESXi/ESX host:
        For ESX 4.1 and earlier, see Connecting to an ESX host using a SSH client . Alternatively, access the system directly and press Alt+F1 to begin the login process. Log in as root .
        For ESXi 4.1 and 5.x, see Using Tech Support Mode in ESXi 4.1, ESXi 5.x, and ESXi 6.0 .
        For ESXi 4.0 and 3.5  Navigate to the directory that contains the virtual machine disk with the missing descriptor file using the command:

    # cd /vmfs/volumes/myvmfsvolume/mydir

    Notes:
        If you are using a version of ESXi, you can access and modify files and directories using the vSphere Client Datastore Browser or the vifs utility included with the vSphere CLI. For more information, see the section Performing File System Operations in the vSphere Command-Line Interface Documentation.
        If you are using VMware Fusion, the default location for the virtual machine files is the home/Documents/Virtual Machines.localized/virtual_machine/ folder, where home is your home folder, and virtual_machine is the name of the virtual machine.

    Identify the type of SCSI controller the virtual disk is using. You can do this by examining the virtual machine configuration file (.vmx ). The controller is identified by the line scsi#.virtualDev , where # is the controller number. There may be more than one controller and controller type attached to the virtual machine, such as lsisas1068 (which is the LSILogic SAS controller), lsilogic , or buslogic . This example uses lsilogic :

    scsi0.present = "true"
    scsi0.sharedBus = "none"
    scsi1.present = "true"
    scsi1.sharedBus = "virtual"
    scsi1.virtualDev = "lsilogic"
    Identify and record the exact size of the -flat file using a command similar to:

    # ls -l vmdisk0-flat.vmdk

    -rw------- 1 root root 4294967296 Oct 11 12:30 vmdisk0-flat.vmdk
    Use the vmkfstools command to create a new virtual disk:

    # vmkfstools -c 4294967296 -a lsilogic -d thin temp.vmdk

    The command uses these flags:
        -c size

        This is the size of the virtual disk.
        -a virtual_controller

        Whether the virtual disk was configured to work with BusLogic, LSILogic (for both lsilogic and lsilogic SAS), Paravirtual, or IDE:
        Use lsilogic for virtual disk type "lsilogic" and "lsisas1068"
        -d thin

        This creates the disk in thin-provisioned format.

    Note: To save disk space, we create the disk in thin-provisioned format using the type thin . The resulting flat file then consumes minimal amounts of space (1 MB) instead of immediately assuming the capacity specified with the -c switch. The only consequence, however, is the descriptor file contains an extra line that must be manually removed in a later step.

    The temp.vmdk and temp-flat.vmdk files are created as a result.
    Delete temp-flat.vmdk , as it is not needed. Run the command:

    # rm -i temp-flat.vmdk
    Rename temp.vmdk to the name that is required to match the orphaned .flat file (or vmdisk0.vmdk , in this example):

    # mv -i temp.vmdk vmdisk0.vmdk
    Edit the descriptor file using a text editor:
        Under the Extent Description section, change the name of the .flat file to match the orphaned .flat file you have.
        Find and remove the line ddb.thinProvisioned = "1" if the original .vmdk was not a thin disk. If it was, retain this line.

        # Disk DescriptorFile
        version=1
        CID=fb183c20
        parentCID=ffffffff
        createType="vmfs"

        # Extent description
        RW 8388608 VMFS "vmdisk0-flat.vmdk"

        # The Disk Data Base
        #DDB

        ddb.virtualHWVersion = "4"
        ddb.geometry.cylinders = "522"
        ddb.geometry.heads = "255"
        ddb.geometry.sectors = "63"
        ddb.adapterType = "lsilogic"
        ddb.thinProvisioned = "1"

        The virtual machine is now ready to power on. Verify your changes before starting the virtual machine.

        If powering on the virtual machine is not successful
    To check the disk chain for consistency, run this command against the disk descriptor file:

    For ESXi 6.0 and 5.x:
    # vmkfstools -e filename.vmdk

    For a complete chain, you see output similar to:
    Disk chain is consistent

    For a broken chain, you see a summary of the snapshot chain and then an output similar to:
    Disk chain is not consistent : The parent virtual disk has been modified since the child was created. The content ID of the parent virtual disk does not match the corresponding parent content ID in the child (18)

    For ESXi 3.5/4.x:
    # vmkfstools -q filename.vmdk

    For a complete chain, you see output similar to:
    filename.vmdk is not an rdm

    For a broken chain, you see output similar to:
    Failed to open 'test-000001.vmdk' : The parent virtual disk has been modified since the child was created (18)
    Note: The primary purpose of the vmkfstools -q command is(from the vmkfstools help page: vmkfstools -h ): -q --queryrdm .
    This command identify any issues with the snapshot chain, not its intended purpose, which is to identify if the vmdk disk is a raw device mapping.

    For more information on the vmkfstools command, see: vmkfstools - vSphere CLI for managing VMFS volumes

Understand the Hostd and Vpxa in VMWare

Wednesday, October 14, 2015 0
hostd is an app that runs in the Service Console that is responsible for managing most of the operations on the ESX machine.  It knows about all the VMs that are registered on that host, the luns/vmfs volumes visible by the host, what the VMs are doing, etc.  Most all commands or operations come down from VC through it.  i.e, powering on a VM, VM vMotion, VM creation, etc.

vpxa also runs on the Service Console and talks to VC.
Vmware hostd and vpxa on ESXi

HOSTD

The vmware-hostd management service is the main communication channel between ESX/ESXi hosts and VMkernel. If vmware-hostd fails, ESX/ESXi hosts disconnects from vCenter Server/VirtualCenter and cannot be managed, even if you try to connect to the ESX/ESXi host directly. It knows about all the VMs that are registered on that host, the luns/vmfs volumes visible by the host, what the VMs are doing, etc. Most all commands or operations come down from VC through it. i.e, powering on a VM, VM vMotion, VM creation, etc.

Restart the management agent /etc/init.d/hostd restart

VPXA

It acts as an intermediary between VC and hostd. The vCenter Server Agent, also referred to as vpxa or the vmware-vpxa service, is what allows a vCenter Server to connect to a ESX host. Specifically, vpxa is the communication conduit to the hostd, which in turn communicates to the ESX kernel. Restart the vpxa service

/etc/init.d/vpxa restart

hostd is the daemon for direct VIC connection (when you use Virtual Infra Client (VIC) to connect to your ESX).

Also,

    vpxa is the VC agent (ESX side)
    vpxd is the VC daemon (VC side)

How to Reinstall the VPXA or AAM agent

Wednesday, October 14, 2015 0
Reinstalling the vpxa or aam agent without losing the host record from the VMware vCenter Server database

Purpose

This article provides information on updating or reinstalling the vpxa or aam agent without removing the ESX host from vCenter Server. This procedure ensures that the host and virtual machine entries, performance history, and resource pool references in vCenter Server are not lost.

VMware recommends to use this method if you do not want to lose database records.

Note: This process does not impact virtual machines that are running.
Resolution

To update or reinstall the vpxa or aam agent in an ESX\ESXi host without removing it from vCenter Server:

    Disconnect the host from vCenter Server.
    Connect to the ESX\ESXi host using SSH.
    Remove the vpxuser:

 For ESX:

    userdel vpxuser

 For ESXi:

        Log in to ESXi using the vSphere Client.
        Click Local Users & Groups and click Users.
        Right-click vpxuser and click Remove.

        Note: Do not remove the root user for any reason.
    Run these commands to remove the vpxa or aam agent from an  ESX 3.5 or ESX 4.x server:

    For vpx agent:

    /bin/rpm -qa | grep vpx
    /bin/rpm -e output from previous command

    For aam agent:

    /bin/rpm -qa | grep aam

    Note: The output of this command has two entries.

    /bin/rpm -e output from previous command

    Run this command to remove the vpxa or aam agent from an ESX\ESXi server:

    For ESXi 3.5 and ESXi 4.x:

    /opt/vmware/uninstallers/VMware-vpxa-uninstall.sh
    /opt/vmware/uninstallers/VMware-aam-ha-uninstall.sh

    For ESXi 5.0.x, ESXi 5.1.x and ESXi 5.5.x:

    Note: This command uninstalls the HA agent (FDM) from ESXi 5.0 as aam functionality is no longer used for HA on vCenter Server 5.0. For further HA (Fault Domain Manager) troubleshooting steps, see Vmware Doc. In ESXi 5.x, vpxa is now a part of the esxi-base package.

    cp /opt/vmware/uninstallers/VMware-fdm-uninstall.sh /tmp
    chmod +x /tmp/VMware-fdm-uninstall.sh
    /tmp/VMware-fdm-uninstall.sh

    Reconnect the host to vCenter Server.

Note: When you reconnect the host to vCenter Server, vpxuser is automatically recreated.

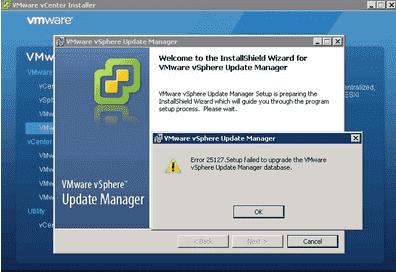
Issue when upgrading vCenter Server Update Manager – Error 25127

Wednesday, October 14, 2015 0
When we encountered with an error almost immediately.

 It is due  SQL Authentication account used to connect to the SQL Database had a recent password change.  In order to change the password for Update Manager, you need to go to a special utility called the VMware Update Manager Utility (VMwareUpdateManagerUtility.exe).  The utility is located within the Update Manager installation folder.  Launching the utility and using a windows account with vCenter Server privileges, will allow you to modify the database settings, including the SQL Authentication username and password. 


Once this password was changed, the utility will ask that you restart the Update Manager service.  Once that was done, the Update Manager application installed properly.
There are other reasons you might receive Error 25127 when upgrading Update Manager.  Some administrators encounter this error if the account used to connect to the Update Manager database does not have enough permissions on the SQL Server.  Giving the account dbowner will fix the problem.