This Blog is to share our knowledge and expertise on Linux System Administration and VMware Administration

Friday, January 26, 2018

Working with Docker Container - Creating an account with Docker Hub

Friday, January 26, 2018 0

Creating an account with Docker Hub

Docker Hub is like GitHub for images. It is a public registry on which you can host images both public and private, share them and collaborate with others. It has integration with GitHub, Bitbucket, and can trigger automated builds.

As of now, the creation of an account on Docker Hub is free. A repository can hold different versions of an image. You can create any number of public repositories for your images. By default, you will have one private repository, which will not be accessible to the public. You can buy more private repositories. You can create an account either through a web browser or from the command line.

To create an account through a web browser on Docker Hub, visit https://hub.docker.com/account/signup/ and create an account:
 

Give the required details & and get created docker login.

To create an account using the command line, run the following command and submit the required details:
root@Docker:~# docker login
Login with your Docker ID to push and pull images from Docker Hub. If you don't have a Docker ID, head over to https://hub.docker.com to create one.
Username (nskselvan):
Password:

Thursday, January 25, 2018

How to extend the windows server disk space in command line

Thursday, January 25, 2018 0

Extending the windows server disk space in command line

Once the disk space added from storage to windows server.

Here, C drive is 75G and need to extend 25 GB. So total 100GB.

Go to command prompt and type disk part.


C:\Users\nsk>diskpart

C:\Users\nsk>

It will open a separate windows. Then follow the below steps to extend the C drive from 75GB to 100GB  (adding 25 GB)

Microsoft DiskPart version 6.1.7601
Copyright (C) 1999-2008 Microsoft Corporation.
On computer: TESTSERVER

DISKPART> list disk

  Disk ###  Status         Size          Free     Dyn  Gpt
  --------  -------------       -------         -------    ---   ---
  Disk 0    Online         75 GB        25 GB
  Disk 1    Online         6144 MB  1024 KB
  Disk 2    Online         12 GB       1024 KB
  Disk 3    Online         100 GB     1024 KB
  Disk 4    Online         225 GB       224 GB

DISKPART> select disk 0

Disk 0 is now the selected disk.

DISKPART> list part

  Partition ###  Type                 Size       Offset
  -------------  ----------------          -------     -------
  Partition 1    Primary            100 MB  1024 KB
  Partition 2    Primary              49 GB   101 MB

DISKPART> select part2

Microsoft DiskPart version 6.1.7601

DISK              - Shift the focus to a disk. For example, SELECT DISK.
PARTITION   - Shift the focus to a partition. For example, SELECT PARTITION.
VOLUME       - Shift the focus to a volume. For example, SELECT VOLUME.
VDISK           - Shift the focus to a virtual disk. For example, SELECT VDISK.

DISKPART> select part 2

Partition 2 is now the selected partition.

DISKPART> extend

DiskPart successfully extended the volume.

DISKPART> list disk

  Disk ###  Status           Size          Free          Dyn  Gpt
  --------  -------------         -------          -------            ---  ---
* Disk 0    Online           75 GB         0 B
  Disk 1    Online         6144 MB      1024 KB
  Disk 2    Online           12 GB         1024 KB
  Disk 3    Online          100 GB        1024 KB
  Disk 4    Online          225 GB         224 GB

DISKPART>

Hope it helps.

Monday, January 22, 2018

ss command in RHEL7 and examples

Monday, January 22, 2018 0

ss command in RHEL7 


NAME
       ss - another utility to investigate sockets
   
ss is used to dump socket statistics. It allows showing information similar to netstat.  It can display more TCP and state informations than other tools.
When no option is used ss displays a list of open non-listening sockets (e.g. TCP/UNIX/UDP) that have established connection.

[root@nsk ~]# ss -tpna | grep -i 25
LISTEN     0      100    127.0.0.1:25       *:*     users:(("master",pid=1198,fd=13))
LISTEN     0      100               ::1:25       :::*    users:(("master",pid=1198,fd=14))

Here,
-t, --tcp  Display TCP sockets
-p, --processes Show process using socket
-n, --numeric Do not try to resolve service names
-a, --all Display both listening and non-listening (for TCP this means established connections) sockets

SS command example:

Display all TCP sockets
[root@nsk ~]# ss -t -a
State       Recv-Q Send-Q    Local Address:Port        Peer Address:Port
LISTEN      0      128                  *:ssh                         *:*
LISTEN      0      100           127.0.0.1:smtp              *:*
ESTAB       0       0               10.0.2.15:ssh        10.0.2.2:56004
ESTAB       0       0               10.0.2.15:ssh        10.0.2.2:55714
LISTEN      0      128                 :::ssh                        :::*
LISTEN      0      100                ::1:smtp                            :::*
[root@nsk ~]#                                    

Display all TCP sockets with process SELinux security contexts
[root@nsk ~]# ss -t -a -Z
State       Recv-Q Send-Q    Local Address:Port   Peer Address:Port
LISTEN      0      128                   *:ssh              *:*          users:(("sshd",pid=966,proc_ctx=system_u:system_r:sshd_t:s0-s0:c0.c1023,fd=3))
LISTEN      0      100           127.0.0.1:smtp              *:*          users:(("master",pid=1198,proc_ctx=system_u:system_r:postfix_master_t:s0,fd=13))
ESTAB       0       0               10.0.2.15:ssh        10.0.2.2:56004     users:(("sshd",pid=1329,proc_ctx=unconfined_u:unconfined_r:unconfined_t:s0-s0:c0.c1023,fd=3))
ESTAB       0       0               10.0.2.15:ssh        10.0.2.2:55714     users:(("sshd",pid=1263,proc_ctx=unconfined_u:unconfined_r:unconfined_t:s0-s0:c0.c1023,fd=3))
LISTEN      0      128                  :::ssh              :::*          users:(("sshd",pid=966,proc_ctx=system_u:system_r:sshd_t:s0-s0:c0.c1023,fd=4))
LISTEN      0      100                 ::1:smtp            :::*          users:(("master",pid=1198,proc_ctx=system_u:system_r:postfix_master_t:s0,fd=14))

Display all UDP sockets
[root@nsk ~]# ss -u -a
State       Recv-Q Send-Q   Local Address:Port      Peer Address:Port
ESTAB       0      0            10.0.2.15:42417    198.55.111.50:ntp
ESTAB       0      0            10.0.2.15:39451    66.135.44.92:ntp
ESTAB       0      0            10.0.2.15:50903    198.60.22.240:ntp
ESTAB       0      0            10.0.2.15:51175    198.58.105.63:ntp
UNCONN      0      0                    *:bootpc              *:*
UNCONN      0      0                    *:42307                *:*
UNCONN      0      0            127.0.0.1:323            *:*
UNCONN      0      0                   :::42236                :::*
UNCONN      0      0                  ::1:323          :::*
                                                  
Display all established ssh connections.
[root@nsk ~]# ss -o state established '( dport = :ssh or sport = :ssh )'
Netid Recv-Q Send-Q      Local Address:Port       Peer Address:Port  
tcp   0      0               10.0.2.15:ssh           10.0.2.2:56004  timer:(keepalive,117min,0)
tcp   0      0               10.0.2.15:ssh           10.0.2.2:55714  timer:(keepalive,110min,0)
                                                           
For more infor, please refer man ss.

Sunday, January 21, 2018

Working with Docker Container - Setting the restart policy on a container

Sunday, January 21, 2018 0

Setting the restart policy on a container

Restart policy is added with the run command with flags to specify the restart policy. With this policy, we can configure containers to start at boot time. This option is also very useful when a container dies accidentally.

Syntax:docker run --restart=POLICY [ OPTIONS ]  IMAGE[:TAG]  [COMMAND]  [ARG...] 

root@Docker:~# docker run --restart=always -d -i -t centos /bin/bash
fb83a04222c73d0e80f84103d4fe58c3ccd95e4a44b39386a937427bda2ad465

Options: 
no            : This does not start the container if it dies
on-failure : This restarts the container if it fails with nonzero exit code
always     : This always restarts the container without worrying about the return code

You can also give an optional restart count with the on-failure policy as follows:

root@Docker:~# docker run --restart=on-failure:3 -d -i -t centos /bin/bash
96b07463e85f3452cbbbf0de1298d4311634efef20f60a1d164e18f83ea19e15

For help with the docker run use --help

Saturday, January 20, 2018

Working with Docker Container - Accessing the host device inside the container

Saturday, January 20, 2018 0

Accessing the host device inside the container

 we can give access of the host device to a container with the --device option to the run command. Earlier, one has bind mount it with the -v option and that had to be done with the --privileged option.

Syntax :
     docker run --device=<Host Device>:<Container Device Mapping>:<Permissions>   [ OPTIONS ]  IMAGE[:TAG]  [COMMAND]  [ARG...]

#docker run --device=/dev/sdc:/dev/xvdc -i -t centos /bin/bash


The preceding command will access /dev/sdc inside the container.

For help with the docker run use --help

Friday, January 19, 2018

Working with Docker Container - Exposing a port while starting a container

Friday, January 19, 2018 0

Exposing a port while starting a container

There are a number of ways by which ports on the container can be exposed. One of them is through the run command, which we will cover in this chapter. The other ways are through the Docker file and the --link command.

Syntax:  docker run --expose=PORT [ OPTIONS ]  IMAGE[:TAG]  [COMMAND]  [ARG...]

to expose port 22 while starting a container, run the following command:

root@Docker:~# docker run --expose=22 -i -t centos /bin/bash
[root@88a0e1ab48df /]#
root@Docker:~# docker ps
CONTAINER ID  IMAGE   COMMAND  CREATED          STATUS            PORTS       NAMES
88a0e1ab48df    centos     "/bin/bash"   27 seconds ago  Up 26 seconds   22/tcp  amazing_bohr

For help with the docker run use --help

Thursday, January 18, 2018

Working with Docker Container - Looking at the logs of containers

Thursday, January 18, 2018 0

Looking at the logs of containers

If the container emits logs or output on STDOUT/STDERR, then we can get them without logging into the container.

Syntax : docker logs  CONTAINER

root@Docker:~# docker logs centos
[root@6d65e303381c /]# uptime
 04:07:13 up  1:02,  0 users,  load average: 0.02, 0.01, 0.00
[root@6d65e303381c /]# hostname
6d65e303381c
[root@6d65e303381c /]# exit
root@Docker:~#

Docker will look at the container's specific log file from /var/lib/docker/containers/<Container ID> and show the result.

For help with the docker logs use --help

Working with Docker Container - Returning low level information about a container

Thursday, January 18, 2018 0

Returning low-level information about a container

While doing the debugging, automation, and so on, we will need the container configuration details. Docker provides the inspect command to get those easily.

To inspect a container/image, run the following command:
Syntax:
docker inspect [-f|--format="" CONTAINER|IMAGE [CONTAINER|IMAGE...]
We'll start a container and then inspect it:

root@Docker:~# docker run -id centos /bin/bash
c5f6ce3b5d2f82bb7a2bbc82b0b71bc2130ceb4caf163afbf5883cfbb150f256

root@Docker:~# docker inspect c5f6ce3b5d2f82bb7a2bbc82b0b71bc2130ceb4caf163afbf5883cfbb150f256

[
    {
        "Id": "c5f6ce3b5d2f82bb7a2bbc82b0b71bc2130ceb4caf163afbf5883cfbb150f256",
        "Created": "2018-01-02T12:18:18.232317934Z",
        "Path": "/bin/bash",
        "Args": [],
        "State": {
            "Status": "running",
            "Running": true,

    .........
    .........
}]

Docker will look into the metadata and configuration for the given image or container and present it.

With the -f | --format option we can use the Go (programming language) template to get the specific information. The following command will give us an IP address of the container:

root@Docker:~# docker inspect --format='{{.NetworkSettings.IPAddress}}' c5f6ce3b5d2f82bb7a2bbc82b0b71bc2130ceb4caf163afbf5883cfbb150f256
172.17.0.4

The following command will give us an Hostname Path of the container:

root@Docker:~# docker inspect --format='{{.HostnamePath}}' c5f6ce3b5d2f82bb7a2bbc82b0b71bc2130ceb4caf163afbf5883cfbb150f256
/var/lib/docker/containers/c5f6ce3b5d2f82bb7a2bbc82b0b71bc2130ceb4caf163afbf5883cfbb150f256/hostname

For help with the docker inspect use --help

Tuesday, January 16, 2018

Working with Docker Container - Getting privileged access inside a container

Tuesday, January 16, 2018 0

Getting privileged access inside a container

Linux divides the privileges traditionally associated with superuser into distinct units, known as capabilities (run man capabilities on a Linux-based system), which can be independently enabled and disabled. For example, the net_bind_service capability allows nonuser processes to bind the port below 1,024. By default, Docker starts containers with limited capabilities. With privileged access inside the container, we give more capabilities to perform operations normally done by root. For example, let's try to create a loopback device while mounting a disk image.

Syntax : docker run --privileged [ OPTIONS ]  IMAGE[:TAG]  [COMMAND]  [ARG...] 

root@Docker:~# docker run --privileged -i -t centos /bin/bash
[root@89f516205250 /]#
[root@89f516205250 /]# dd if=/dev/zero of=disk.img bs=1M count=10 &> /dev/null
[root@89f516205250 /]# mkfs -t minix disk.img &> /dev/null
[root@89f516205250 /]# mount disk.img /mnt/
[root@89f516205250 /]# mount | grep -i disk
/var/lib/docker/aufs/diff/72bebd0aff7bf4dbbd74495a41884d3113f2dedbfcffa3c82256abced73b0b21/disk.img on /mnt type minix (rw,relatime)
[root@89f516205250 /]# df -hP | grep -i /mnt
/dev/loop0                   9.9M  1.0K  9.9M   1% /mnt
[root@89f516205250 /]# cd /mnt/
[root@89f516205250 mnt]# echo "This is docker test" > test
[root@89f516205250 mnt]# cat test
This is docker test

This mode causes security risks as containers can get root-level access on the Docker host. With Docker 1.2 or new, two new flags --cap-add and --cap-del have been added to give fine-grained control inside a container. For example, to prevent any chown inside the container, use the following command:

 docker run --cap-drop=CHOWN [ OPTIONS ]  IMAGE[:TAG]  [COMMAND]  [ARG...]
root@Docker:~# docker run --cap-drop=CHOWN  -i -t centos /bin/bash
[root@5c536ea0d181 /]# chown root:adm mnt
chown: changing ownership of 'mnt': Operation not permitted

For help with the docker run use --help

Monday, January 15, 2018

Working with Docker Container - Deleting a container

Monday, January 15, 2018 0

Deleting a container

We can delete a container permanently, but before that we have to stop the container or use the force option. In this recipe, we'll start, stop, and delete a container.
Syntax : docker rm [ OPTIONS ] CONTAINER [ CONTAINER ]

Let's first start a container, stop it, and then delete it using the following commands:

root@Docker:~# id=`docker run -d -i centos /bin/bash`
root@Docker:~# docker stop $id
e62286794466459f2dd08d5f1cec0749187247ffabb5224d6b6b3aae334d4bf8
root@Docker:~# docker rm $id
e62286794466459f2dd08d5f1cec0749187247ffabb5224d6b6b3aae334d4bf8

To forcefully delete a container without an intermediate stop, use the -f option.

To delete all the containers, we first need to stop all the running containers and then remove them. Be careful before running the commands as these will delete both the running and the stopped containers:

root@Docker:~# docker stop `docker ps -q`
root@Docker:~# docker rm `docker ps -q`

For help with the docker rm use --help

Sunday, January 14, 2018

Basics of YAML - Ansible

Sunday, January 14, 2018 0

YAML

YAML, like many other data serialization languages (such as JSON), has very few, basic concepts:

Declarations
Lists
Associative arrays

A declaration is very similar to a variable in any other language, that is:
name: 'This is the name' 

To create a list, we will have to use '-':
- 'item1' 
- 'item2' 
- 'item3' 
YAML uses indentation to logically divide parents from children. So if we want to create associative arrays (also known as objects), we would just need to add an indentation:

item: 
  name: TheName 
  location: TheLocation 
Obviously, we can mix those together, that is:

people: 
  - name: Jhon
    number: +91123456
    country: India
  - name: Cena
    number: +44763520 
    country: UK 
Those are the basics of YAML. YAML can do much more, but for now this will be enough.

Working with Docker Container - Stopping a container

Sunday, January 14, 2018 0

Stopping a container

We can stop one or more containers at once. In this recipe, we will first start a container and then stop it.
Syntax : docker stop [-t|--time[=10]] CONTAINER [CONTAINER...]


root@Docker:~# docker stop fb83a04222c7
fb83a04222c7


This will save the state of the container and stop it. It can be started again, if needed.

To stop a container after waiting for some time, use the --time/-t option.

To stop all the running containers run the following command:

root@Docker:~# docker stop `docker ps -q`
5d950a3835d6
32238eabfac4

For help with the docker stop use --help

Friday, January 12, 2018

Which command is used to run sudo commands without password

Friday, January 12, 2018 0
Command used to run sudo commands without password

NAME
     sudo - execute a command as another user

sudo allows a permitted user to execute a command as the superuser or another user, as specified by the security policy.

But here option s is used to run the privileged commands without password.

[nsk@testserver ~]$ sudo -s /etc/init.d/nslcd restart
Stopping nslcd:                                            [  OK  ]
Starting nslcd:                                              [  OK  ]
[nsk@testserver ~]$

Here,
-s [command] The -s (shell) option runs the shell specified by the SHELL environment variable if it is set or the shell as specified in the password database.  If a command is specified, it is passed to the shell for execution via the shell’s -c option.  If no command is specified, an interactive shell is executed.

Thursday, January 11, 2018

Working with Docker Container - Listing containers

Thursday, January 11, 2018 0

Listing containers

We can list both running and stopped containers.

Syntax: docker ps [ OPTIONS ]
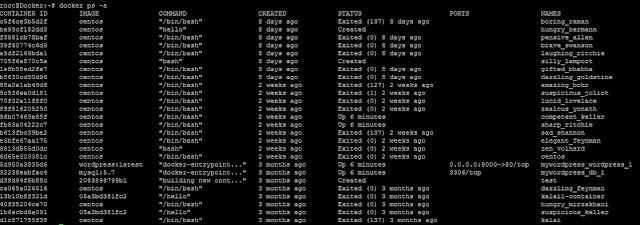
The Docker daemon can look at the metadata associated with the containers and list them down. By default, the command returns:

The container ID
The image from which it got created
The command that was run after starting the container
The details about when it got created
The current status
The ports that are exposed from the container
The name of the container

root@Docker:~# docker ps -a


To return just the container IDs of all the containers, use the -aq option as follows:
root@Docker:~# docker ps -aq
b613fbc39be2
e3bfe67aa175
8813d555d0dc
6d65e303381c
5d950a3835d6
32238eabfac4
d38d94f8b88c
ce065a026516
13b10b8f321d
40f35204ce70
1b6ecbd6a091
d1c871755f38

To show the last created container, including the non-running container, run the following command:
root@Docker:~# docker ps -l
CONTAINER ID   IMAGE   COMMAND    CREATED       STATUS       PORTS  NAMES
b613fbc39be2      centos    "/bin/bash"     8 minutes ago  Up 8 minutes             sad_shannon

For help with the docker ps use --help

Display the timestamping capabilities of particular interface of Linux Server.

Thursday, January 11, 2018 0
Many NICs support software timestamping, but to query your own interface, use the below command, which will display the timestamping capabilities of particular interface

NAME
       ethtool - query or control network driver and hardware settings

[root@nsk ~]# ethtool -T enp0s3
Time stamping parameters for enp0s3:
Capabilities:
        software-transmit     (SOF_TIMESTAMPING_TX_SOFTWARE)
        software-receive      (SOF_TIMESTAMPING_RX_SOFTWARE)
        software-system-clock (SOF_TIMESTAMPING_SOFTWARE)
PTP Hardware Clock: none
Hardware Transmit Timestamp Modes: none
Hardware Receive Filter Modes: none
[root@nsk ~]#

Monday, January 8, 2018

Working with Docker Container - Starting a container

Monday, January 08, 2018 0

Starting a container

Listing images

We can list the images available on the system running the Docker daemon. These images might have been pulled from the registry, imported through the docker command, or created through Docker files.
root@Docker:~# docker images
REPOSITORY                     TAG                 IMAGE ID               CREATED            SIZE
nskselvan/nsk                      latest              b2f0c17eed23        2 months ago        197MB
centos-latest                        latest              2083898799b1       2 months ago        197MB
wordpress                            latest              224b7eef6944        3 months ago        408MB
mysql                                   5.7                  b4e78b89bcf3        3 months ago        412MB
registry                                 2                    28525f9a6e46         3 months ago        33.2MB
localhost:5000/reg               latest              28525f9a6e46         3 months ago        33.2MB
centos                                  latest             196e0ce0c9fb          3 months ago        197MB
localhost:5000/centos-ka     latest             196e0ce0c9fb          3 months ago        197MB

For help with the docker images use --help

Once we have images, we can use them to start the containers. In this recipe, we will start a container with the fedora:latest image and see what all things happen behind the scene.
syntax  : docker run [ OPTIONS ]  IMAGE[:TAG]  [COMMAND]  [ARG...]

root@Docker:~# docker run -i -t --name=centos centos /bin/bash
[root@6d65e303381c /]# uptime
 04:07:13 up  1:02,  0 users,  load average: 0.02, 0.01, 0.00

Here,
The -i option starts the container in the interactive mode
The -t option allocates a pseudo-tty and attaches it to the standard input

So, with the preceding command, we start a container from the centos:latest image, attach pseudo-tty, name it centos, and run the /bin/bash command. If the name is not specified, then a random string will be assigned as the name.
Also, if the image is not available locally, then it will get downloaded from the registry first and then run. Docker will run the search and pull commands before running the run command.

Under the hood, Docker:

Will merge all the layers that make that image using UnionFS.
Allocates a unique ID to a container, which is referred to as Container ID.
Allocates a filesystem and mounts a read/write layer for the container. Any changes on this layer will be temporary and will be discarded if they are not committed.
Allocates a network/bridge interface.
Assigns an IP address to the container.
Executes the process specified by the user.
Also, with the default Docker configuration, it creates a directory with the container's ID inside /var/lib/docker/containers, which has the container's specific information such as hostname, configuration details, logs, and /etc/hosts.

To exit from the container, press Ctrl + D or type exit. It is similar to exiting from a shell but this will stop the container.
The run command creates and starts the container. With Docker 1.3 or later, it is possible to just create the container using the create command and run it later using the start command, as shown in the following example:

root@Docker:~# ID=$(docker create -t -i centos bash)
root@Docker:~# docker start -a -i $ID
[root@8813d555d0dc /]#

The container can be started in the background and then we can attach to it whenever needed. We need to use the -d option to start the container in the background:
root@Docker:~# docker run -d -i -t centos /bin/bash
e3bfe67aa1759c5ccd0e8e061595b8214881673c4df599f9652a58369df7d948

The preceding command returns the container ID of the container to which we can attach later, as follows:
root@Docker:~# docker attach e3bfe67aa1759c5ccd0e8e061595b8214881673c4df599f9652a58369df7d948
[root@e3bfe67aa175 /]#

The --read-only option of the run command will mount the root filesystem in the read-only mode:
root@Docker:~# docker run --read-only -d -i -t centos /bin/bash
b613fbc39be2b46cbc485d76bae3f2e7f1781c570e32b6509dab5345d45b6e04

Note: this option just makes sure that we cannot modify anything on the root filesystem, but we are writing on volumes
For help with the docker run use --help

lsblk command in Linux

Monday, January 08, 2018 0
NAME
       lsblk - list block devices

lsblk lists information about all available or the specified block devices.  The lsblk command reads the sysfs filesystem to gather information. The command prints all block devices (except RAM disks) in a tree-like format by default

[root@nsk postfix]# lsblk
NAME                           MAJ:MIN RM  SIZE    RO TYPE MOUNTPOINT
sda                                     8:0       0      20G     0    disk
├─sda1                              8:1       0        1G     0    part /boot
└─sda2                              8:2       0      19G     0    part
  ├─centos-root              253:0       0      17G     0    lvm  /
  └─centos-swap            253:1       0        2G     0    lvm  [SWAP]
sr0                                     11:0       1  1024M     0     rom

The  default  output, as well as the default output from options like --fs and --topology, is subject to change.

[root@nsk postfix]# lsblk --fs
NAME               FSTYPE           LABEL UUID                                          MOUNTPOINT
sda
├─sda1              xfs                    7b4cffc6-3fe2-4ad9-9be9-ea83e11532fc           /boot
└─sda2              LVM2_member DQjmHN-fso4-Mu4t-3l1V-Yogj-ksTH-ROFiK7
  ├─centos-root  xfs                    4d056c54-3e98-4bbd-953d-ad49d24e89a3       /
  └─centos-swap swap               e97f5f2c-66b2-42c6-9baf-544123ee9abf          [SWAP]
sr0

[root@nsk postfix]# lsblk --topology


 For mre help, please refer man pages

Sunday, January 7, 2018

How to modify the Default Physical extent size of Physical Volume?

Sunday, January 07, 2018 0

There are 2 situation for modifying or Setting the Default Physical extent size in LVM.

1. Create a volume group with new Physical extent size. This method will be used before creating logical volume on that Volume Group.

#vgcreate -s PE_SIZE 

Here,
-s  --physicalextentsize Size[m|UNIT] - Sets the physical extent size of PVs in the VG.  The value must be either a power of 2 of at least 1 sector (where the sector size is the largest sector size of the PVs currently used in the VG), or at least 128KiB.  Once this value has been set, it is difficult to change without recreating the VG,unless no extents need moving.

2. Modify the Existing value of Physical extent size.

- remove all Logical Volumes of the Volume Group with lvremove
- do a vgreduce on that VG.
- "vgchage -an" on that VG
- vgremove that VG
- setup the VG with large PE size (vgcreate -s PE_SIZE)

A more "Forceful" approach is:
- "vgchange -a n" on the VG
- "pvcreate -ff" on all its PVs
- setup the VG with large PE size (vgcreate -s PE_SIZE)

Saturday, January 6, 2018

Display what extents are allocated on the physical volume to logical volume

Saturday, January 06, 2018 0
We can see what extents are allocated on the physical volume

NAME
       pvdisplay - Display various attributes of physical volume(s)
   
pvdisplay shows the attributes of PVs, like size, physical extent size, space used for the VG descriptor area, etc. Here pvdisplay along with options --maps will show the what extents are allocated on the physical volume to the lv.

[root@nsk postfix]# pvdisplay --maps /dev/sda2
  --- Physical volume ---
  PV Name                /dev/sda2
  VG Name                centos
  PV Size                  <19.00 GiB / not usable 3.00 MiB
  Allocatable              yes (but full)
  PE Size                   4.00 MiB
  Total PE                   4863
  Free PE                   0
  Allocated PE           4863
  PV UUID                 DQjmHN-fso4-Mu4t-3l1V-Yogj-ksTH-ROFiK7

  --- Physical Segments ---
  Physical extent 0 to 511:
    Logical volume      /dev/centos/swap
    Logical extents      0 to 511
  Physical extent 512 to 4862:
    Logical volume      /dev/centos/root
    Logical extents      0 to 4350

Here,
         -m  --maps  Display the mapping of physical extents to LVs and logical extents.

Tee command in Linux

Saturday, January 06, 2018 0
NAME
       tee - read from standard input and write to standard output and files
   
Copy standard input to each FILE, and also to standard output

options:
-a, --append  - append to the given FILEs, do not overwrite
-i, --ignore-interrupts - ignore interrupt signals
Ex : 
    [root@nsk postfix]# cat main.cf | egrep -v "^#|^$" |tee -a main.cf_catoutput

Here,
Tee command will read the output of cat command & write the standard output to a specified file.

Friday, January 5, 2018

Single command to take the backup and removes the commented and blank lines in a file

Friday, January 05, 2018 0
We can achieve by using 2 ways in Linux.

SED Command:

Normally, we will take back up and tidy the most of the configuration file. There is a tendency for many software packages to over comment their configurations. This can cause issues where you think that you have implemented a change; however, it was also set later on and you may not have noticed it.
Postfix, main.cf configuration file having 679 lines. We will back up the file so that we do not lose comments and documentations, but we will also have a new working file with less than 10 percent of the number of lines. The following command shows how this is done
[root@nsk etc]# cat /etc/postfix/main.cf | wc -l
679

[root@nsk etc]# sudo sed -i.bak '/^#/d;/^$/d' /etc/postfix/main.cf
Here:
#/d   - Remove the commented line
^$   - Remove the blank line

[root@nsk etc]# cat postfix/main.cf | wc -l
25
Above sed command reduces the file from 679 lines to 25 lines and is far easier to work with. We can now edit this file without any distractions. We will add two new lines and edit two existing lines to the /etc/postfix/main.cf file. This will need to be edited as root.

CAT Command:

We can use below command also to achieve the above output. 

[root@nsk etc]# [root@nsk postfix]# cat main.cf.bak | egrep -v "^#|^$" |tee -a main.cf_catoutput
[root@nsk postfix]# cat main.cf_catoutput | wc -l
25


Sed command will take the backup of existing file & the output will be saved in existing name. Here Cat command output will be saved in different name.

Thursday, January 4, 2018

find: paths must precede expression: SOLVED

Thursday, January 04, 2018 0

While running find command, we are getting the message "find: paths must precede expression:"

[root@testserver emd]# find /oem1/agent12c/odcagent/agent_inst/sysman/emd/ -mtime +10 -mtime -30 -type f -name core.* -exec ls -al {} \;
find: paths must precede expression: core.java.11182
Usage: find [-H] [-L] [-P] [-Olevel] [-D help|tree|search|stat|rates|opt|exec] [path...] [expression]

Solution: 
While running find command, name field should be covered with ' ' notation.
[root@testserver emd]# find /oem1/agent12c/odcagent/agent_inst/sysman/emd/ -mtime +6 -mtime -30 -type f -name 'core.*'  -exec ls -al {} \;
-rw------- 1 odcagent dba 869224448 Dec 25 13:19 /oem1/agent12c/odcagent/agent_inst/sysman/emd/core.java.56825
-rw------- 1 odcagent dba 869380096 Dec 23 19:39 /oem1/agent12c/odcagent/agent_inst/sysman/emd/core.java.1860

Wednesday, January 3, 2018

Working with Docker Containers

Wednesday, January 03, 2018 0

Working with Docker Containers

We need an image to start the container. Let's see how we can search images on the Docker registry. A registry holds the Docker images and it can be both public and private. By default, the search will happen on 
the default public registry, which is called Docker Hub and is located at https://hub.docker.com/

Docker client and server version
root@Docker:~# docker version
Client:
 Version:        17.09.0-ce
 API version:  1.32
 Go version:   go1.8.3
 Git commit:   afdb6d4
 Built:             Tue Sep 26 22:42:18 2017
 OS/Arch:       linux/amd64

Server:
 Version:        17.09.0-ce
 API version:  1.32 (minimum version 1.12)
 Go version:   go1.8.3
 Git commit:   afdb6d4
 Built:             Tue Sep 26 22:40:56 2017
 OS/Arch:       linux/amd64
 Experimental: false

Listing/searching for an image
Format : docker search TERM
root@Docker:~# docker search centos

For help with the Docker search, run the following command:
docker search --help

Pulling an image
Format: docker pull NAME[:TAG]

root@Docker:~# docker pull fedora
Using default tag: latest
latest: Pulling from library/fedora
a8ee583972c2: Downloading [=========>                                         ]  16.75MB/86.82MB
..
Image tags group images of the same type. For example, CentOS can have images with tags such as centos5, centos6, and so on. For example, to pull an image with the specific tag, run the following command:
$ docker pull centos:centos7

By default, the image with latest tag gets pulled. To pull all images corresponding to all tags, use the following command:
$ docker pull --all-tags centos

For help with the docker pull use --help

Tuesday, January 2, 2018

Configuring SMTP in RHEL 7

Tuesday, January 02, 2018 0

Configuring Simple Mail Transfer Protocol in RHEL 7

Many programs use  SMTP to send messages about their status and so on. By default, postfix is configured to deliver all messages locally and not respond to incoming mails. If you have an environment of multiple servers, this can become quite tedious to log on to each server to check for new mail. This document will show you how to relay messages to a central mail relay or message store that also uses SMTP.

Postfix is installed by default on RHEL 7.

In this document, we'll combine several options:
We'll allow the server to accept incoming mails
We'll only allow the server to relay messages from recipients in the testdomain.local domain
We'll forward all mails to the mailhost.testdomain.local mailserver

To complete this document, perform the following steps:
Edit /etc/postfix/main.cf with your favorite editor.
Modify inet_interface to accept mails on any interface through the following command:
      inet_interface = all
Add the smtpd_recipient_restrictions directive to only allow incoming mails from the testdomain.local domain, as follows:
     smtpd_recipient_restrictions =
     check_sender_access hash:/etc/postfix/sender_access, 
      reject
As you can see, the last two lines are indented. The postfix considers this block as one line instead of three separate lines.
Add the relayhost directive to point to mailhost.testdomain.local, as follows:
      relayhost = mailhost.testdomain.local
Now, save the postfix file.
Create /etc/postfix/sender_access with the following contents:
       testdomain.local   OK
Next, hash the /etc/postfix/access file using the following command:
       #postmap /etc/postfix/access
Finally, restart postfix, as follows:
       # systemctl restart postfix

To monitor your mail queue on the system, execute the following:
       # postqueue -p
Whenever your mail relay cannot forward mails, it stores them locally and tries to resend them at a later time. When you restore the mailflow, you can flush the queue and attempt delivery by executing the following:
       # postqueue -f
The kind of setup presented in this recipe is quite simple and assumes that you don't have malicious users on your network. There are software that allow you to mitigate spam and viruses. Popular solutions for this are spamassassin and amavis.