This Blog is to share our knowledge and expertise on Linux System Administration and VMware Administration

Saturday, November 21, 2015

Brief about ESXTOP - Batch Mode

Saturday, November 21, 2015 0
Batch mode – Statistics can be collected  and output can be saved in a file (csv) and  also  it can be viewed & analyzed using windows perfmon & other tools in later time.

To run esxtop in batch mode and save the output file for feature analysis use the command as in in below syntax

esxtop -b -d 10 -n 5 >/home/nagu/esxtstats.csv

–d Switch is used for the number of seconds between refreshes
–n switch is the number of iterations to run the esxtop


In our above example, esxtop command will run for about 50 seconds. 10 seconds dealy* 5 iterations. redirecting the output of above esxtop stats into csv file to store in the location  

/home/nagu/esxstats.csv


Once the command completed, Browse towards the location /home/nagu to see the esxtop output file “esxstats.csv”. Transfer the csv file using winscp to your windows desktop and analyze using windows perfmon or esxplot.

VMWare Interview Questions and answers on vMotion

Saturday, November 21, 2015 0
1.What is vMotion?

      Live migration of a virtual machine from one ESX server to another with Zero downtime.

2. What are the use cases of vMotion ?
  • Balance the load on ESX servers (DRS
  • Save power by shutting down ESX using DPM
  • Perform patching and maintenance on ESX server (Update Manager or HW maintenance
3.  What are Pre-requisites for the vMotion to Work?
  • ESX host must be licensed for VMotion
  • ESX  servers must be configured with vMotion Enabled VMkernel Ports.   
  • ESX servers must have compatible CPU’s for the vMotion to work
  • ESX servers should have Shared storage (FB, iSCSI or NFS) and VM’s should be stored on that    storage.
  • ESX servers should have exact similar network & network names
4. What are the Limitations of vMotion?
  • Virtual machines configured with the Raw Device Mapping(RDM) for clustering features using vMotion
  • VM cannot be connected to a CD-ROM or floppy drive that is using an ISO or floppy image stored on a drive that is local to the host server. The device should be disconnected before initiating the vMotion.
  • Virtual Machine cannot be migrated with VMotion unless the destination swapfile location is the same as the source swapfile location. As a best practice, Place the virtual machine swap files with the virtual  machine configuration file.
  • Virtual Machine affinity must not be set (aka, bound to physical CPUs).
5. Steps involved in VMWare vMotion ?
  • A request has been made that VM-1 should be migrated (or “VMotioned”) from ESX A to ESX B.
  • VM-1’s memory is pre-copied from ESX A to ESX B while ongoing changes are written to a memory bitmap on ESX A.
  • VM-1 is quiesced on ESX A and VM-1’s memory bitmap is copied to ESX B.
  • VM-1 is started on ESX B and all access to VM-1 is now directed to the copy running on ESX B.
  • The rest of VM-1’s memory is copied from ESX A all the while memory is being read and written from VM-1 on ESX A when applications attempt to access that memory on VM-1 on ESX B.
  • If the migration is successful, VM-1 is unregistered on ESX A. 

PowerShell Script to List all VM’s with a connected CD-ROM/floppy device

Saturday, November 21, 2015 0
This script will report all VMs with a connected CD-ROM/floppy device. It will give you information about the device status – e.g. connected, connect at power on, client device

Replace vCenter Server with your vCenter Server name in the first line:

Connect-VIServer vCenter_name

$vms = Get-VM
write “VMs with a connected CD-ROM:”
foreach ($vm in $vms | where { $_ | Get-CDDrive | where { $_.ConnectionState.Connected -eq “true”}}) {
write $vm.name
}
write “VMs with CD-ROM connected at power on:”
foreach ($vm in $vms | where { $_ | Get-CDDrive | where { $_.ConnectionState.StartConnected -eq “true”}}) {
write $vm.name
}
write “VMs with CD-ROM connected as ‘Client Device’:”
foreach ($vm in $vms | where { $_ | Get-CDDrive | where { $_.RemoteDevice.Length -ge 0}}) {
write $vm.name
}
write “VMs with CD-ROM connected to ‘Datastore ISO file’:”
foreach ($vm in $vms | where { $_ | Get-CDDrive | where { $_.ISOPath -like “*.ISO*”}}) {
write $vm.name
}
write “VMs with connected Floppy:”
foreach ($vm in $vms | where { $_ | Get-FloppyDrive | where { $_.ConnectionState.Connected -eq “true”}}) {
write $vm.name
}
write “VMs with floppy connected at power on:”
foreach ($vm in $vms | where { $_ | Get-FloppyDrive | where { $_.ConnectionState.StartConnected -eq “true”}}) {
write $vm.name
}
write “VMs with floppy connected as ‘Client Device’:”
foreach ($vm in $vms | where { $_ | Get-FloppyDrive | where { $_.RemoteDevice.Length -ge 0}}) {
write $vm.name
}

Note: Copy this code in a notepad and save the file as .ps1

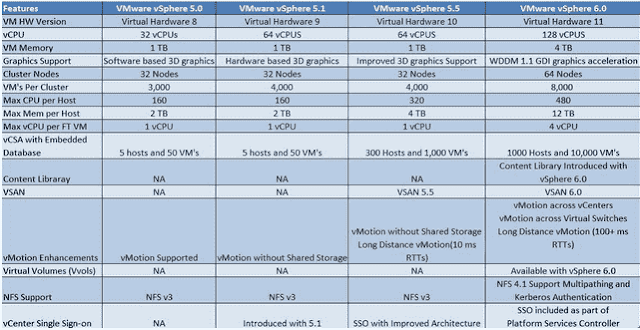
vSphere 6.0 -Difference between vSphere 5.0, 5.1, 5.5 and vSphere 6.0

Saturday, November 21, 2015 0
vSphere 6.0 -Difference between vSphere 5.0, 5.1, 5.5 and vSphere 6.0
vSphere 6.0 released with lot of new features and enhancements as compared to the previous versions of vSphere releases. Below is the difference between vSphere 5.0, 5.1, 5.5 and vSphere 6.0:


VMWare HA Slots Calculation

Saturday, November 21, 2015 0
 What is SLOT?

As per VMWare’s Definition,
“A slot is a logical representation of the memory and CPU resources that satisfy the requirements for any powered-on virtual machine in the cluster.”
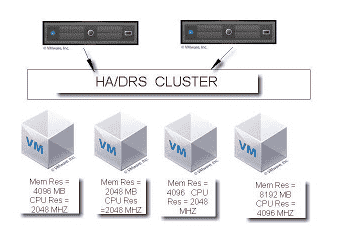
If you have configured reservations at VM level, It influence the HA slot calculation. Highest memory reservation and highest CPU reservation of the VM in your cluster determines the slot size for the cluster.

Here is the Example,

If you have the VM configured with the highest memory reservation of 8192 MB (8 GB) and  highest CPU reservation of 4096 MHZ. among the other VM’s  in the cluster, then the slot size for memory is 8192 MB and slot size for CPU is 4096 MHZ. in the cluster.


If no VM level reservation is configured , Minimum CPU size of 256 MHZ and memory size of 0 MB +  VM memory overhead will be considered as CPU and Memory slot size.
Calculation for Number of Slots in cluster :-
Once we got the Slot size for memory and CPU by the above method , Use the below calculation
Num of CPU Slots  = Total available CPU resource of ESX or cluster   /  CPU Slot Size
Num of memory slots = Total available memory resource of ESX or cluster minus memory used for service console & ESX system /  Memory Slot size

Let’s take a Example, 
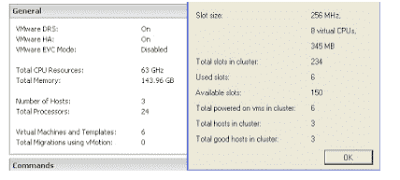
I have 3 host on the cluster and 6 Virtual machine is running on the cluster and Each host capacity as follows
RAM = 50 GB per Host
CPU = 8 X 2.666 GHZ  per host
Cluster RAM Resources = 50 X 3 = 150 GB – Memory for service console and system = 143 GB
Cluster CPU resources = 8 X 2.6 X 3 =  63 GHZ (63000 MHZ) of total CPU capacity in the cluster – CPU Capacity used by the ESX System = 60384 MHZ


I don’t have any memory  or CPU reservation in my cluster, So,  the default CPU slot size 256 MHZ and one of my Virtual machine is assigned with 8 vcpu and its memory overhead is  344.98 MB (which is the highest overhead among my 6 virtual machines in the cluster)
Let’s calculate the num of  CPU  & Memory slots
Num of CPU Slots  = Total available CPU resource of cluster /  CPUSlot size in MHZ
No of CPU Slots = 60384 MHZ / 256 MHZ = 235.875 Approx
Num of Memory Slots =  Total available Memory resource of cluster  /  memory Slot Size  in MB
Num of Memory Slots =  146432 / 345 =  424 Approx
The most restrictive number among CPU and Memory slots determines the amount of slots for this cluster. We have 235 slots available for  CPU and 424 Slots available for Memory. So the most restrictive number is 235.
So, Total number of slots for my cluster is 235 Approx. Please find the below snapshot


Installing Esxi Patches by using LCI

Saturday, November 21, 2015 0
Pre-requisites steps for installing ESXi patches

    Download the patches applicable for our ESX/ESXi  version manually

    We can install patches using esxcli command by using SSH connection or via ESXi shell using remote console connections like ILO, DRAC.
    Now the downloaded patches needs to be transferred to the datastore of ESX/ESXi hosts

 Implementation steps

    1. Login to your ESXi host using SSH or ESXi shell with your root credentials
    2. Browse towards the Patch location in your datastore  and verify the donwloaded patches are alreadys in and note down the complete path for the patch.
   3 .Before installing patches placing your ESXi host in maintenance mode    is  very important.

    esxcli software vib install -d /vmfs/volumes/datastore1/ESXi\ patches/ESXi510-201210001.zip

    To verify the installed VIB's installed on your host execute the below command

esxcli software vib list

    Reboot your ESXi host for the changes to take effect and exit your host from the maintenance mode

Explain the Vmotion Background Process

Saturday, November 21, 2015 0
 Vmotion Background Process
  • The Virtual Machine Memory state is copied over the Vmotion Network from the source Host to the Target Host. users continue to access the virtual machine and potentially update pages in memory. A list of modified pages in memory is kept in a memory Bitmap on the source Host.
  • After most of the virtual machine memory is copied from the source host to target host the virtual machine quiesced no additional activity occurs on the virtual machine. In quiesce period VMOTION transfers the virtual machine device state and memory Bitmap to the destination Host.
  • Immediately after the virtual machine is quiesced on the source host, the virtual machine initialized and starts running on the target host.
  • Users access the virtual machine on the target host instead of the source host.
  • The memory pages that the virtual machine was using on the source host are marked as free.

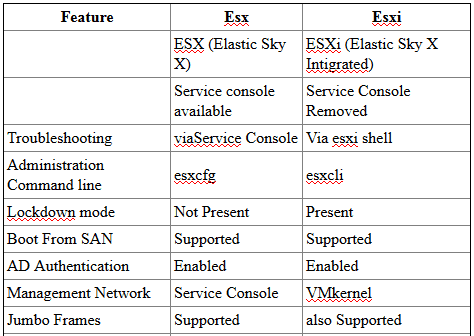
Difference Between Esx and Esxi

Saturday, November 21, 2015 0
Difference Between Esx and Esxi


Thursday, November 19, 2015

How to Ignore the Local Disks when Generating Multipath Devices in Linux Server

Thursday, November 19, 2015
Some machines have local SCSI cards for their internal disks. DM-Multipath is not recommended for these devices.

The following procedure shows how to modify the multipath  configuration file to ignore the local disks when configuring multipath.

1.  Determine which disks are the internal disks and mark them as the ones to blacklist.

In this example, /dev/sda is the internal disk. Note that as originally configured in the default multipath configuration file, executing the multipath -v2 shows the local disk, /dev/sda, in the multipath map.

[root@test ~]# multipath -v2
create: SIBM-ESXSST336732LC____F3ET0EP0Q000072428BX1
[size=33 GB][features="0"][hwhandler="0"]
\_ round-robin 0
  \_ 0:0:0:0 sda  8:0    [---------
device-mapper ioctl cmd 9 failed: Invalid argument
device-mapper ioctl cmd 14 failed: No such device or address
create: 3600a0b80001327d80000006d43621677
[size=12 GB][features="0"][hwhandler="0"]
\_ round-robin 0
  \_ 2:0:0:0 sdb  8:16  
  \_ 3:0:0:0 sdf  8:80  
create: 3600a0b80001327510000009a436215ec
[size=12 GB][features="0"][hwhandler="0"]
\_ round-robin 0
  \_ 2:0:0:1 sdc  8:32  
  \_ 3:0:0:1 sdg  8:96  
create: 3600a0b80001327d800000070436216b3
[size=12 GB][features="0"][hwhandler="0"]
\_ round-robin 0
  \_ 2:0:0:2 sdd  8:48  
  \_ 3:0:0:2 sdh  8:112 

2. In order to prevent the device mapper from mapping /dev/sda in its multipath maps, edit the blacklist section of the /etc/multipath.conf file to include this device. Although you could blacklist the sda device using a devnode type, that would not be safe procedure since /dev/sda is not guaranteed to be the same on reboot. To blacklist individual devices, you can blacklist using the WWID of that device.
ote that in the output to the multipath -v2 command, the WWID of the /dev/sda device is SIBM-ESXSST336732LC____F3ET0EP0Q000072428BX1.
To blacklist this device, include the following in the /etc/multipath.conf file.

blacklist {
      wwid SIBM-ESXSST336732LC____F3ET0EP0Q000072428BX1
}

3. After you have updated the /etc/multipath.conf file, you must manually tell the multipathd daemon to reload the file.

The following command reloads the updated /etc/multipath.conf file.
service multipathd reload

4. Run the following commands:

multipath -F
multipath -v2
[root@test~]# multipath -F
[root@test ~]# multipath -v2

create: 3600a0b80001327d80000006d43621677
[size=12 GB][features="0"][hwhandler="0"]
\_ round-robin 0
  \_ 2:0:0:0 sdb  8:16  
  \_ 3:0:0:0 sdf  8:80  
create: 3600a0b80001327510000009a436215ec
[size=12 GB][features="0"][hwhandler="0"]
\_ round-robin 0
  \_ 2:0:0:1 sdc  8:32  
  \_ 3:0:0:1 sdg  8:96  
create: 3600a0b80001327d800000070436216b3
[size=12 GB][features="0"][hwhandler="0"]
\_ round-robin 0
  \_ 2:0:0:2 sdd  8:48  
  \_ 3:0:0:2 sdh  8:112 

Tuesday, November 17, 2015

Explain Multipath command output in Linux Server

Tuesday, November 17, 2015
When you create, modify, or list a multipath device, you get a printout of the current device setup. The format is as follows.

For each multipath device:

 action_if_any: alias (wwid_if_different_from_alias) [size][features][hardware_handler]

For each path group:

\_ scheduling_policy [path_group_priority_if_known] [path_group_status_if_known]

For each path:

\_ host:channel:id:lun devnode major:minor [path_status] [dm_status_if_known]

For example, the output of a multipath command might appear as follows:

mpath1 (3600d0230003228bc000339414edb8101) [size=10 GB][features="0"][hwhandler="0"]
\_ round-robin 0 [prio=1][active]
 \_ 2:0:0:6 sdb 8:16 [active][ready]
\_ round-robin 0 [prio=1][enabled]
 \_ 3:0:0:6 sdc 8:64 [active][ready]

If the path is up and ready for I/O, the status of the path is ready or active. If the path is down, the status is faulty or failed.


 The path status is updated periodically by the multipathd daemon based on the polling interval defined in the /etc/multipath.conf file.

The dm status is similar to the path status, but from the kernel's point of view. The dm tatus has two states: failed, which is analogous to faulty, and active which covers all other path states. Occasionally, the path state and the dm state of a device will temporarily not agree.

Friday, November 13, 2015

How to setup DM-Multipath in Linux server?

Friday, November 13, 2015 0
DM-Multipath includes compiled-in default settings that are suitable for common multipath configurations.

Setting up DM-multipath is often a simple procedure.

The basic procedure for configuring your system with DM-Multipath is as follows:

1. Install device-mapper-multipath rpm.
 
Before setting up DM-Multipath on your system, ensure that your system has been updated and includes the device-mapper-multipath package.

2. Edit the multipath.conf configuration file:

  Edit the /etc/multipath.conf file by commenting out the following lines at the top of the file. This section of the configuration   file, in its initial state, blacklists all devices. You must comment it out to enable multipathing.
     
       blacklist {
        devnode "*"
}

The default settings for DM-Multipath are compiled in to the system and do not need to be explicitly set in the /etc/multipath.conf file.

The default value of path_grouping_policy is set to failover, so in this example you do not need to change the default value.

The initial defaults section of the configuration file configures your system that the names of the multipath devices are of the  form mpathn; without this setting, the names of the multipath devices would be aliased to the WWID of the device.

Save the configuration file and exit the editor.

3. Start the multipath daemons.

modprobe dm-multipath
service multipathd start
multipath -v2

The multipath -v2 command prints out multipathed paths that show which devices are multipathed. If the command does not print anything out, ensure that all SAN connections are set up properly and the system is multipathed.

4. Execute the following command to ensure sure that the multipath daemon starts on bootup:

    chkconfig multipathd on

Since the value of user_friendly_name is set to yes in the configuration file the multipath devices will be created as /dev/mapper/mpathn

Monday, November 9, 2015

Understanding the TCPDUMP command with an example - Linvirtshell

Monday, November 09, 2015 0
In most cases you will need root permission to be able to capture packets on an interface. Using tcpdump (with root) to capture the packets and saving them to a file to analyze.

See the list of interfaces on which tcpdump can listen:

tcpdump -D

[root@nsk-linux nsk]# tcpdump -D

1.usbmon1 (USB bus number 1)
2.eth4
3.any (Pseudo-device that captures on all interfaces)
4.lo

Listen on interface eth0:

tcpdump -i eth0

Listen on any available interface (cannot be done in promiscuous mode. Requires Linux kernel 2.2 or greater)

tcpdump -i any

Capture only N number of packets using tcpdump -c

 [root@nsk-linux nsk]# tcpdump -c 2 -i eth4

tcpdump: verbose output suppressed, use -v or -vv for full protocol decode
listening on eth4, link-type EN10MB (Ethernet), capture size 65535 bytes
18:35:51.382706 IP 10.0.2.15.ssh > 10.0.2.2.51879: Flags [P.], seq 4037059562:4037059770, ack 3747030, win 36432, length 208
18:35:51.383008 IP 10.0.2.2.51879 > 10.0.2.15.ssh: Flags [.], ack 208, win 65535, length 0
2 packets captured
6 packets received by filter
0 packets dropped by kernel

Display Captured Packets in ASCII using tcpdump -A

# tcpdump -A -i eth0

Display Captured Packets in HEX and ASCII using tcpdump -XX

#tcpdump -XX -i eth0

Be verbose while capturing packets

#tcpdump –v

Be very verbose while capturing packets

#tcpdump -vvv

Be verbose and print the data of each packet in both hex and ASCII, excluding the link level header

tcpdump -v -X

Be verbose and print the data of each packet in both hex and ASCII, also including the link level header

tcpdump -v -XX

Be less verbose (than the default) while capturing packets

tcpdump -q

Limit the capture to 100 packets

tcpdump -c 100

Record the packet capture to a file called capture.cap

tcpdump -w capture.cap

Record the packet capture to a file called capture.cap but display on-screen how many packets have been captured in real-time

tcpdump -v -w capture.cap

Display the packets of a file called capture.cap

tcpdump -r capture.cap

Display the packets using maximum detail of a file called capture.cap

tcpdump -vvv -r capture.cap

Display IP addresses and port numbers instead of domain and service names when capturing packets (note: on some systems you need to specify -nn to display port numbers)

tcpdump -n

Capture any packets where the destination host is 10.0.2.2. Display IP addresses and port numbers

tcpdump -n dst host 10.0.2.2

Capture any packets where the source host is 10.0.2.2. Display IP addresses and port numbers

tcpdump -n src host 10.0.2.2

Capture any packets where the source or destination host is 10.0.2.15. Display IP addresses and port numbers

tcpdump -n host 10.0.2.15

Capture any packets where the destination network is 10.0.2.0/24. Display IP addresses and port numbers

tcpdump -n dst net 10.0.2.0/24

Capture any packets where the source network is 10.0.2.0/24. Display IP addresses and port numbers

tcpdump -n src net 10.0.2.0/24


Capture any packets where the source or destination network is 10.0.2.0/24. Display IP addresses and port numbers

[root@nsk ~]# tcpdump -n net 10.0.2.0/24

tcpdump: verbose output suppressed, use -v or -vv for full protocol decode

listening on enp0s3, link-type EN10MB (Ethernet), capture size 262144 bytes

18:56:07.471583 IP 10.0.2.15.ssh > 10.0.2.2.60038: Flags [P.], seq 312243348:312243556, ack 3492510, win 65136, length 208
18:56:07.471790 IP 10.0.2.15.ssh > 10.0.2.2.60038: Flags [P.], seq 208:384, ack 1, win 65136, length 176
18:56:07.471947 IP 10.0.2.15.ssh > 10.0.2.2.60038: Flags [P.], seq 384:544, ack 1, win 65136, length 160
18:56:07.472093 IP 10.0.2.15.ssh > 10.0.2.2.60038: Flags [P.], seq 544:704, ack 1, win 65136, length 160
18:56:07.472247 IP 10.0.2.15.ssh > 10.0.2.2.60038: Flags [P.], seq 704:864, ack 1, win 65136, length 160
18:56:07.472370 IP 10.0.2.15.ssh > 10.0.2.2.60038: Flags [P.], seq 864:1024, ack 1, win 65136, length 160
18:56:07.472576 IP 10.0.2.15.ssh > 10.0.2.2.60038: Flags [P.], seq 1024:1184, ack 1, win 65136, length 160
18:56:07.472605 IP 10.0.2.2.60038 > 10.0.2.15.ssh: Flags [.], ack 208, win 65535, length 0
18:56:07.472619 IP 10.0.2.2.60038 > 10.0.2.15.ssh: Flags [.], ack 384, win 65535, length 0
18:56:07.472624 IP 10.0.2.2.60038 > 10.0.2.15.ssh: Flags [.], ack 544, win 65535, length 0
18:56:07.472627 IP 10.0.2.2.60038 > 10.0.2.15.ssh: Flags [.], ack 704, win 65535, length 0
18:56:07.472629 IP 10.0.2.2.60038 > 10.0.2.15.ssh: Flags [.], ack 864, win 65535, length 0
18:56:07.472632 IP 10.0.2.2.60038 > 10.0.2.15.ssh: Flags [.], ack 1024, win 65535, length 0

Capture any packets where the destination port is 22. Display IP addresses and port numbers

[root@nsk ~]# tcpdump -n dst port 22

tcpdump: verbose output suppressed, use -v or -vv for full protocol decode

listening on enp0s3, link-type EN10MB (Ethernet), capture size 262144 bytes
18:54:41.047546 IP 10.0.2.2.60038 > 10.0.2.15.ssh: Flags [.], ack 312125892, win 65535, length 0
18:54:41.047856 IP 10.0.2.2.60038 > 10.0.2.15.ssh: Flags [.], ack 161, win 65535, length 0
18:54:41.048086 IP 10.0.2.2.60038 > 10.0.2.15.ssh: Flags [.], ack 305, win 65535, length 0
18:54:41.048309 IP 10.0.2.2.60038 > 10.0.2.15.ssh: Flags [.], ack 449, win 65535, length 0
18:54:41.048535 IP 10.0.2.2.60038 > 10.0.2.15.ssh: Flags [.], ack 593, win 65535, length 0
18:54:41.048744 IP 10.0.2.2.60038 > 10.0.2.15.ssh: Flags [.], ack 737, win 65535, length 0
18:54:41.048969 IP 10.0.2.2.60038 > 10.0.2.15.ssh: Flags [.], ack 881, win 65535, length 0

Capture any packets where the destination port is is between 1 and 1023 inclusive. Display IP addresses and port numbers

[root@nsk ~]# tcpdump -n dst portrange 1-1023

tcpdump: verbose output suppressed, use -v or -vv for full protocol decode
listening on enp0s3, link-type EN10MB (Ethernet), capture size 262144 bytes
18:53:33.082176 IP 10.0.2.2.60038 > 10.0.2.15.ssh: Flags [.], ack 311660756, win 65535, length 0
18:53:33.082872 IP 10.0.2.2.60038 > 10.0.2.15.ssh: Flags [.], ack 161, win 65535, length 0
18:53:33.083288 IP 10.0.2.2.60038 > 10.0.2.15.ssh: Flags [.], ack 305, win 65535, length 0
18:53:33.083668 IP 10.0.2.2.60038 > 10.0.2.15.ssh: Flags [.], ack 449, win 65535, length 0
18:53:33.083860 IP 10.0.2.2.60038 > 10.0.2.15.ssh: Flags [.], ack 593, win 65535, length 0
18:53:33.084131 IP 10.0.2.2.60038 > 10.0.2.15.ssh: Flags [.], ack 737, win 65535, length 0
18:53:33.084410 IP 10.0.2.2.60038 > 10.0.2.15.ssh: Flags [.], ack 881, win 65535, length 0
18:53:33.084655 IP 10.0.2.2.60038 > 10.0.2.15.ssh: Flags [.], ack 1025, win 65535, length 0

Capture only TCP packets where the destination port is is between 1 and 1023 inclusive. Display IP addresses and port numbers

[root@nsk ~]# tcpdump -n tcp dst portrange 1-1023

tcpdump: verbose output suppressed, use -v or -vv for full protocol decode
listening on enp0s3, link-type EN10MB (Ethernet), capture size 262144 bytes
18:51:43.154211 IP 10.0.2.2.60038 > 10.0.2.15.ssh: Flags [.], ack 311537732, win 65535, length 0
18:51:43.155095 IP 10.0.2.2.60038 > 10.0.2.15.ssh: Flags [.], ack 161, win 65535, length 0
18:51:43.155509 IP 10.0.2.2.60038 > 10.0.2.15.ssh: Flags [.], ack 305, win 65535, length 0
18:51:43.155805 IP 10.0.2.2.60038 > 10.0.2.15.ssh: Flags [.], ack 449, win 65535, length 0
18:51:43.156082 IP 10.0.2.2.60038 > 10.0.2.15.ssh: Flags [.], ack 593, win 65535, length 0
18:51:43.156352 IP 10.0.2.2.60038 > 10.0.2.15.ssh: Flags [.], ack 737, win 65535, length 0
18:51:43.156619 IP 10.0.2.2.60038 > 10.0.2.15.ssh: Flags [.], ack 881, win 65535, length 0


Capture only UDP packets where the destination port is is between 1 and 1023 inclusive. Display IP addresses and port numbers

[root@nsk ~]# tcpdump -n udp dst portrange 1-1023


Capture any packets with destination IP 10.0.2.15 and destination port 23. Display IP addresses and port numbers

[root@nsk ~]# tcpdump -n "dst host 10.0.2.15 and dst port 23"


Capture any packets with destination IP 10.0.2.15 and destination port 80 or 443. Display IP addresses and port numbers

[root@nsk ~]# tcpdump -n "dst host 10.0.2.15 and (dst port 80 or dst port 443)"


Capture any ICMP packets

[root@nsk ~]# tcpdump -v icmp


Capture any ARP packets

[root@nsk ~]# tcpdump -v arp


Capture 500 bytes of data for each packet rather than the default of 68 bytes

[root@nsk-linux nsk]# tcpdump -s 500


Capture all bytes of data within the packet

[root@nsk-linux nsk]# tcpdump -s 0


Capture the particular interface traffic and save as .cap file

[root@nsk-linux nsk]# tcpdump -i enp0s3 -s 0 -vvv -w /home/nsk/file_18:03:54.pcap
tcpdump: listening on enp0s3, link-type EN10MB (Ethernet), capture size 65535 bytes
^C97390 packets captured
97855 packets received by filter
460 packets dropped by kernel

Thursday, November 5, 2015

Explain about the LVM DUMPCONFIG command in Linux Server?

Thursday, November 05, 2015 0
The lvm dumpconfig Command

You can display the current LVM configuration, or save the configuration to a file, with the dumpconfig option of the lvm command. There are a variety of features that the lvm dumpconfig command provides, including the following;


1. You can dump the current lvm configuration merged with any tag configuration files.
2. You can dump all current configuration settings for which the values differ from the defaults.
3. You can dump all new configuration settings introduced in the current LVM version, in a specific LVM version.
4. You can dump all profilable configuration settings, either in their entirety or separately   for command and metadata profiles

5. You can dump only the configuration settings for a specific version of LVM.
6. You can validate the current configuration.

For a full list of supported features and information on specifying the lvm dumconfig options, see the lvm-dumpconfig man page.

What are the Metadata Contents available in LVM?

Thursday, November 05, 2015 0
The volume group metadata contains:
    ·         Information about how and when it was created
    ·         Information about the volume group:

The volume group information contains:
    ·         Name and unique id
    ·         A version number which is incremented whenever the metadata gets updated
    ·         Any properties: Read/Write? Resizeable?
    ·         Any administrative limit on the number of physical volumes and logical volumes it may contain
    ·         The extent size (in units of sectors which are defined as 512 bytes)

An unordered list of physical volumes making up the volume group, each with:
    ·         Its UUID, used to determine the block device containing it
    ·         Any properties, such as whether the physical volume is allocatable
    ·         The offset to the start of the first extent within the physical volume (in sectors)
    ·         The number of extents

 An unordered list of logical volumes. Each consisting of
        An ordered list of logical volume segments. For each segment the metadata includes a mapping applied to an ordered list of physical volume segments or logical volume segments.

Sample Metadata Contents.

# Generated by LVM2 version 2.02.88(2)-RHEL5 (2012-01-20): Sat Mar 21 15:44:51 2015

contents = "Text Format Volume Group"
version = 1

description = "Created *before* executing '/usr/sbin/vgs --noheadings -o name'"

creation_host = "testserver.com"    # Linux testserver.com 2.6.32-300.10.1.el5uek #1 SMP Wed Feb 22 17:37:40 EST 2012 x86_64
creation_time = 1426945491      # Sat Mar 21 15:44:51 2015

VolGroup00 {
        id = "ZfQCQ1-suTc-ykV9-TwvN-ACpB-XcEM-NuWlnE"
        seqno = 3
        status = ["RESIZEABLE", "READ", "WRITE"]
        flags = []
        extent_size = 65536             # 32 Megabytes
        max_lv = 0
        max_pv = 0
        metadata_copies = 0

        physical_volumes {

                pv0 {
                        id = "36bcud-E3uI-NPeG-BfTe-ePx0-FEpQ-un5N5F"
                        device = "/dev/xvda2"   # Hint only

                        status = ["ALLOCATABLE"]
                        flags = []
                        dev_size = 104647410    # 49.8998 Gigabytes
                        pe_start = 384
                        pe_count = 1596 # 49.875 Gigabytes
                }
        }
        logical_volumes {

                LogVol00 {
                        id = "SWOjo1-qFZZ-CztY-CSXb-zQdX-pwRH-jDNI3o"
                        status = ["READ", "WRITE", "VISIBLE"]
                        flags = []
                        segment_count = 1

                        segment1 {
                                start_extent = 0
                                extent_count = 1024     # 32 Gigabytes

                                type = "striped"
                                stripe_count = 1        # linear

                                stripes = [
                                        "pv0", 0
                                ]
                        }
                }
                LogVol01 {
                        id = "LoJOLg-5TDC-5ity-l5a6-qLJ5-fuju-oRRzWb"
                        status = ["READ", "WRITE", "VISIBLE"]
                        flags = []
                        segment_count = 1

                        segment1 {
                                start_extent = 0
                                extent_count = 572      # 17.875 Gigabytes

                                type = "striped"
                                stripe_count = 1        # linear

                                stripes = [
                                        "pv0", 1024
                                ]
                        }
                }
        }
}

Wednesday, November 4, 2015

Explain about the dmsetup Command in Linux?

Wednesday, November 04, 2015 0
The dmsetup command is a command line wrapper for communication with the Device Mapper. For general system information about LVM devices, you may find the info, ls, status, and deps options of the dmsetup command to be useful, as described in the following subsections.

The dmsetup info Command

The dmsetup info device command provides summary information about Device Mapper devices. If you do not specify a device name, the output is information about all of the currently configured Device Mapper devices.
If you specify a device, then this command yields information for that device only.
The dmsetup info command provides information in the following categories:

Name:
The name of  the device. An LVM device is expressed as the volume group name and the logical volume name separated   by a hyphen. A hyphen in the original name is translated to two hyphens. During standard LVM operations, you should not use the name of an LVM device in this format to specify an LVM device directly, but instead you should  use the vg/lv alternative.

State:
Possible device states are SUSPENDED, ACTIVE, and READ-ONLY. The dmsetup suspend command sets a device state to SUSPENDED.
When a device is suspended, all I/O operations to that device stop. The dmsetup resume command restores a device state to ACTIVE.

Read Ahead:
The number of data blocks that the system reads ahead for any open file on which read operations are ongoing. By default, the kernel chooses a suitable value automatically. You can change this value with the --readahead option of the dmsetup command.

Tables present:
Possible states for this category are LIVE and INACTIVE. An INACTIVE state indicates that a table has been loaded which will be swapped in when a dmsetup resume command restores a device state to ACTIVE, at which point the table's state becomes LIVE. For information, see the dmsetup man page.

Open count:
    The open reference count indicates how many times the device is opened. A mount command opens a device.

Event number:
The current number of events received. Issuing a dmsetup wait n command allows the user to wait for the n'th event, blocking the call until it is received.

Major, minor
    Major and minor device number

Number of targets
    The number of frag ments that make up a device. For example, a linear device spanning 3 disks would have 3 targets. A linear      device composed of the beginning and end of a disk, but not the middle would have 2 targets.      

UUID
    UUID of the device.

The following example shows partial output for the dmsetup info command.

[root@testserver ~]# dmsetup info
Name:                       VolGroup00-LogVol01
State:                         ACTIVE
Read Ahead:             256
Tables present:          LIVE
Open count:              2
Event number:          0
Major, minor:            252, 1
Number of targets:    1
UUID: LVM-ZfQCQ1suTcykV9TwvNACpBXcEMNuWlnELoJOLg5TDC5ityl5a6qLJ5fujuoRRzWb

Name:                     VolGroup00-LogVol00
State:                      ACTIVE
Read Ahead:          256
Tables present:       LIVE
Open count:           1
Event number:       0
Major, minor:          252, 0
Number of targets: 1
UUID: LVM-ZfQCQ1suTcykV9TwvNACpBXcEMNuWlnESWOjo1qFZZCztYCSXbzQdXpwRHjDNI3o

Remediating an ESXi 5.x and 6.0 host with Update Manager fails with the error: There was an error checking file system on altbootbank

Wednesday, November 04, 2015 0
To resolve the issue, repair the altbootbank partition.

To repair the altbootbank partition:

    Run this command to determine the device for /altbootbank:
    vmkfstools -P /altbootbank

    You see output similar to:
    mpx.vmhba32:C0:T0:L0:5

    Run this command to repair the altbootbank filesystem:
    dosfsck -a -w /dev/disks/device_name
For example:
    dosfsck -a -w /dev/disks/mpx.vmhba32:C0:T0:L0:5

    If remediation fails at this stage, reboot the host.

Red Hat Enterprise Virtualization Manager (RHEVM) minimum hardware requirements.

Wednesday, November 04, 2015 0
Red Hat Enterprise Virtualization Manager servers must run Red Hat Enterprise Linux 6. A number  of additional hardware requirements must also be met.

Item                   Limitations
RAM                  A minimum of 3 GB of RAM is required.
PCI Devices      At least one network controller with a minimum bandwidth of 1 Gbps (Rec)

Storage             A minimum of 3 GB of available local disk space is recommended.

Monday, November 2, 2015

How to Manage Software with YUM in Linux Server?

Monday, November 02, 2015 0
Use the yum utility to modify the software on your system in four ways:

    To install new software from package repositories
    To install new software from an individual package file
    To update existing software on your system
    To remove unwanted software from your system

[Important]            Installing Software from a Package File


To use yum, specify a function and one or more packages or package groups. Each section below gives some examples.

For each operation, yum downloads the latest package information from the configured repositories.

The yum utility searches these data files to determine the best set of actions to produce the required result, and displays the transaction for you to approve. The transaction may include the installation, update, or removal of additional packages, in order to resolve software dependencies.

This is an example of the transaction for installing tsclient:
==================================================================
 Package                 Arch       Version          Repository        Size
==================================================================
Installing:
 tsclient                   i386       0.132-4          base              247 k
Installing for dependencies:
 rdesktop                i386       1.3.1-5            base              107 k
Transaction Summary
==================================================================
Install      2 Package(s)
Update       0 Package(s)
Remove       0 Package(s)
Total download size: 355 k

Is this ok [y/N]:
Format of YUM Transaction Reports:
Review the list of changes, and then press y to accept and begin the process. If you press N or Enter, yum does not download or change any packages.

Package Versions
 The yum utility only displays and uses the newest version of each package, unless you specify an older version.
The yum utility also imports the repository public key if it is not already installed on the rpm keying.

This is an example of the public key import:

warning: rpmts_HdrFromFdno: Header V3 DSA signature: NOKEY, key ID 443E1821
public key not available for tsclient-0.132-4.i386.rpm
Retrieving GPG key from http://mirror.centos.org/centos/RPM-GPG-KEY-CentOS-4
Importing GPG key 0x443E1821 "CentOS-4 Key<centos-4key@centos.org>"
Is this ok [y/N]:

Format of yum Public Key Import

 Check the public key, and then press y to import the key and authorize the key for use. If you press N or Enter, yum stops without installing any packages.
To ensure that downloaded packages are genuine, yum verifies the digital signature of each package against the public key of the provider. Once all of the packages required for the transaction are successfully downloaded and verified, yum applies them to your system.

Downloads are Cached

The yum utility keeps downloaded data files and packages for reuse. You may copy packages from the repository cache directories under /var/cache/yum/, and use them elsewhere if you wish. If you remove a package from the cache, you do not affect the copy of the software installed on your system.

Installing New Software with YUM:

 To install the package tsclient, enter the command:
 yum install tsclient

To install the package group MySQL Database, enter the command:
yum groupinstall "MySQL Database"

Updating Software with YUM:
yum update tsclient

Note: New Software Versions Require Reloading

If a piece of software is in use when you update it, the old version remains active until the application or service is restarted. Kernel updates take effect when you reboot the system.

To update all of the packages in the package group MySQL Database, enter the command:
yum groupupdate "MySQL Database"

Removing Software with YUM:

To remove software, yum examines your system for both the specified software, and any software which claims it as a dependency. The transaction to remove the software deletes both the software and the dependencies.
yum remove tsclient

To remove all of the packages in the package group MySQL Database, enter the command:
yum groupremove "MySQL Database"

Searching for Packages with YUM:
Use the search features of yum to find software that is available from the configured repositories, or already installed on your system. Searches automatically include both installed and available packages.

The format of the results depends upon the option. If the query produces no information, there are no packages matching the criteria.

Searching by Package Name and Attributes
yum list tsclient

To make your queries more precise, specify packages with a name that include other attributes, such as version or hardware architecture. To search for version 0.132 of the application, use the command:
yum list tsclient-0.132

Advanced Searches:

If you do not know the name of the package, use the search or provides options. Alternatively, use wild cards or regular expressions with any yum search option to broaden the search criteria.

The search option checks the names, descriptions, summaries and listed package maintainers of all of the available packages to find those that match. For example, to search for all packages that relate to PalmPilots, type:
yum search PalmPilot

This provides function checks both the files included in the packages and the functions that the software provides. This option requires yum to download and read much larger index files than with the search option.

To search for all packages that include files called libneon, type:
yum provides libneon

To search for all packages that either provides a MTA (Mail Transport Agent) service, or includes files with mta in their name:
yum provides MTA

Use the standard wildcard characters to run any search option with a partial word or name: ? to represent any one character, and * to mean zero or more characters. Always add the escape character (\) before wildcards.

To list all packages with names that begin with tsc, type:
yum list tsc\*

Understanding Matches
 Searches with yum show all of the packages that match your criteria. Packages must meet the terms of the search exactly to be  considered matches,  unless you use wildcards or a regular expression.

For example, a search query for shadowutils or shadow-util would not produce the package shadow-utils. This package would match and be shown if the query was shadow-util\?, or shadow\*.
Updating Your System with yum

Use the update option to upgrade all of your system software to the latest version with one operation.
yum update

Automatically Updating Your System
/sbin/chkconfig --level 345 yum on; /sbin/service yum start

How Daily Updates are Run

There is no separate yum service that runs on your system. The command given above enables the control script /etc/rc.d/init.d/yum.
This control script activates the script /etc/cron.daily/yum.cron, which causes the cron service to perform the system update  automatically at 4am each day.

Maintaining YUM
The yum system does not require any routine maintenance. To ensure that yum operations are carried out at optimal speed, disable or remove repository definitions which you no longer require. You may also clear the files from the yum caches in order to recover disk space.

Disabling or Removing Package Sources
 Set enable=0 in a definition file to prevent yum from using that repository. The yum utility ignores any definition file with this setting.

To completely remove access to a repository:
    Delete the relevant file from /etc/yum.repos.d/.
    Delete the cache directory from /var/cache/yum/.

Clearing the yum Caches

By default, yum retains the packages and package data files that it downloads, so that they may be reused in future operations without being downloaded again. To purge the package data files, use this command:
yum clean headers

Run this command to remove all of the packages held in the caches:
yum clean packages

For CentOS-4 users, to clean the metadata files use this command:
yum clean metadata

Purging cached files causes those files to downloaded again the next time that they are required. This increases the amount of time required to complete the operation.

Difference Between RHEL 5, 6, AND 7 - JOBS & SERVICES

Monday, November 02, 2015 0
Difference Between RHEL 5, 6, AND 7 - JOBS & SERVICES


Difference Between RHEL 5, 6, AND 7 - NETWORKING

Monday, November 02, 2015 0
Difference Between RHEL 5, 6, AND 7 - NETWORKING

How to resolve the Insufficient Free Extents for a Logical Volume in Linux Server?

Monday, November 02, 2015 0
 You may get the error message "Insufficient free extents" when creating a logical volume when you think you have enough extents based on the output of the vgdisplay or vgs commands. This is because this commands round figures to 2 decimal places to provide human-readable output. To specify exact size, use free physical extent count instead of some multiple of bytes to determine the size of the logical volume.

The vgdisplay command, by default, includes this line of output that indicates the free physical extents.

# vgdisplay
  --- Volume group ---
  ...
  Free  PE / Size       8780 / 34.30 GB

Alternately, you can use the vg_free_count and vg_extent_count arguments of the vgs command to display the free extents
and the total number of extents.

[root@tng3-1 ~]# vgs -o +vg_free_count,vg_extent_count
  VG     #PV #LV #SN Attr   VSize   VFree   Free #Ext
  testvg   2       0    0 wz--n- 34.30G 34.30G 8780 8780

With 8780 free physical extents, you can run the following command, using the lower-case l argument to use extents instead of bytes:

# lvcreate -l8780 -n testlv testvg

This uses all the free extents in the volume group.

# vgs -o +vg_free_count,vg_extent_count
  VG     #PV #LV #SN Attr   VSize  VFree Free #Ext
  testvg   2      1      0 wz--n- 34.30G    0     0 8780

Alternately, you can extend the logical volume to use a percentage of the remaining free space in the volume group by using the -l argument of the lvcreate command.

How to Recover from LVM Mirror Failure in Linux Server?

Monday, November 02, 2015 0
This section provides an example of recovering from a situation where one leg of an LVM mirrored volume fails because the underlying device for a physical volume goes down. When a mirror leg fails, LVM converts the mirrored volume into a linear volume, which continues to operate as before but without the mirrored redundancy. At that point, you can add a new disk device to the system to use as a replacement physical device and rebuild the mirror.

The following command creates the physical volumes which will be used for the mirror.

[root@test ~]# pvcreate /dev/sd[abcdef][12]
  Physical volume "/dev/sda1" successfully created
  Physical volume "/dev/sda2" successfully created
  Physical volume "/dev/sdb1" successfully created
  Physical volume "/dev/sdb2" successfully created
  Physical volume "/dev/sdc1" successfully created
  Physical volume "/dev/sdc2" successfully created
  Physical volume "/dev/sdd1" successfully created
  Physical volume "/dev/sdd2" successfully created
  Physical volume "/dev/sde1" successfully created
  Physical volume "/dev/sde2" successfully created
  Physical volume "/dev/sdf1" successfully created
  Physical volume "/dev/sdf2" successfully created

The following commands creates the volume group vg and the mirrored volume lvgroupfs

[root@test ~]# vgcreate vg /dev/sd[abcdef][12]
  Volume group "vg" successfully created


[root@test ~]# lvcreate -L 750M -n lvgroupfs -m 1 vg /dev/sda1 /dev/sdb1 /dev/sdc1
  Rounding up size to full physical extent 752.00 MB
  Logical volume "lvgroupfs" created

We can use lvs command to verify the layout of the mirrored volume and the underlying devices for the mirror leg and the mirror log. Note that in the first example the mirror is not yet completely synced; you should wait until the Copy% field displays 100.00 before continuing.

[root@test ~]# lvs -a -o +devices
  LV                                  VG   Attr   LSize   Origin Snap%  Move Log          Copy% Devices
  lvgroupfs                        vg   mwi-a- 752.00M                  lvgroupfs_mlog 21.28 lvgroupfs_mimage_0(0),lvgroupfs_mimage_1(0)
  [lvgroupfs_mimage_0]   vg   iwi-ao 752.00M                                       /dev/sda1(0)
  [lvgroupfs_mimage_1]   vg   iwi-ao 752.00M                                       /dev/sdb1(0)
  [lvgroupfs_mlog]            vg   lwi-ao   4.00M                                       /dev/sdc1(0)

[root@test ~]# lvs -a -o +devices
  LV                                VG   Attr   LSize   Origin Snap%  Move Log          Copy%  Devices
  lvgroupfs                      vg   mwi-a- 752.00M                  lvgroupfs_mlog 100.00  lvgroupfs_mimage_0(0),lvgroupfs_mimage_1(0)
  [lvgroupfs_mimage_0] vg   iwi-ao 752.00M                                        /dev/sda1(0)
  [lvgroupfs_mimage_1] vg   iwi-ao 752.00M                                        /dev/sdb1(0)
  [lvgroupfs_mlog]          vg   lwi-ao   4.00M     i                                  /dev/sdc1(0)

In this example, the primary leg of the mirror /dev/sda1 fails. Any write activity to the mirrored volume causes LVM to detect the failed mirror. When this occurs, LVM converts the mirror into a single linear volume. In this case, to trigger the conversion, we execute a dd command

[root@test ~]# dd if=/dev/zero of=/dev/vg/lvgroupfs count=10
10+0 records in
10+0 records out

You can use the lvs command to verify that the device is now a linear device. Because of the failed disk, I/O errors occur.

[root@test ~]# lvs -a -o +devices
  /dev/sda1: read failed after 0 of 2048 at 0: Input/output error
  /dev/sda2: read failed after 0 of 2048 at 0: Input/output error
  LV                     VG   Attr   LSize   Origin Snap%  Move Log Copy%  Devices
  lvgroupfs           vg   -wi-a- 752.00M                               /dev/sdb1(0)

 At this point you should still be able to use the logical volume, but there will be no mirror redundancy.

To rebuild the mirrored volume, you replace the broken drive and recreate the physical volume. If you use the same disk rather than replacing it with a new one, you will see "inconsistent" warnings when you run the pvcreate command.

[root@test ~]# pvcreate /dev/sda[12]
  Physical volume "/dev/sda1" successfully created
  Physical volume "/dev/sda2" successfully created

[root@test ~]# pvscan
  PV /dev/sdb1   VG vg   lvm2 [67.83 GB / 67.10 GB free]
  PV /dev/sdb2   VG vg   lvm2 [67.83 GB / 67.83 GB free]
  PV /dev/sdc1   VG vg   lvm2 [67.83 GB / 67.83 GB free]
  PV /dev/sdc2   VG vg   lvm2 [67.83 GB / 67.83 GB free]
  PV /dev/sdd1   VG vg   lvm2 [67.83 GB / 67.83 GB free]
  PV /dev/sdd2   VG vg   lvm2 [67.83 GB / 67.83 GB free]
  PV /dev/sde1   VG vg   lvm2 [67.83 GB / 67.83 GB free]
  PV /dev/sde2   VG vg   lvm2 [67.83 GB / 67.83 GB free]
  PV /dev/sdf1   VG vg   lvm2 [67.83 GB / 67.83 GB free]
  PV /dev/sdf2   VG vg   lvm2 [67.83 GB / 67.83 GB free]
  PV /dev/sda1              lvm2 [603.94 GB]
  PV /dev/sda2              lvm2 [603.94 GB]

Next you extend the original volume group with the new physical volume.

[root@test ~]# vgextend vg /dev/sda[12]
  Volume group "vg" successfully extended

[root@test ~]# pvscan
  PV /dev/sdb1   VG vg   lvm2 [67.83 GB / 67.10 GB free]
  PV /dev/sdb2   VG vg   lvm2 [67.83 GB / 67.83 GB free]
  PV /dev/sdc1   VG vg   lvm2 [67.83 GB / 67.83 GB free]
  PV /dev/sdc2   VG vg   lvm2 [67.83 GB / 67.83 GB free]
  PV /dev/sdd1   VG vg   lvm2 [67.83 GB / 67.83 GB free]
  PV /dev/sdd2   VG vg   lvm2 [67.83 GB / 67.83 GB free]
  PV /dev/sde1   VG vg   lvm2 [67.83 GB / 67.83 GB free]
  PV /dev/sde2   VG vg   lvm2 [67.83 GB / 67.83 GB free]
  PV /dev/sdf1   VG vg   lvm2 [67.83 GB / 67.83 GB free]
  PV /dev/sdf2   VG vg   lvm2 [67.83 GB / 67.83 GB free]
  PV /dev/sda1   VG vg   lvm2 [603.93 GB / 603.93 GB free]
  PV /dev/sda2   VG vg   lvm2 [603.93 GB / 603.93 GB free]

Convert the linear volume back to its original mirrored state.

[root@test ~]# lvconvert -m 1 /dev/vg/lvgroupfs /dev/sda1 /dev/sdb1 /dev/sdc1
  Logical volume mirror converted.

You can use the lvs command to verify that the mirror is restored.

[root@test ~]# lvs -a -o +devices
  LV                                   VG   Attr   LSize   Origin Snap%  Move Log          Copy% Devices
  lvgroupfs                         vg   mwi-a- 752.00M                  lvgroupfs_mlog 68.62 lvgroupfs_mimage_0(0),lvgroupfs_mimage_1(0)
  [lvgroupfs_mimage_0]    vg   iwi-ao 752.00M                                       /dev/sdb1(0)
  [lvgroupfs_mimage_1]     vg   iwi-ao 752.00M                                       /dev/sda1(0)
  [lvgroupfs_mlog]             vg   lwi-ao   4.00M                                       /dev/sdc1(0)

Difference Between RHEL 5, 6, AND 7 - SYSTEM BASICS & BASIC CONFIGURATION

Monday, November 02, 2015 0
Difference Between RHEL 5, 6, AND 7 - SYSTEM BASICS &  BASIC CONFIGURATION


Understanding the Virsh Command in Linux Virtualization

Monday, November 02, 2015 0
Connecting to a Hypervisor  (Unsupported now)
virsh connect <name>

Where <name> is the machine name of the hypervisor. If you want to initiate a read—only connection, append the above command with —readonly.

Creating a Virtual Machine
virsh create <path to XML configuration file>

Configuring an XML Dump
virsh dumpxml [domain-id | domain-name | domain-uuid]

This command outputs the domain information (in XML) to stdout . If you save the data to a file, you can use the create option to recreate the virtual machine.

Suspending a Virtual Machine
virsh suspend [domain-id | domain-name |domain-uuid]

When a domain is in a suspended state, it still consumes system RAM. There will also be no disk or network I/O when suspended. This operation is immediate and the virtual machine must be restarted with the resume option

Resuming a Virtual Machine
virsh resume [domain-id | domain-name | domain-uuid]

This operation is immediate and the virtual machine parameters are preserved in a suspend and resume cycle.

Saving a Virtual Machine
virsh save [domain-name][domain-id | domain-uuid][filename]

This stops the virtual machine you specify and saves the data to a file, which may take some time given the amount of memory in use by your virtual machine. You can restore the state of the virtual machine with the restore option

Restoring a Virtual Machine
virsh restore [filename]

This restarts the saved virtual machine, which may take some time. The virtual machine's name and UUID are preserved but are allocated for a new id.

Shutting Down a Virtual Machine
virsh shutdown [domain-id | domain-name | domain-uuid]

You can control the behavior of the rebooting virtual machine by modifying the on_shutdown parameter of the xmdomain.cfg file.

Rebooting a Virtual Machine
virsh reboot [domain-id | domain-name | domain-uuid]

 You can control the behavior of the rebooting virtual machine by modifying the on_reboot parameter of the xmdomain.cfg file.

Terminating a Domain
virsh destroy [domain-name | domain-id | domain-uuid]

This command does an immediate ungraceful shutdown and stops any guest domain sessions (which could potentially lead to file corrupted file systems still in use by the virtual machine). You should use the destroy option only when the virtual machine's
operating system is non-responsive. For a paravirtualized virtual machine, you should use the shutdown option .

Converting a Domain Name to a Domain ID
virsh domid [domain-name | domain-uuid]

Converting a Domain ID to a Domain Name
virsh domname [domain-name | domain-uuid]

Converting a Domain Name to a UUID
virsh domuuid [domain-id | domain-uuid]

Displaying Virtual Machine Information
virsh dominfo [domain-id | domain-name | domain-uuid]

Displaying Node Information
virsh nodeinfo

 The outputs displays something similar to:
CPU model                    x86_64
CPU (s)                      8
CPU frequency                2895 Mhz
CPU socket(s)                2    
Core(s) per socket           2
Threads per core:            2
Numa cell(s)                 1
Memory size:                 1046528 kb
This displays the node information and the machines that support the virtualization process.

Displaying the Virtual Machines
virsh list domain-name [ ——inactive  |  ——all]


The ——inactive option lists inactive domains (domains that have been defined but are not currently active).
The —all domain lists all domains, whether active or not. Your output should resemble the this example:
ID                 Name                 State
————————————————
0                   Domain0             running
1                   Domain202           paused
2                   Domain010           inactive
3                   Domain9600          crashed

Here are the six domain states:
running           lists domains currently active on the CPU
blocked           lists domains that are blocked
paused            lists domains that are suspended
shutdown          lists domains that are in process of shutting down
shutoff           lists domains that are completely down.
crashed           lists domains that are crashed

Displaying Virtual CPU Information
virsh vcpuinfo [domain-id | domain-name | domain-uuid]

Configuring Virtual CPU Affinity
virsh vcpupin [domain-id | domain-name | domain-uuid] [vcpu] , [cpulist]

Where [vcpu] is the virtual VCPU number and [cpulist] lists the physical number of CPUs.

Configuring Virtual CPU Count
virsh setvcpus [domain-name | domain-id | domain-uuid] [count]

 Note that the new count cannot exceed the amount you specified when you created the Virtual Machine

Configuring Memory Allocation
virsh setmem [domain-id | domain-name]  [count]

You must specify the [count] in kilobytes. Note that the new count cannot exceed the amount you specified when you created the Virtual Machine. Values lower than 64 MB probably won't work.You can adjust the Virtual Machine memory as necessary.

Configuring Maximum Memory
virsh setmaxmem  [domain-name | domain-id | domain-uuid] [count]

You must specify the [count] in kilobytes. Note that the new count cannot exceed the amount
you specified when you created the Virtual Machine. Values lower than 64 MB probably won't work. The maximum memory doesn't affect the current use of the Virtual Machine (unless the new value is lower which should shrink memory usage).

BASIC MANAGEMENT OPTIONS


Resource Management Options

setmem         : changes the allocated memory.
setmaxmem  : changes maximum memory limit
setvcpus        : changes number of virtual CPUs.
vcpuinfo         : domain vcpu information.
vcpupin          : control the domain vcpu affinity.

Monitoring and troubleshooting Options

version        : show version
dumpxml        : domain information in XML
nodeinfo        : node information

virsh command output

The following are example outputs from common virsh commands:
the list command:
virsh # list

Id  Name                 State
----------------------------------
0   Domain-0             running
13  r5b2-mySQL01         blocked

the dominfo domain command:
virsh # dominfo r5b2-mySQL01

Id:             13
Name:           r5b2-mySQL01
UUID:           4a4c59a7-ee3f-c781-96e4-288f2862f011
OS Type:                 linux
State:          blocked
CPU(s):         1
CPU time:               11.0s
Max memory:     512000 kB
Used memory:    512000 kB

the domstate domain command:

virsh # domstate r5b2-mySQL01
blocked

the domuuid domain command:

virsh # domuuid r5b2-mySQL01
4a4c59a7-ee3f-c781-96e4-288f2862f011

the vcpuinfo domain command:

virsh # vcpuinfo r5b2-mySQL01
VCPU:           0
CPU:            0
State:          blocked
CPU time:       0.0s
CPU Affinity:   yy

the dumpxml domain command:

virsh # dumpxml r5b2-mySQL01
<domain type='xen' id='13'>
            <name>r5b2-mySQL01</name>
            <uuid>4a4c59a7ee3fc78196e4288f2862f011</uuid>
            <bootloader>/usr/bin/pygrub</bootloader>
            <os>
                                 <type>linux</type>
                                 <kernel>/var/lib/xen/vmlinuz.2dgnU_</kernel>
                                 <initrd>/var/lib/xen/initrd.UQafMw</initrd>
                                <cmdline>ro root=/dev/VolGroup00/LogVol00 rhgb quiet</cmdline>
            </os>
            <memory>512000</memory>
            <vcpu>1</vcpu>
            <on_poweroff>destroy</on_poweroff>
            <on_reboot>restart</on_reboot>
            <on_crash>restart</on_crash>
            <devices>
                                <interface type='bridge'>
                                                     <source bridge='xenbr0'/>
                                                    <mac address='00:16:3e:49:1d:11'/>
                                                     <script path='vif-bridge'/>
                                 </interface>
                                 <graphics type='vnc' port='5900'/>
                                 <console tty='/dev/pts/4'/>
            </devices>

the version domain command:

virsh # version
Compiled against library: libvir 0.1.7
Using library: libvir 0.1.7
Using API: Xen 3.0.1
Running hypervisor: Xen 3.0.0