This Blog is to share our knowledge and expertise on Linux System Administration and VMware Administration

Wednesday, February 14, 2018

Working with Docker Container - Docker info Command

Wednesday, February 14, 2018 0
Docker info Command

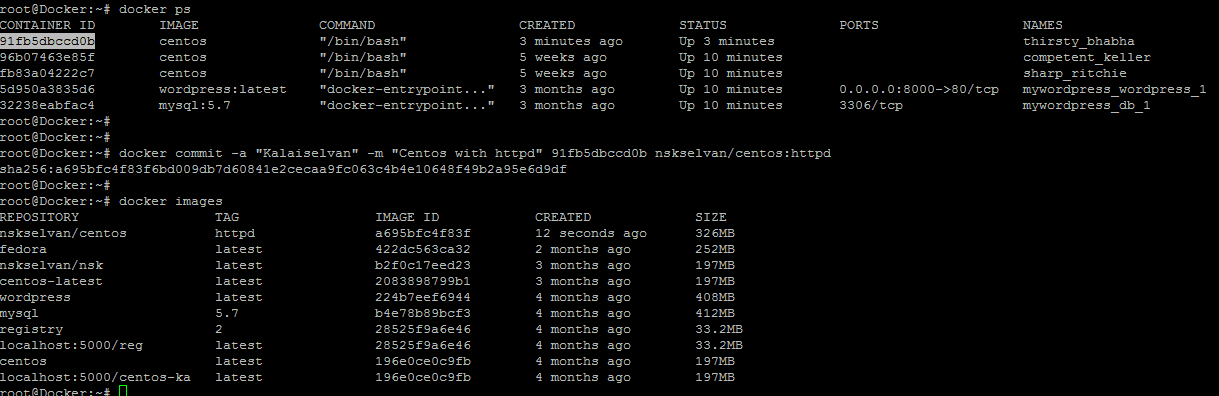
As we know, images are required to run containers. You can either use existing images or create new custom images. You will need to create custom images to suit your development and deployment environment. Once you create an image, you can share it through the public or private registry. Before we explore more about Docker images, let's look at the output of the docker info command:

root@Docker:~# docker info
Containers: 26
 Running: 5
 Paused: 0
 Stopped: 21
Images: 6
Server Version: 17.09.0-ce
Storage Driver: aufs
 Root Dir: /var/lib/docker/aufs
 Backing Filesystem: extfs
 Dirs: 87
 Dirperm1 Supported: true
Logging Driver: json-file
Cgroup Driver: cgroupfs
Plugins:
 Volume: local
 Network: bridge host macvlan null overlay
 Log: awslogs fluentd gcplogs gelf journald json-file logentries splunk syslog
Swarm: inactive
Runtimes: runc
Default Runtime: runc
Init Binary: docker-init
containerd version: 06b9cb35161009dcb7123345749fef02f7cea8e0
runc version: 3f2f8b84a77f73d38244dd690525642a72156c64
init version: 949e6fa
Security Options:
 apparmor
 seccomp
  Profile: default
Kernel Version: 4.4.0-96-generic
Operating System: Ubuntu 16.04.3 LTS
OSType: linux
Architecture: x86_64
CPUs: 1
Total Memory: 3.859GiB
Name: Docker
ID: S3LP:G73H:NJWO:SVEG:I7U5:UB5M:B3LC:WAQV:AINP:7YYE:I7EN:MRFF
Docker Root Dir: /var/lib/docker
Debug Mode (client): false
Debug Mode (server): false
Username: nskselvan
Registry: https://index.docker.io/v1/
Experimental: false
Insecure Registries:
 127.0.0.0/8
Live Restore Enabled: false

WARNING: No swap limit support
root@Docker:~#

The preceding command gives the current system-wide info as follows:

It has 26 containers and 6 images.


The current storage driver, devicemapper, and its related information, such as thin pool name, data, metadata file, and so on. Other types of storage drivers are aufs, btrfs, overlayfs, vfs, and so on. Devicemapper, btrfs, and overlayfs have native support in the Linux kernel. AUFS support needs a patched kernel. 


To leverage the kernel features that enable containerization, the Docker daemon has to talk to the Linux kernel. This is done through the execution driver. libconatiner or native is one of that type. The others are libvirt, lxc, and so on.


The kernel version on the host operating system.
The user account that is registered on the registry mentioned in the next section to pull/push images.

Saturday, February 10, 2018

Why does vncserver fails with "Starting VNC server: Fatal server error"

Saturday, February 10, 2018 0
Issue:
        vncserver service failed to start with below error
[orpmtn1o@Servername ~]$ vncserver

WARNING: The first attempt to start Xvnc failed, possibly because the font
catalog is not properly configured.  Attempting to determine an appropriate
font path for this system and restart Xvnc using that font path ...
Could not start Xvnc.

_XSERVTransmkdir: Owner of /tmp/.X11-unix should be set to root

Xvnc TigerVNC 1.1.0 - built Sep 22 2014 07:15:59
Copyright (C) 1999-2011 TigerVNC Team and many others (see README.txt)
See http://www.tigervnc.org for information on TigerVNC.
Underlying X server release 11500000, The X.Org Foundation

Initializing built-in extension Generic Event Extension
Initializing built-in extension SHAPE
Initializing built-in extension MIT-SHM
Initializing built-in extension XInputExtension
Initializing built-in extension XTEST
Initializing built-in extension BIG-REQUESTS
Initializing built-in extension SYNC
Initializing built-in extension XKEYBOARD
Initializing built-in extension XC-MISC
Initializing built-in extension XFIXES
Initializing built-in extension RENDER
Initializing built-in extension RANDR
Initializing built-in extension DAMAGE
Initializing built-in extension MIT-SCREEN-SAVER
Initializing built-in extension DOUBLE-BUFFER
Initializing built-in extension RECORD
Initializing built-in extension DPMS
Initializing built-in extension X-Resource
Initializing built-in extension XVideo
Initializing built-in extension XVideo-MotionCompensation
Initializing built-in extension VNC-EXTENSION
Initializing built-in extension GLX

Sat Feb 10 01:18:59 2018
 vncext:      VNC extension running!
 vncext:      Listening for VNC connections on all interface(s), port 5901
 vncext:      created VNC server for screen 0
[dix] Could not init font path element catalogue:/etc/X11/fontpath.d, removing from list!
[dix] Could not init font path element built-ins, removing from list!
(EE)
Fatal server error:
(EE) could not open default font 'fixed'(EE)
_XSERVTransmkdir: Owner of /tmp/.X11-unix should be set to root

Xvnc TigerVNC 1.1.0 - built Sep 22 2014 07:15:59
Copyright (C) 1999-2011 TigerVNC Team and many others (see README.txt)
See http://www.tigervnc.org for information on TigerVNC.
Underlying X server release 11500000, The X.Org Foundation

Initializing built-in extension Generic Event Extension
Initializing built-in extension SHAPE
Initializing built-in extension MIT-SHM
Initializing built-in extension XInputExtension
Initializing built-in extension XTEST
Initializing built-in extension BIG-REQUESTS
Initializing built-in extension SYNC
Initializing built-in extension XKEYBOARD
Initializing built-in extension XC-MISC
Initializing built-in extension XFIXES
Initializing built-in extension RENDER
Initializing built-in extension RANDR
Initializing built-in extension DAMAGE
Initializing built-in extension MIT-SCREEN-SAVER
Initializing built-in extension DOUBLE-BUFFER
Initializing built-in extension RECORD
Initializing built-in extension DPMS
Initializing built-in extension X-Resource
Initializing built-in extension XVideo
Initializing built-in extension XVideo-MotionCompensation
Initializing built-in extension VNC-EXTENSION
Initializing built-in extension GLX

Sat Feb 10 01:19:02 2018
 vncext:      VNC extension running!
 vncext:      Listening for VNC connections on all interface(s), port 5901
 vncext:      created VNC server for screen 0
[dix] Could not init font path element /usr/share/X11/fonts/misc, removing from list!
[dix] Could not init font path element built-ins, removing from list!
(EE)
Fatal server error:
(EE) could not open default font 'fixed'(EE)

Resolution:
First install the below packages on server.

tigervnc-server 
tigervnc-server-module 
libXfont 
pixman 
xterm 
xorg-x11-twm

Add the below lines under /etc/sysconfig/vncservers
VNCSERVERS="2:root"
VNCSERVERARGS[2]="-geometry 800x600 -nolisten tcp -nohttpd -localhost"

Next, stop the local firewall.
[root@Servername ~]# /etc/init.d/iptables stop
iptables: Setting chains to policy ACCEPT: filter          [  OK  ]
iptables: Flushing firewall rules:                                   [  OK  ]
iptables: Unloading modules:                                       [  OK  ]

Now Vncserver should work.
[orpmtn1o@Servername~]$ vncserver
New 'Servername.localhost.com:1 (orpmtn1o)' desktop is Servername.localhost.com:1
Creating default startup script /home/orpmtn1o/.vnc/xstartup
Starting applications specified in /home/orpmtn1o/.vnc/xstartup
Log file is /home/orpmtn1o/.vnc/Servername.localhost.com:1.log


Hope it helps.

Sunday, February 4, 2018

Working with Docker Container - Creating an image from the container

Sunday, February 04, 2018 0

Creating an image from the container

There are a couple of ways to create images, one is by manually committing layers and the other way is through Dockerfiles.

As we start a new container, a read/write layer gets attached to it. This layer will get destroyed if we do not save it. In this recipe, we will see how to save that layer and make a new image from the running or stopped container using the docker commit command.

Syntax: docker commit -a|--author[=""] -m|--message[=""] CONTAINER [REPOSITORY[:TAG]]

root@Docker:~# docker run -i -t centos /bin/bash
[root@91fb5dbccd0b /]# yum install -y httpd
Loaded plugins: fastestmirror, ovl
base                                                                | 3.6 kB  00:00:00
extras                                                              | 3.4 kB  00:00:00
updates                                                           | 3.4 kB  00:00:00
(1/4): base/7/x86_64/group_gz                       | 156 kB  00:00:00
(2/4): extras/7/x86_64/primary_db                  | 166 kB  00:00:00
(3/4): base/7/x86_64/primary_db                    | 5.7 MB  00:00:11
(4/4): updates/7/x86_64/primary_db               | 6.0 MB  00:00:13
...........
...........


As you can see, the new image is now being committed to the local repository with  nskselvan/centos  as a name and httpd as a tag.

we saw that while starting a container, a read/write filesystem layer will be created on top of the existing image layers from which the container started, and with the installation of a package, some files would have been added/modified in that layer. All of those changes are currently in the ephemeral read/write filesystem layer, which is assigned to the container. If we stop and delete the container, then all of the earlier mentioned modifications would be lost.

Using commit, we create a new layer with the changes that have occurred since the container started, which get saved in the backend storage driver.


root@Docker:~# docker diff 91fb5dbccd0b
C /.wh..wh.plnk
A /.wh..wh.plnk/1010.142994
.....................
A /boot/grub/splash.xpm.gz
C /etc/group
...................
C /etc/gshadow-
A /etc/httpd
A /etc/httpd/conf
A /etc/httpd/conf/httpd.conf
A /etc/httpd/conf/magic
A /etc/httpd/conf.d
...................
A /etc/httpd/conf.modules.d

We can see a prefix before each entry of the output. The following is a list of those prefixes:

    A: This is for when a file/directory has been added
    C: This is for when a file/directory has been modified
    D: This is for when a file/directory has been deleted


For more details, please check docker commit --help 

Friday, February 2, 2018

Working with Docker Container - Injecting a new process to a running container

Friday, February 02, 2018 0

 Injecting a new process to a running container

While doing development and debugging, we might want to look inside the already running container. There are a few utilities, such as nsenter (https://github.com/jpetazzo/nsenter), that allow us to enter into the namespace of the container to inspect it. With the exec option, we can inject a new process inside a running container.

Syntax:
    docker exec [-d|--detach[=false]] [--help] [-i|--interactive[=false]] [-t|--tty[=false]] CONTAINER COMMAND [ARG...]

Let's start an centos container and then inject uptime into that


root@Docker:~# id='docker run -d mysql'
root@Docker:~# docker run -it $id bash
root@b4e78b89bcf3#

For help with the docker run use --help

Thursday, February 1, 2018

User not allowed to access to (crontab) because of pam configuration - SOLVED

Thursday, February 01, 2018 0
Situation:
While running the crontab command user getting the below error.
[root@testserver ~]# su - user13
[user13@testserver ~]$ crontab -l
Authentication token is no longer valid; new one required
You (user13) are not allowed to access to (crontab) because of pam configuration.

Solution:
First check the age before adding the user in /etc/security/access.conf
If it is expired, set the password.

[root@testserver ~]# chage -l user13
Last password change                                                    : Sep 06, 2017
Password expires                                                            : Dec 05, 2017
Password inactive                                                           : never
Account expires                                                              : never
Minimum number of days between password change    : 1
Maximum number of days between password change   : 90
Number of days of warning before password expires     : 7

Set the password
[root@testserver ~]# passwd user13
Enter new password:
Re-type new password:
passwd: all authentication tokens updated successfully.

[root@testserver ~]# chage -l user13
Last password change                                                     : Jan 31, 2018
Password expires                                                             : May 01, 2018
Password inactive                                                            : never
Account expires                                                               : never
Minimum number of days between password change     : 1
Maximum number of days between password change    : 90
Number of days of warning before password expires      : 7

Then now add the user in /etc/security/access.conf file above -: ALL : ALL line.
+ : user13 : cron crond crontab

[root@testserver ~]# su - user13
[user13@testserver ~]$ crontab -l
no crontab for user13
[user13@testserver ~]$ exit

Hope it is help.

Friday, January 26, 2018

Working with Docker Container - Creating an account with Docker Hub

Friday, January 26, 2018 0

Creating an account with Docker Hub

Docker Hub is like GitHub for images. It is a public registry on which you can host images both public and private, share them and collaborate with others. It has integration with GitHub, Bitbucket, and can trigger automated builds.

As of now, the creation of an account on Docker Hub is free. A repository can hold different versions of an image. You can create any number of public repositories for your images. By default, you will have one private repository, which will not be accessible to the public. You can buy more private repositories. You can create an account either through a web browser or from the command line.

To create an account through a web browser on Docker Hub, visit https://hub.docker.com/account/signup/ and create an account:
 

Give the required details & and get created docker login.

To create an account using the command line, run the following command and submit the required details:
root@Docker:~# docker login
Login with your Docker ID to push and pull images from Docker Hub. If you don't have a Docker ID, head over to https://hub.docker.com to create one.
Username (nskselvan):
Password:

Thursday, January 25, 2018

How to extend the windows server disk space in command line

Thursday, January 25, 2018 0

Extending the windows server disk space in command line

Once the disk space added from storage to windows server.

Here, C drive is 75G and need to extend 25 GB. So total 100GB.

Go to command prompt and type disk part.


C:\Users\nsk>diskpart

C:\Users\nsk>

It will open a separate windows. Then follow the below steps to extend the C drive from 75GB to 100GB  (adding 25 GB)

Microsoft DiskPart version 6.1.7601
Copyright (C) 1999-2008 Microsoft Corporation.
On computer: TESTSERVER

DISKPART> list disk

  Disk ###  Status         Size          Free     Dyn  Gpt
  --------  -------------       -------         -------    ---   ---
  Disk 0    Online         75 GB        25 GB
  Disk 1    Online         6144 MB  1024 KB
  Disk 2    Online         12 GB       1024 KB
  Disk 3    Online         100 GB     1024 KB
  Disk 4    Online         225 GB       224 GB

DISKPART> select disk 0

Disk 0 is now the selected disk.

DISKPART> list part

  Partition ###  Type                 Size       Offset
  -------------  ----------------          -------     -------
  Partition 1    Primary            100 MB  1024 KB
  Partition 2    Primary              49 GB   101 MB

DISKPART> select part2

Microsoft DiskPart version 6.1.7601

DISK              - Shift the focus to a disk. For example, SELECT DISK.
PARTITION   - Shift the focus to a partition. For example, SELECT PARTITION.
VOLUME       - Shift the focus to a volume. For example, SELECT VOLUME.
VDISK           - Shift the focus to a virtual disk. For example, SELECT VDISK.

DISKPART> select part 2

Partition 2 is now the selected partition.

DISKPART> extend

DiskPart successfully extended the volume.

DISKPART> list disk

  Disk ###  Status           Size          Free          Dyn  Gpt
  --------  -------------         -------          -------            ---  ---
* Disk 0    Online           75 GB         0 B
  Disk 1    Online         6144 MB      1024 KB
  Disk 2    Online           12 GB         1024 KB
  Disk 3    Online          100 GB        1024 KB
  Disk 4    Online          225 GB         224 GB

DISKPART>

Hope it helps.