This Blog is to share our knowledge and expertise on Linux System Administration and VMware Administration

Sunday, February 4, 2018

Working with Docker Container - Creating an image from the container

Sunday, February 04, 2018 0

Creating an image from the container

There are a couple of ways to create images, one is by manually committing layers and the other way is through Dockerfiles.

As we start a new container, a read/write layer gets attached to it. This layer will get destroyed if we do not save it. In this recipe, we will see how to save that layer and make a new image from the running or stopped container using the docker commit command.

Syntax: docker commit -a|--author[=""] -m|--message[=""] CONTAINER [REPOSITORY[:TAG]]

root@Docker:~# docker run -i -t centos /bin/bash
[root@91fb5dbccd0b /]# yum install -y httpd
Loaded plugins: fastestmirror, ovl
base                                                                | 3.6 kB  00:00:00
extras                                                              | 3.4 kB  00:00:00
updates                                                           | 3.4 kB  00:00:00
(1/4): base/7/x86_64/group_gz                       | 156 kB  00:00:00
(2/4): extras/7/x86_64/primary_db                  | 166 kB  00:00:00
(3/4): base/7/x86_64/primary_db                    | 5.7 MB  00:00:11
(4/4): updates/7/x86_64/primary_db               | 6.0 MB  00:00:13
...........
...........


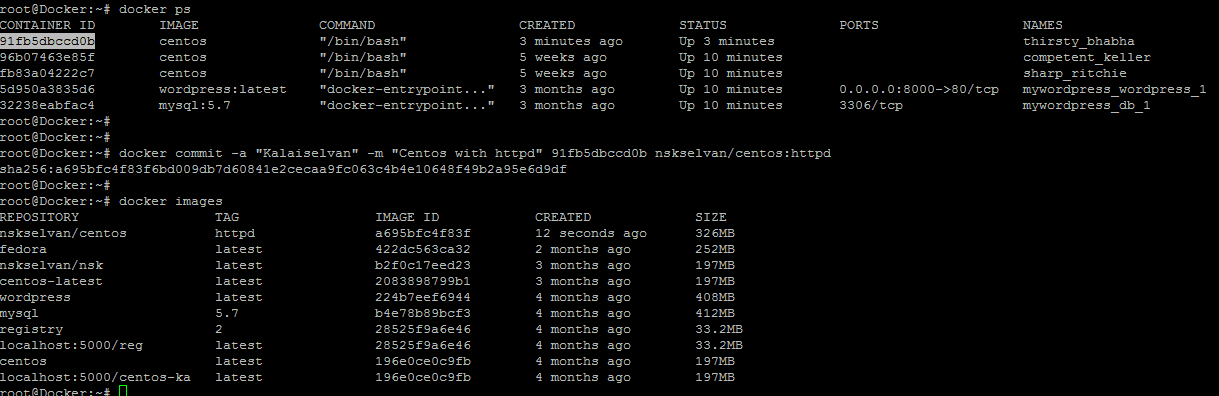
As you can see, the new image is now being committed to the local repository with  nskselvan/centos  as a name and httpd as a tag.

we saw that while starting a container, a read/write filesystem layer will be created on top of the existing image layers from which the container started, and with the installation of a package, some files would have been added/modified in that layer. All of those changes are currently in the ephemeral read/write filesystem layer, which is assigned to the container. If we stop and delete the container, then all of the earlier mentioned modifications would be lost.

Using commit, we create a new layer with the changes that have occurred since the container started, which get saved in the backend storage driver.


root@Docker:~# docker diff 91fb5dbccd0b
C /.wh..wh.plnk
A /.wh..wh.plnk/1010.142994
.....................
A /boot/grub/splash.xpm.gz
C /etc/group
...................
C /etc/gshadow-
A /etc/httpd
A /etc/httpd/conf
A /etc/httpd/conf/httpd.conf
A /etc/httpd/conf/magic
A /etc/httpd/conf.d
...................
A /etc/httpd/conf.modules.d

We can see a prefix before each entry of the output. The following is a list of those prefixes:

    A: This is for when a file/directory has been added
    C: This is for when a file/directory has been modified
    D: This is for when a file/directory has been deleted


For more details, please check docker commit --help 

Friday, February 2, 2018

Working with Docker Container - Injecting a new process to a running container

Friday, February 02, 2018 0

 Injecting a new process to a running container

While doing development and debugging, we might want to look inside the already running container. There are a few utilities, such as nsenter (https://github.com/jpetazzo/nsenter), that allow us to enter into the namespace of the container to inspect it. With the exec option, we can inject a new process inside a running container.

Syntax:
    docker exec [-d|--detach[=false]] [--help] [-i|--interactive[=false]] [-t|--tty[=false]] CONTAINER COMMAND [ARG...]

Let's start an centos container and then inject uptime into that


root@Docker:~# id='docker run -d mysql'
root@Docker:~# docker run -it $id bash
root@b4e78b89bcf3#

For help with the docker run use --help

Thursday, February 1, 2018

User not allowed to access to (crontab) because of pam configuration - SOLVED

Thursday, February 01, 2018 0
Situation:
While running the crontab command user getting the below error.
[root@testserver ~]# su - user13
[user13@testserver ~]$ crontab -l
Authentication token is no longer valid; new one required
You (user13) are not allowed to access to (crontab) because of pam configuration.

Solution:
First check the age before adding the user in /etc/security/access.conf
If it is expired, set the password.

[root@testserver ~]# chage -l user13
Last password change                                                    : Sep 06, 2017
Password expires                                                            : Dec 05, 2017
Password inactive                                                           : never
Account expires                                                              : never
Minimum number of days between password change    : 1
Maximum number of days between password change   : 90
Number of days of warning before password expires     : 7

Set the password
[root@testserver ~]# passwd user13
Enter new password:
Re-type new password:
passwd: all authentication tokens updated successfully.

[root@testserver ~]# chage -l user13
Last password change                                                     : Jan 31, 2018
Password expires                                                             : May 01, 2018
Password inactive                                                            : never
Account expires                                                               : never
Minimum number of days between password change     : 1
Maximum number of days between password change    : 90
Number of days of warning before password expires      : 7

Then now add the user in /etc/security/access.conf file above -: ALL : ALL line.
+ : user13 : cron crond crontab

[root@testserver ~]# su - user13
[user13@testserver ~]$ crontab -l
no crontab for user13
[user13@testserver ~]$ exit

Hope it is help.

Friday, January 26, 2018

Working with Docker Container - Creating an account with Docker Hub

Friday, January 26, 2018 0

Creating an account with Docker Hub

Docker Hub is like GitHub for images. It is a public registry on which you can host images both public and private, share them and collaborate with others. It has integration with GitHub, Bitbucket, and can trigger automated builds.

As of now, the creation of an account on Docker Hub is free. A repository can hold different versions of an image. You can create any number of public repositories for your images. By default, you will have one private repository, which will not be accessible to the public. You can buy more private repositories. You can create an account either through a web browser or from the command line.

To create an account through a web browser on Docker Hub, visit https://hub.docker.com/account/signup/ and create an account:
 

Give the required details & and get created docker login.

To create an account using the command line, run the following command and submit the required details:
root@Docker:~# docker login
Login with your Docker ID to push and pull images from Docker Hub. If you don't have a Docker ID, head over to https://hub.docker.com to create one.
Username (nskselvan):
Password:

Thursday, January 25, 2018

How to extend the windows server disk space in command line

Thursday, January 25, 2018 0

Extending the windows server disk space in command line

Once the disk space added from storage to windows server.

Here, C drive is 75G and need to extend 25 GB. So total 100GB.

Go to command prompt and type disk part.


C:\Users\nsk>diskpart

C:\Users\nsk>

It will open a separate windows. Then follow the below steps to extend the C drive from 75GB to 100GB  (adding 25 GB)

Microsoft DiskPart version 6.1.7601
Copyright (C) 1999-2008 Microsoft Corporation.
On computer: TESTSERVER

DISKPART> list disk

  Disk ###  Status         Size          Free     Dyn  Gpt
  --------  -------------       -------         -------    ---   ---
  Disk 0    Online         75 GB        25 GB
  Disk 1    Online         6144 MB  1024 KB
  Disk 2    Online         12 GB       1024 KB
  Disk 3    Online         100 GB     1024 KB
  Disk 4    Online         225 GB       224 GB

DISKPART> select disk 0

Disk 0 is now the selected disk.

DISKPART> list part

  Partition ###  Type                 Size       Offset
  -------------  ----------------          -------     -------
  Partition 1    Primary            100 MB  1024 KB
  Partition 2    Primary              49 GB   101 MB

DISKPART> select part2

Microsoft DiskPart version 6.1.7601

DISK              - Shift the focus to a disk. For example, SELECT DISK.
PARTITION   - Shift the focus to a partition. For example, SELECT PARTITION.
VOLUME       - Shift the focus to a volume. For example, SELECT VOLUME.
VDISK           - Shift the focus to a virtual disk. For example, SELECT VDISK.

DISKPART> select part 2

Partition 2 is now the selected partition.

DISKPART> extend

DiskPart successfully extended the volume.

DISKPART> list disk

  Disk ###  Status           Size          Free          Dyn  Gpt
  --------  -------------         -------          -------            ---  ---
* Disk 0    Online           75 GB         0 B
  Disk 1    Online         6144 MB      1024 KB
  Disk 2    Online           12 GB         1024 KB
  Disk 3    Online          100 GB        1024 KB
  Disk 4    Online          225 GB         224 GB

DISKPART>

Hope it helps.

Monday, January 22, 2018

ss command in RHEL7 and examples

Monday, January 22, 2018 0

ss command in RHEL7 


NAME
       ss - another utility to investigate sockets
   
ss is used to dump socket statistics. It allows showing information similar to netstat.  It can display more TCP and state informations than other tools.
When no option is used ss displays a list of open non-listening sockets (e.g. TCP/UNIX/UDP) that have established connection.

[root@nsk ~]# ss -tpna | grep -i 25
LISTEN     0      100    127.0.0.1:25       *:*     users:(("master",pid=1198,fd=13))
LISTEN     0      100               ::1:25       :::*    users:(("master",pid=1198,fd=14))

Here,
-t, --tcp  Display TCP sockets
-p, --processes Show process using socket
-n, --numeric Do not try to resolve service names
-a, --all Display both listening and non-listening (for TCP this means established connections) sockets

SS command example:

Display all TCP sockets
[root@nsk ~]# ss -t -a
State       Recv-Q Send-Q    Local Address:Port        Peer Address:Port
LISTEN      0      128                  *:ssh                         *:*
LISTEN      0      100           127.0.0.1:smtp              *:*
ESTAB       0       0               10.0.2.15:ssh        10.0.2.2:56004
ESTAB       0       0               10.0.2.15:ssh        10.0.2.2:55714
LISTEN      0      128                 :::ssh                        :::*
LISTEN      0      100                ::1:smtp                            :::*
[root@nsk ~]#                                    

Display all TCP sockets with process SELinux security contexts
[root@nsk ~]# ss -t -a -Z
State       Recv-Q Send-Q    Local Address:Port   Peer Address:Port
LISTEN      0      128                   *:ssh              *:*          users:(("sshd",pid=966,proc_ctx=system_u:system_r:sshd_t:s0-s0:c0.c1023,fd=3))
LISTEN      0      100           127.0.0.1:smtp              *:*          users:(("master",pid=1198,proc_ctx=system_u:system_r:postfix_master_t:s0,fd=13))
ESTAB       0       0               10.0.2.15:ssh        10.0.2.2:56004     users:(("sshd",pid=1329,proc_ctx=unconfined_u:unconfined_r:unconfined_t:s0-s0:c0.c1023,fd=3))
ESTAB       0       0               10.0.2.15:ssh        10.0.2.2:55714     users:(("sshd",pid=1263,proc_ctx=unconfined_u:unconfined_r:unconfined_t:s0-s0:c0.c1023,fd=3))
LISTEN      0      128                  :::ssh              :::*          users:(("sshd",pid=966,proc_ctx=system_u:system_r:sshd_t:s0-s0:c0.c1023,fd=4))
LISTEN      0      100                 ::1:smtp            :::*          users:(("master",pid=1198,proc_ctx=system_u:system_r:postfix_master_t:s0,fd=14))

Display all UDP sockets
[root@nsk ~]# ss -u -a
State       Recv-Q Send-Q   Local Address:Port      Peer Address:Port
ESTAB       0      0            10.0.2.15:42417    198.55.111.50:ntp
ESTAB       0      0            10.0.2.15:39451    66.135.44.92:ntp
ESTAB       0      0            10.0.2.15:50903    198.60.22.240:ntp
ESTAB       0      0            10.0.2.15:51175    198.58.105.63:ntp
UNCONN      0      0                    *:bootpc              *:*
UNCONN      0      0                    *:42307                *:*
UNCONN      0      0            127.0.0.1:323            *:*
UNCONN      0      0                   :::42236                :::*
UNCONN      0      0                  ::1:323          :::*
                                                  
Display all established ssh connections.
[root@nsk ~]# ss -o state established '( dport = :ssh or sport = :ssh )'
Netid Recv-Q Send-Q      Local Address:Port       Peer Address:Port  
tcp   0      0               10.0.2.15:ssh           10.0.2.2:56004  timer:(keepalive,117min,0)
tcp   0      0               10.0.2.15:ssh           10.0.2.2:55714  timer:(keepalive,110min,0)
                                                           
For more infor, please refer man ss.

Sunday, January 21, 2018

Working with Docker Container - Setting the restart policy on a container

Sunday, January 21, 2018 0

Setting the restart policy on a container

Restart policy is added with the run command with flags to specify the restart policy. With this policy, we can configure containers to start at boot time. This option is also very useful when a container dies accidentally.

Syntax:docker run --restart=POLICY [ OPTIONS ]  IMAGE[:TAG]  [COMMAND]  [ARG...] 

root@Docker:~# docker run --restart=always -d -i -t centos /bin/bash
fb83a04222c73d0e80f84103d4fe58c3ccd95e4a44b39386a937427bda2ad465

Options: 
no            : This does not start the container if it dies
on-failure : This restarts the container if it fails with nonzero exit code
always     : This always restarts the container without worrying about the return code

You can also give an optional restart count with the on-failure policy as follows:

root@Docker:~# docker run --restart=on-failure:3 -d -i -t centos /bin/bash
96b07463e85f3452cbbbf0de1298d4311634efef20f60a1d164e18f83ea19e15

For help with the docker run use --help