This Blog is to share our knowledge and expertise on Linux System Administration and VMware Administration

Sunday, January 14, 2018

Working with Docker Container - Stopping a container

Sunday, January 14, 2018 0

Stopping a container

We can stop one or more containers at once. In this recipe, we will first start a container and then stop it.
Syntax : docker stop [-t|--time[=10]] CONTAINER [CONTAINER...]


root@Docker:~# docker stop fb83a04222c7
fb83a04222c7


This will save the state of the container and stop it. It can be started again, if needed.

To stop a container after waiting for some time, use the --time/-t option.

To stop all the running containers run the following command:

root@Docker:~# docker stop `docker ps -q`
5d950a3835d6
32238eabfac4

For help with the docker stop use --help

Friday, January 12, 2018

Which command is used to run sudo commands without password

Friday, January 12, 2018 0
Command used to run sudo commands without password

NAME
     sudo - execute a command as another user

sudo allows a permitted user to execute a command as the superuser or another user, as specified by the security policy.

But here option s is used to run the privileged commands without password.

[nsk@testserver ~]$ sudo -s /etc/init.d/nslcd restart
Stopping nslcd:                                            [  OK  ]
Starting nslcd:                                              [  OK  ]
[nsk@testserver ~]$

Here,
-s [command] The -s (shell) option runs the shell specified by the SHELL environment variable if it is set or the shell as specified in the password database.  If a command is specified, it is passed to the shell for execution via the shell’s -c option.  If no command is specified, an interactive shell is executed.

Thursday, January 11, 2018

Working with Docker Container - Listing containers

Thursday, January 11, 2018 0

Listing containers

We can list both running and stopped containers.

Syntax: docker ps [ OPTIONS ]
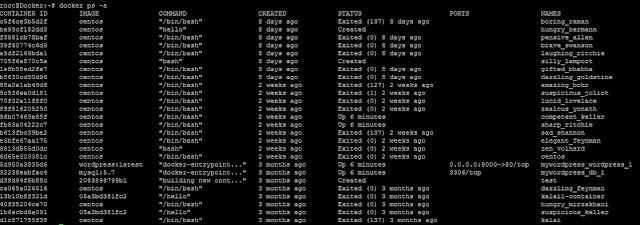
The Docker daemon can look at the metadata associated with the containers and list them down. By default, the command returns:

The container ID
The image from which it got created
The command that was run after starting the container
The details about when it got created
The current status
The ports that are exposed from the container
The name of the container

root@Docker:~# docker ps -a


To return just the container IDs of all the containers, use the -aq option as follows:
root@Docker:~# docker ps -aq
b613fbc39be2
e3bfe67aa175
8813d555d0dc
6d65e303381c
5d950a3835d6
32238eabfac4
d38d94f8b88c
ce065a026516
13b10b8f321d
40f35204ce70
1b6ecbd6a091
d1c871755f38

To show the last created container, including the non-running container, run the following command:
root@Docker:~# docker ps -l
CONTAINER ID   IMAGE   COMMAND    CREATED       STATUS       PORTS  NAMES
b613fbc39be2      centos    "/bin/bash"     8 minutes ago  Up 8 minutes             sad_shannon

For help with the docker ps use --help

Display the timestamping capabilities of particular interface of Linux Server.

Thursday, January 11, 2018 0
Many NICs support software timestamping, but to query your own interface, use the below command, which will display the timestamping capabilities of particular interface

NAME
       ethtool - query or control network driver and hardware settings

[root@nsk ~]# ethtool -T enp0s3
Time stamping parameters for enp0s3:
Capabilities:
        software-transmit     (SOF_TIMESTAMPING_TX_SOFTWARE)
        software-receive      (SOF_TIMESTAMPING_RX_SOFTWARE)
        software-system-clock (SOF_TIMESTAMPING_SOFTWARE)
PTP Hardware Clock: none
Hardware Transmit Timestamp Modes: none
Hardware Receive Filter Modes: none
[root@nsk ~]#

Monday, January 8, 2018

Working with Docker Container - Starting a container

Monday, January 08, 2018 0

Starting a container

Listing images

We can list the images available on the system running the Docker daemon. These images might have been pulled from the registry, imported through the docker command, or created through Docker files.
root@Docker:~# docker images
REPOSITORY                     TAG                 IMAGE ID               CREATED            SIZE
nskselvan/nsk                      latest              b2f0c17eed23        2 months ago        197MB
centos-latest                        latest              2083898799b1       2 months ago        197MB
wordpress                            latest              224b7eef6944        3 months ago        408MB
mysql                                   5.7                  b4e78b89bcf3        3 months ago        412MB
registry                                 2                    28525f9a6e46         3 months ago        33.2MB
localhost:5000/reg               latest              28525f9a6e46         3 months ago        33.2MB
centos                                  latest             196e0ce0c9fb          3 months ago        197MB
localhost:5000/centos-ka     latest             196e0ce0c9fb          3 months ago        197MB

For help with the docker images use --help

Once we have images, we can use them to start the containers. In this recipe, we will start a container with the fedora:latest image and see what all things happen behind the scene.
syntax  : docker run [ OPTIONS ]  IMAGE[:TAG]  [COMMAND]  [ARG...]

root@Docker:~# docker run -i -t --name=centos centos /bin/bash
[root@6d65e303381c /]# uptime
 04:07:13 up  1:02,  0 users,  load average: 0.02, 0.01, 0.00

Here,
The -i option starts the container in the interactive mode
The -t option allocates a pseudo-tty and attaches it to the standard input

So, with the preceding command, we start a container from the centos:latest image, attach pseudo-tty, name it centos, and run the /bin/bash command. If the name is not specified, then a random string will be assigned as the name.
Also, if the image is not available locally, then it will get downloaded from the registry first and then run. Docker will run the search and pull commands before running the run command.

Under the hood, Docker:

Will merge all the layers that make that image using UnionFS.
Allocates a unique ID to a container, which is referred to as Container ID.
Allocates a filesystem and mounts a read/write layer for the container. Any changes on this layer will be temporary and will be discarded if they are not committed.
Allocates a network/bridge interface.
Assigns an IP address to the container.
Executes the process specified by the user.
Also, with the default Docker configuration, it creates a directory with the container's ID inside /var/lib/docker/containers, which has the container's specific information such as hostname, configuration details, logs, and /etc/hosts.

To exit from the container, press Ctrl + D or type exit. It is similar to exiting from a shell but this will stop the container.
The run command creates and starts the container. With Docker 1.3 or later, it is possible to just create the container using the create command and run it later using the start command, as shown in the following example:

root@Docker:~# ID=$(docker create -t -i centos bash)
root@Docker:~# docker start -a -i $ID
[root@8813d555d0dc /]#

The container can be started in the background and then we can attach to it whenever needed. We need to use the -d option to start the container in the background:
root@Docker:~# docker run -d -i -t centos /bin/bash
e3bfe67aa1759c5ccd0e8e061595b8214881673c4df599f9652a58369df7d948

The preceding command returns the container ID of the container to which we can attach later, as follows:
root@Docker:~# docker attach e3bfe67aa1759c5ccd0e8e061595b8214881673c4df599f9652a58369df7d948
[root@e3bfe67aa175 /]#

The --read-only option of the run command will mount the root filesystem in the read-only mode:
root@Docker:~# docker run --read-only -d -i -t centos /bin/bash
b613fbc39be2b46cbc485d76bae3f2e7f1781c570e32b6509dab5345d45b6e04

Note: this option just makes sure that we cannot modify anything on the root filesystem, but we are writing on volumes
For help with the docker run use --help

lsblk command in Linux

Monday, January 08, 2018 0
NAME
       lsblk - list block devices

lsblk lists information about all available or the specified block devices.  The lsblk command reads the sysfs filesystem to gather information. The command prints all block devices (except RAM disks) in a tree-like format by default

[root@nsk postfix]# lsblk
NAME                           MAJ:MIN RM  SIZE    RO TYPE MOUNTPOINT
sda                                     8:0       0      20G     0    disk
├─sda1                              8:1       0        1G     0    part /boot
└─sda2                              8:2       0      19G     0    part
  ├─centos-root              253:0       0      17G     0    lvm  /
  └─centos-swap            253:1       0        2G     0    lvm  [SWAP]
sr0                                     11:0       1  1024M     0     rom

The  default  output, as well as the default output from options like --fs and --topology, is subject to change.

[root@nsk postfix]# lsblk --fs
NAME               FSTYPE           LABEL UUID                                          MOUNTPOINT
sda
├─sda1              xfs                    7b4cffc6-3fe2-4ad9-9be9-ea83e11532fc           /boot
└─sda2              LVM2_member DQjmHN-fso4-Mu4t-3l1V-Yogj-ksTH-ROFiK7
  ├─centos-root  xfs                    4d056c54-3e98-4bbd-953d-ad49d24e89a3       /
  └─centos-swap swap               e97f5f2c-66b2-42c6-9baf-544123ee9abf          [SWAP]
sr0

[root@nsk postfix]# lsblk --topology


 For mre help, please refer man pages

Sunday, January 7, 2018

How to modify the Default Physical extent size of Physical Volume?

Sunday, January 07, 2018 0

There are 2 situation for modifying or Setting the Default Physical extent size in LVM.

1. Create a volume group with new Physical extent size. This method will be used before creating logical volume on that Volume Group.

#vgcreate -s PE_SIZE 

Here,
-s  --physicalextentsize Size[m|UNIT] - Sets the physical extent size of PVs in the VG.  The value must be either a power of 2 of at least 1 sector (where the sector size is the largest sector size of the PVs currently used in the VG), or at least 128KiB.  Once this value has been set, it is difficult to change without recreating the VG,unless no extents need moving.

2. Modify the Existing value of Physical extent size.

- remove all Logical Volumes of the Volume Group with lvremove
- do a vgreduce on that VG.
- "vgchage -an" on that VG
- vgremove that VG
- setup the VG with large PE size (vgcreate -s PE_SIZE)

A more "Forceful" approach is:
- "vgchange -a n" on the VG
- "pvcreate -ff" on all its PVs
- setup the VG with large PE size (vgcreate -s PE_SIZE)