This Blog is to share our knowledge and expertise on Linux System Administration and VMware Administration

Tuesday, November 7, 2017

How to Determin if Intel Virtualization Technology or AMD Virtualization is enabled in the BIOS without reboot

Tuesday, November 07, 2017
When troubleshooting vMotion, Enhanced VMotion Capability (EVC), or 64bit virtual machine performance, you may need to determine if the Intel Virtualization Technology (VT) or AMD Virtualization (AMD-V) are enabled in the BIOS.

This section describes how to identify hardware virtualization extensions and enable them in your BIOS if they are disabled.

Log in to the ESX host as the root user.

    Run this command:

    esxcfg-info|grep "\----\HV Support"

    The output of the HV Support command indicates the type of Hyper-visor support available. These are the descriptions for the possible values:

    0 - VT/AMD-V indicates that support is not available for this hardware.
    1 - VT/AMD-V indicates that VT or AMD-V might be available but it is not supported for this hardware.2 - VT/AMD-V indicates that VT or AMD-V is available but is currently not enabled in the BIOS.3 - VT/AMD-V indicates that VT or AMD-V is enabled in the BIOS and can be used.

How to check the Listening Ports on Linux Server - Linvirtshell

Tuesday, November 07, 2017

We can check the listening ports on Linux Server by below ways

fuser - identify processes using files or sockets (Refer- Man Pages for more information)

Linvirtshell.com

netstat -  Print network connections, routing tables, interface statistics, masquerade connections, and multicast memberships (Refer- Man Pages for more information)

Linvirtshell.com

ssh  - OpenSSH SSH client (remote login program)  (Refer- Man Pages for more information)

[root@nsk-linux ~]# ssh -vv 10.0.2.15 25

OpenSSH_5.3p1, OpenSSL 1.0.1e-fips 11 Feb 2013
debug1: Reading configuration data /etc/ssh/ssh_config
debug1: Applying options for *
debug2: ssh_connect: needpriv 0
debug1: Connecting to 10.0.2.15 [10.0.2.15] port 22.
debug1: Connection established.
debug1: permanently_set_uid: 0/0
debug1: identity file /root/.ssh/identity type -1
debug1: identity file /root/.ssh/identity-cert type -1
debug1: identity file /root/.ssh/id_rsa type -1
debug1: identity file /root/.ssh/id_rsa-cert type -1
....
...

lsof - list open files (Refer- Man Pages for more information)

Linvirtshell.com

  nmap - Network exploration tool and security / port scanner (Refer- Man Pages for more information) 

Here for ex, i took output from localhost, you can change any ip or server name.
Linvirtshell.com

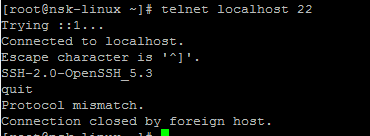
telnet -  user interface to the TELNET protocol  (Refer- Man Pages for more information)

Here for ex, i took output from localhost, you can change any ip or server name.

Linvirtshell.com

Monday, November 6, 2017

How to Avoid & Solve the Disk Limitations error with KVM guests?

Monday, November 06, 2017
There are some limitations specific to the virtio-blk driver that will be discussed in this kbase article. Please note, these are not general limitations of KVM, but rather relevant only to cases where virtio-blk is used.

Disks under KVM are para-virtualized block devices when used with the virtio-blk driver. All para-virtualized devices (e.g. disk, network, balloon, etc.) are PCI devices. Presently, guests are limited to a maximum of 32 PCI devices. Of the 32, 4 are required by the guest for minimal baseline functionality and are
therefore reserved.


When adding a disk to a KVM guest, the default method assigns a separate virtual PCI controller for every disk to allow hot-plug support (i.e. the ability to add/remove disks from a running VM without downtime). Therefore, if no other PCI devices have been assigned, the max number of hot-pluggable disks is 28.


If a guest requires more disks than the available PCI slots allow, then there are three possible work-arounds.


1. Use PCI pass-through to assign a physical disk controller (i.e. FC HBA, SCSI controller, etc.) to the VM and subsequently use as many devices as that controller supports.
2. Forego the ability to hot-plug and assign the virtual disks using multi-function PCI addressing.
3. Use the virtio-scsi driver, which creates a virtual SCSI HBA that occupies a single PCI address and supports thousands of hot-plug disks.


Here i have used the option 2 for correcting this problem.

Multi-function PCI addressing allows up to 8 virtual disks per controller. Therefore you can have n * 8 possible disks, where n is the number of available PCI slots.

On a system with 28 free PCI slots, you can assign up to 224 virtual disks to that VM. However, as previously stated you will not be able to add and/or remove the multi-function disks from the guest without a reboot of the guest.

Any disks assigned without multifunction can however continue to use
hot-plug.

The XML config below, demonstrates how to configure a multi-function PCI controller:

<disk type='block' device='disk'>
<driver name='qemu' type='raw'/>
<source dev='/dev/rootvg/lvtest01'/>
<target dev='vdb' bus='virtio'/>
<alias name='virtio-disk1'/>
<address type='pci' domain='0x0000' bus='0x00' slot='0x07' function='0x0' multifunction='on'/>
</disk>
<disk type='block' device='disk'>
<driver name='qemu' type='raw'/>
<source dev='/dev/rootvg/lvtest02'/>
<target dev='vdc' bus='virtio'/>
<alias name='virtio-disk2'/>
<address type='pci' domain='0x0000' bus='0x01' slot='0x07' function='0x1' multifunction='on'/>


In the above, we defined a new controller in slot 7. And then attached 2 disks (vdb, vdc) to that controller. So that only one PCI slot is used, slot 7. And 2 disks are attached to it. We could add 8 more disks to the controller before having to create a new controller in slot 8 (assuming 8 is the next available slot).

You can check a guests config from the virtualization host, by using "virsh dumpxml <guest>". This will show you which slots are in use and therefore which are available.


To add one or more multifunction controllers you would use "virsh edit <guest>" and then add the appropriate XML entries modeled after the example above. Remember, the guest must be rebooted before the changes to the XML config are applied.

How to Rebuild initramfs (initrd) on RHEL6?

Monday, November 06, 2017
 The mkinitrd command was used to rebuild the initial ramdisk on prior versions of RHEL . This has been replaced in RHEL6 with dracut.

The equivalent command to rebuild the initramfs for the running kernel on RHEL6 is:
 

$dracut -f /boot/initramfs-$(uname -r).img $(uname -r)

Hope it helps.

Sunday, November 5, 2017

Single command to list the software packages (RPMs) by install date in Linux Server

Sunday, November 05, 2017
Occasionally one needs to get a list of all software packages (rpm's) installed on a RHEL host, sorted by their install date. While there are many ways to do this

# rpm -qa --last


Linvirtshell.com


or

 copy and paste the following scriptlet into a shell command line:

#rpm -qa --queryformat="%{INSTALLTIME} %{NAME}\n" | sort -n | while read rpm_line; do rpm_date=$( date -d @$(echo $rpm_line | awk '{print $1}')); rpm=$( echo $rpm_line | awk '{print $2}'); printf '%-50s %s\n' "$rpm" "$rpm_date"; done

Linvirtshell.com
  
Hope it helps

Saturday, November 4, 2017

How to Manually Deactivate a High Available cluster volume group?

Saturday, November 04, 2017
Follow the below steps 

unmount all filesystem assocated with the VG:

#umount <mount_point>

deactivate the cluster VG:

#vgchange –a n HAVG_<vgname>

Remove all hostname tags from the VG:

#vgchange –-deltag <server_name>.testdoamin.com HAVG_<vgname>

Friday, November 3, 2017

Changing the Auto logout Timeout in SSH

Friday, November 03, 2017 0

The ssh "timed out waiting for input: auto-logout" messages is generated by ssh upon reaching a auto-logout after an inactivity time specified by the TMOUT environment variable. If this variable is not set your session will not be auto-logged out due to inactivity. If the environment variable is set, your session will be automatically closed/logged out after the amount of seconds specified by the TMOUT variable.


To see if your auto-logout variable is set and/or see what it is set to issue the following command:

[root@localhost ~]# timed out waiting for input: auto-logout

[root@localhost ~]# echo $TMOUT
120


Often this value is defined in /etc/profile (globally) or your user's profile (~/.profile or ~/.bash_profile).


To alter the auto-logout amount, set the TMOUT environment variable accordingly:


* TMOUT=120   #set an auto-logout timeout for  2 minutes

* TMOUT=1200  #set an auto-logout timeout for 20 minutes


* TMOUT=   #turn off auto-logout (user session will not auto-logout due to session inactivity)


This value can be set globally (e.g. TMOUT=1200) in the /etc/profile file; however, each user can override the value by setting the TMOUT variable in their personal profile file (~/.profile or ~/.bash_profile). To do this simply set the TMOUT variable as you like in your profile file.


Dont forget to source the file you changed to get the settings to take effect immediately or log out and log back in.


I hope the article was useful.