This Blog is to share our knowledge and expertise on Linux System Administration and VMware Administration

Monday, October 16, 2017

Brief explai about - Modes in esxtop - Vmware

Monday, October 16, 2017 0
ESXTOP

ESXTOP is the utility only for ESX host to examine real-time resource usage for ESX and resxtop for ESX & ESXi hosts.esxtop can only be used for the local ESX machine but resxtop can be used remotely to view the resource utilization of ESX/ESXi hosts from other ESX/ESXi servers or VMA.

There are 3 different types of Modes in esxtop/resxtop

Interactive Mode

Batch Mode

Replay Mode.

Interactive mode (the default mode) – All statistics are displayed  are in real time

Batch mode – Statistics can be collected so that the output can be saved in a file (csv) and can be viewed & analyzed using windows perfmon & other tools in later time.

Replay mode – It is similar to record and replay operation. Data that was collected by the vm-support command is interpreted and played back as esxtop statistics. We can view the captured performance information for a particular duration or time period as like real time to view what was happening during that time. It is perfectly used for the VMware support person to replay the stats to understand what was happening to the server during that time.


Thanks for reading!!!!


VMware Tools Installation for Linux Guests with the RPM installer and with the Tar Installer

Monday, October 16, 2017 0

TO INSTALL VMWARE TOOLS FROM X WITH THE RPM INSTALLER:

1. Choose VM > Install VMware Tools.

The guest operating system mounts the VMware Tools installation virtual CD.

2. Double-click the VMware Tools CD icon on the desktop.

Note: In some Linux distributions, the VMware Tools CD icon may fail to appear when you install VMware Tools within an X windows session on a guest. In this case, you should continue installing VMware Tools as described in Installing VMware Tools from the Command Line with the Tar Installer, beginning with step 3.

3. Double-click the RPM installer in the root of the CD-ROM.

4. Enter the root password.

5. Click Continue.

The installer prepares the packages.

6. Click Continue when the installer presents a dialog box saying Completed System Preparation.

A dialog appears for Updating system, with a progress bar. When the installer is done, VMware Tools are installed. There is no confirmation or finish button.

7. In an X terminal, as root (su -), configure VMware Tools.

vmware-config-tools.pl

Respond to the questions the installer displays on the screen. Press Enter to accept the default value.

Note: Be sure to respond yes when the installer offers to run the configuration program.

8. Launch the VMware Tools background application:

vmware-toolbox &

Note: Some guest operating systems require a reboot for full functionality.

INSTALLING VMWARE TOOLS FROM THE COMMAND LINE WITH THE TAR INSTALLER:


The first steps are performed on the host, within Workstation menus:

1. Power on the virtual machine.

2. After the guest operating system has started, prepare your virtual machine to install VMware Tools.

Choose VM > Install VMware Tools.

The remaining steps take place inside the virtual machine.

3. As root (su -), mount the VMware Tools virtual CD-ROM image, change to a working directory (for example, /tmp), uncompress the installer, then unmount the CD-ROM image.

Note: Some Linux distributions automatically mount CD-ROMs. If your distribution uses automounting, do not use the mount and umount commands below. You still must untar the VMware Tools installer to /tmp.

Some Linux distributions use different device names or organize the /dev directory differently. If your CD-ROM drive is not /dev/cdrom or if the mount point for a CD-ROM is not /mnt/cdrom, you must modify the following commands to reflect the conventions used by your distribution.

mount /dev/cdrom /mnt/cdrom

cd /tmp

Note: If you have a previous installation, delete the previous vmware-distrib directory before installing. The default location of this directory is

/tmp/vmware-tools-distrib.

4. Untar the VMware Tools tar file:

tar zxf /mnt/cdrom/VMwareTools-5.0.0-<xxxx>.tar.gz

umount /dev/cdrom

Where <xxxx> is the build/revision number of the VMware Workstation release.

Note: If you attempt to install a tar installation over an rpm installation — or the reverse — the installer detects the previous installation and must convert the installer database format before continuing.

5. Run the .tar VMware Tools installer:

cd vmware-tools-distrib

./vmware-install.pl

Respond to the configuration questions on the screen. Press Enter to accept the default value.

6. Log off of the root account.

exit

7. Start X and your graphical environment.

8. In an X terminal, launch the VMware Tools background application.

vmware-toolbox &

Note: You may run VMware Tools as root or as a normal user. To shrink virtual disks, you must run VMware Tools as root (su -).

INSTALLING VMWARE TOOLS FROM THE COMMAND LINE WITH THE RPM INSTALLER:

 The first steps are performed on the host, within Workstation menus:

1. Power on the virtual machine.

2. After the guest operating system has started, prepare your virtual machine to install VMware Tools.

Choose VM > Install VMware Tools.

The remaining steps take place inside the virtual machine.

3. As root (su -), mount the VMware Tools virtual CD-ROM image, change to a working directory (for example, /tmp), uncompress the installer, then unmount the CD-ROM image.

Note: Some Linux distributions automatically mount CD-ROMs. If your distribution uses automounting, do not use the mount and umount commands below. You still must untar the VMware Tools installer to /tmp.

Some Linux distributions use different device names or organize the /dev directory differently. If your CD-ROM drive is not /dev/cdrom or if the mount point for a CD-ROM is not /mnt/cdrom, you must modify the following commands to reflect the conventions used by your distribution.

mount /dev/cdrom /mnt/cdrom

cd /tmp

Note: If you have a previous installation, delete the previous vmware-distrib directory before installing. The default location of this directory is

/tmp/vmware-tools-distrib.

4. At the command prompt, enter:

rpm -Uhv /mnt/cdrom/VMwareTools-5.0.0-<xxxx>.i386.rpm

umount /dev/cdrom

Where <xxxx> is the build/revision number of the VMware Workstation release.

Note: If you attempt to install an rpm installation over a tar installation — or the reverse — the installer detects the previous installation and must convert the installer database format before continuing.

5. Configure VMware Tools:

vmware-config-tools.pl

Respond to the questions the installer displays on the screen. Press Enter to accept the default value.

6. Log off of the root account.

exit

7. Start X and your graphical environment.

8. In an X terminal, launch the VMware Tools background application.

vmware-toolbox &

Note: You may run VMware Tools as root or as a normal user. To shrink virtual disks, you must run VMware Tools as root (su -).

STARTING VMWARE TOOLS AUTOMATICALLY

You may find it helpful to configure your guest operating system so VMware Tools starts when you start your X server. The steps for doing so vary depending on your Linux distribution and your desktop environment. Check your operating system documentation for the appropriate steps to take.

For example, in a Red Hat Linux 7.1 guest using GNOME, follow these steps.

1. Open the Startup Programs panel in the GNOME Control Center.

Main Menu (click the foot icon in the lower left corner of the screen) > Programs > Settings > Session > Startup Programs

2. Click Add.

3. In the Startup Command field, enter vmware-toolbox.

4. Click OK, click OK again, then close the GNOME Control Center.

The next time you start X, VMware Tools starts automatically.

UNINSTALLING VMWARE TOOLS

To remove VMware Tools from your Linux guest operating system, log on as root (su -) and enter the following command:


From a tar install

vmware-uninstall-tools.pl


From an RPM install

rpm -e VMwareTools

How to check the UDP port is listening on Remote host?

Monday, October 16, 2017 0
The nc (or netcat) utility is used for just about anything under the sun involving TCP or UDP.  It can open TCP connections, send UDP packets, lis-ten on arbitrary TCP and UDP ports, do port scanning, and deal with both IPv4 and IPv6.
  
NAME

     nc - arbitrary TCP and UDP connections and listens

[root@nsk-linux ~]# nc -v -u -z -w 3 10.0.2.15 1-1024
Connection to 10.0.2.15 68 port [udp/bootpc] succeeded!
Connection to 10.0.2.15 631 port [udp/ipp] succeeded!


10.0.2.15= Server IP (chane as per your needs)
1-1024    = Range of UDP ports

Saturday, October 14, 2017

How to roll back an update in Linux Server?

Saturday, October 14, 2017 0

Roll back packages by using yum in linux


Downgrading a system to minor version (ex: RHEL6.8 to RHEL6.7) is not recommended as this might leave the system in broken state where libgcc and other libraries won't rollback as expected. Use the history option for small update rollbacks.

Roll back of some package to older version is not supported & it makes server crash or installed application will not work properly.

We can use yum history command to rollback.

Please find the below example.

[root@nsklinux ~]# yum install dovecot

Loaded plugins: fastestmirror, security
Setting up Install Process
Loading mirror speeds from cached hostfile
 * base: mirror.vbctv.in
 * extras: centos-hn.viettelidc.com.vn
 * updates: centos-hn.viettelidc.com.vn
Resolving Dependencies
--> Running transaction check
---> Package dovecot.x86_64 1:2.0.9-22.el6 will be installed
--> Finished Dependency Resolution

Dependencies Resolved


===============================================================

 Package                         Arch       Version           Repository          Size
===============================================================
Installing:                                                             
 dovecot                         x86_64     1:2.0.9-22.el6    base               1.9 M
                                                                        
Transaction Summary                                                     
===============================================================
Install       1 Package(s)

Total download size: 1.9 M

Installed size: 5.7 M
Is this ok [y/N]: y
Downloading Packages:
dovecot-2.0.9-22.el6.x86_64.rpm              | 1.9 MB     00:00
Running rpm_check_debug
Running Transaction Test
Transaction Test Succeeded
Running Transaction
  Installing : 1:dovecot-2.0.9-22.el6.x86_64       1/1
  Verifying  : 1:dovecot-2.0.9-22.el6.x86_64       1/1

Installed:

  dovecot.x86_64 1:2.0.9-22.el6

Complete!

[root@nsklinux ~]#
[root@nsklinux ~]#


[root@nsklinux ~]# yum history

Loaded plugins: fastestmirror, security
ID     | Login user               | Date and time    | Action(s)      | Altered
-------------------------------------------------------------------------------
     5 | root <root>              | 2017-10-14 08:01 | Install        |    1
     4 | root <root>              | 2017-10-14 07:52 | I, O, U       |  506 EE
     3 | root <root>              | 2017-10-14 07:27 | Update      |    2
     2 | root <root>              | 2017-10-14 07:17 | I, O            |     3
     1 | System <unset>      | 2017-10-14 07:07 | Install        |  610
history list


[root@nsklinux ~]# yum history undo 5

Loaded plugins: fastestmirror, security
Undoing transaction 5, from Sat Oct 14 08:01:55 2017
    Install dovecot-1:2.0.9-22.el6.x86_64 @base
Resolving Dependencies
--> Running transaction check
---> Package dovecot.x86_64 1:2.0.9-22.el6 will be erased
--> Finished Dependency Resolution

Dependencies Resolved


=============================================================

 Package                       Arch         Version           Repository    Size
=============================================================
Removing:                                                               
 dovecot                       x86_64       1:2.0.9-22.el6    @base        5.7 M
                                                                        
Transaction Summary                                                     
=============================================================
Remove        1 Package(s)

Installed size: 5.7 M

Is this ok [y/N]: y
Downloading Packages:
Running rpm_check_debug
Running Transaction Test
Transaction Test Succeeded
Running Transaction
  Erasing    : 1:dovecot-2.0.9-22.el6.x86_64      1/1
  Verifying  : 1:dovecot-2.0.9-22.el6.x86_64     1/1

Removed:

  dovecot.x86_64 1:2.0.9-22.el6

Complete!

[root@nsklinux ~]# rpm -qa | grep -i dovecot
[root@nsklinux ~]#

Linux NFS share on Windows 2012 server & Visible for all Windows user

Saturday, October 14, 2017 0

Linux NFS share on Windows 2012 server & Visible for all Windows user

Normally Linux - Linux, we can easily mount the NFS share. But mounting Linux NFS share on Windows server need to follow below steps & Also that share should be visible on all Windows user.

Situation :
NFS Server : Linux Server
NFS Client : Windows2012 server
NFS Share name : u01
Windows mount drive : Z


The following steps are for Windows 2012 Server.

1.  Ensure that you are logged into the Windows server as an administrator.
2.  Start the command console as the administrator (Click Start > All Programs >  Accessories > Windows Powershell or Command Prompt)
3.  Right-click the Windows Powershell or Command Prompt, and select Run as administrator.
4.  Run the following command to install FS-NFS-Services:
5.  servermanagercmd.exe -install FS-NFS-Services or follow below GUI
6.  Note: To Windows Server 2012 Datacenter/Standard/Essentials Edition, you can run the command through

powerscript:

    Import-Module ServerManager
    Install-WindowsFeature -Name FS-NFS-Service
    Install-WindowsFeature NFS-Client

Linvirtshell.com


In GUI

a.  Run servermanager.exe.
b.  From the Add Roles and Features Wizard, under Server Roles, select File and Storage Services if it has not been installed.
c.  Under File and iSCSI Services, select File Server and Server for NFS. Click Add Features to select Client for NFS.

7.  Run
    nfsadmin client stop

Linvirtshell.com


8.  Open Regedit and navigate to the following branch:
    HKEY_LOCAL_MACHINE\SOFTWARE\Microsoft\ClientForNFS\CurrentVersion\Default
9.  In the main window, right-click and select New > DWORD 32-bit Value. Set the name as AnonymousGID.
10. Right-click and select New > DWORD 32-bit Value again. Set the name as AnonymousUID.
11. Double-click on AnonymousGID and AnonymousUID, set the value as 0 and the base as Decimal respectively.  


Linvirtshell.com


Click OK.
Close Regedit.

12. In the command prompt, run:
    nfsadmin client start

Linvirtshell.com


13. Close the Windows Powershell Console.
14. Open a command prompt.
15. Run the following command in a command prompt (not Powershell) to set the NFS configuration:
    nfsadmin client localhost config fileaccess=755 SecFlavors=+sys -krb5 -krb5i

Linvirtshell.com


16. Run the following commands to mount the share:
    mount -o mtype=soft retry=10 timeout=6 casesensitive=yes anon nfsservername:/u01  Z:

Linvirtshell.com


Linvirtshell.com


Mount the share automatically with windows restart


1. Create a batch file, for example, c:\windows\OPC\Autonfsmount.bat, and type:
    mount -o mtype=soft retry=10 timeout=6 casesensitive=yes anon nfsservername:/u01 Z:
2. Click Start > Administrative Tools > Task Scheduler.
3. Click Create Task in Task Scheduler (Local).
4. Click General, and type nfs_auto_mount for Name. In Security options, click Change User or Group > Advanced > Find Now, and select SYSTEM. Select Run whether user

    is logged on or not Select, along with Do not store password, and then select Run with highest privileges. Finally click OK.    
 
Linvirtshell.com


5. Click Triggers > New, select At startup for Begin the task. Click OK

Linvirtshell.com


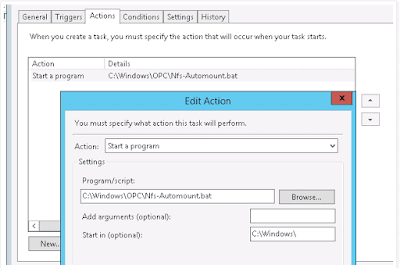
 6. Click Actions > New > Browse, select c:\windows\OPC\Autonfsmount.bat and click OK

Linvirtshell.com


Linvirtshell.com


7. Click OK

8. Restart the machine.
9. The client mounted points will be displayed in Windows explorer as Disconnected Network drivers, and this is the expected normal status. This will ensure the scheduled task is working, as well as causing the drives to be mounted as SYSTEM, which is necessary for the install procedure.

Hope it helps