This Blog is to share our knowledge and expertise on Linux System Administration and VMware Administration

Saturday, October 14, 2017

How to roll back an update in Linux Server?

Saturday, October 14, 2017 0

Roll back packages by using yum in linux


Downgrading a system to minor version (ex: RHEL6.8 to RHEL6.7) is not recommended as this might leave the system in broken state where libgcc and other libraries won't rollback as expected. Use the history option for small update rollbacks.

Roll back of some package to older version is not supported & it makes server crash or installed application will not work properly.

We can use yum history command to rollback.

Please find the below example.

[root@nsklinux ~]# yum install dovecot

Loaded plugins: fastestmirror, security
Setting up Install Process
Loading mirror speeds from cached hostfile
 * base: mirror.vbctv.in
 * extras: centos-hn.viettelidc.com.vn
 * updates: centos-hn.viettelidc.com.vn
Resolving Dependencies
--> Running transaction check
---> Package dovecot.x86_64 1:2.0.9-22.el6 will be installed
--> Finished Dependency Resolution

Dependencies Resolved


===============================================================

 Package                         Arch       Version           Repository          Size
===============================================================
Installing:                                                             
 dovecot                         x86_64     1:2.0.9-22.el6    base               1.9 M
                                                                        
Transaction Summary                                                     
===============================================================
Install       1 Package(s)

Total download size: 1.9 M

Installed size: 5.7 M
Is this ok [y/N]: y
Downloading Packages:
dovecot-2.0.9-22.el6.x86_64.rpm              | 1.9 MB     00:00
Running rpm_check_debug
Running Transaction Test
Transaction Test Succeeded
Running Transaction
  Installing : 1:dovecot-2.0.9-22.el6.x86_64       1/1
  Verifying  : 1:dovecot-2.0.9-22.el6.x86_64       1/1

Installed:

  dovecot.x86_64 1:2.0.9-22.el6

Complete!

[root@nsklinux ~]#
[root@nsklinux ~]#


[root@nsklinux ~]# yum history

Loaded plugins: fastestmirror, security
ID     | Login user               | Date and time    | Action(s)      | Altered
-------------------------------------------------------------------------------
     5 | root <root>              | 2017-10-14 08:01 | Install        |    1
     4 | root <root>              | 2017-10-14 07:52 | I, O, U       |  506 EE
     3 | root <root>              | 2017-10-14 07:27 | Update      |    2
     2 | root <root>              | 2017-10-14 07:17 | I, O            |     3
     1 | System <unset>      | 2017-10-14 07:07 | Install        |  610
history list


[root@nsklinux ~]# yum history undo 5

Loaded plugins: fastestmirror, security
Undoing transaction 5, from Sat Oct 14 08:01:55 2017
    Install dovecot-1:2.0.9-22.el6.x86_64 @base
Resolving Dependencies
--> Running transaction check
---> Package dovecot.x86_64 1:2.0.9-22.el6 will be erased
--> Finished Dependency Resolution

Dependencies Resolved


=============================================================

 Package                       Arch         Version           Repository    Size
=============================================================
Removing:                                                               
 dovecot                       x86_64       1:2.0.9-22.el6    @base        5.7 M
                                                                        
Transaction Summary                                                     
=============================================================
Remove        1 Package(s)

Installed size: 5.7 M

Is this ok [y/N]: y
Downloading Packages:
Running rpm_check_debug
Running Transaction Test
Transaction Test Succeeded
Running Transaction
  Erasing    : 1:dovecot-2.0.9-22.el6.x86_64      1/1
  Verifying  : 1:dovecot-2.0.9-22.el6.x86_64     1/1

Removed:

  dovecot.x86_64 1:2.0.9-22.el6

Complete!

[root@nsklinux ~]# rpm -qa | grep -i dovecot
[root@nsklinux ~]#

Linux NFS share on Windows 2012 server & Visible for all Windows user

Saturday, October 14, 2017 0

Linux NFS share on Windows 2012 server & Visible for all Windows user

Normally Linux - Linux, we can easily mount the NFS share. But mounting Linux NFS share on Windows server need to follow below steps & Also that share should be visible on all Windows user.

Situation :
NFS Server : Linux Server
NFS Client : Windows2012 server
NFS Share name : u01
Windows mount drive : Z


The following steps are for Windows 2012 Server.

1.  Ensure that you are logged into the Windows server as an administrator.
2.  Start the command console as the administrator (Click Start > All Programs >  Accessories > Windows Powershell or Command Prompt)
3.  Right-click the Windows Powershell or Command Prompt, and select Run as administrator.
4.  Run the following command to install FS-NFS-Services:
5.  servermanagercmd.exe -install FS-NFS-Services or follow below GUI
6.  Note: To Windows Server 2012 Datacenter/Standard/Essentials Edition, you can run the command through

powerscript:

    Import-Module ServerManager
    Install-WindowsFeature -Name FS-NFS-Service
    Install-WindowsFeature NFS-Client

Linvirtshell.com


In GUI

a.  Run servermanager.exe.
b.  From the Add Roles and Features Wizard, under Server Roles, select File and Storage Services if it has not been installed.
c.  Under File and iSCSI Services, select File Server and Server for NFS. Click Add Features to select Client for NFS.

7.  Run
    nfsadmin client stop

Linvirtshell.com


8.  Open Regedit and navigate to the following branch:
    HKEY_LOCAL_MACHINE\SOFTWARE\Microsoft\ClientForNFS\CurrentVersion\Default
9.  In the main window, right-click and select New > DWORD 32-bit Value. Set the name as AnonymousGID.
10. Right-click and select New > DWORD 32-bit Value again. Set the name as AnonymousUID.
11. Double-click on AnonymousGID and AnonymousUID, set the value as 0 and the base as Decimal respectively.  


Linvirtshell.com


Click OK.
Close Regedit.

12. In the command prompt, run:
    nfsadmin client start

Linvirtshell.com


13. Close the Windows Powershell Console.
14. Open a command prompt.
15. Run the following command in a command prompt (not Powershell) to set the NFS configuration:
    nfsadmin client localhost config fileaccess=755 SecFlavors=+sys -krb5 -krb5i

Linvirtshell.com


16. Run the following commands to mount the share:
    mount -o mtype=soft retry=10 timeout=6 casesensitive=yes anon nfsservername:/u01  Z:

Linvirtshell.com


Linvirtshell.com


Mount the share automatically with windows restart


1. Create a batch file, for example, c:\windows\OPC\Autonfsmount.bat, and type:
    mount -o mtype=soft retry=10 timeout=6 casesensitive=yes anon nfsservername:/u01 Z:
2. Click Start > Administrative Tools > Task Scheduler.
3. Click Create Task in Task Scheduler (Local).
4. Click General, and type nfs_auto_mount for Name. In Security options, click Change User or Group > Advanced > Find Now, and select SYSTEM. Select Run whether user

    is logged on or not Select, along with Do not store password, and then select Run with highest privileges. Finally click OK.    
 
Linvirtshell.com


5. Click Triggers > New, select At startup for Begin the task. Click OK

Linvirtshell.com


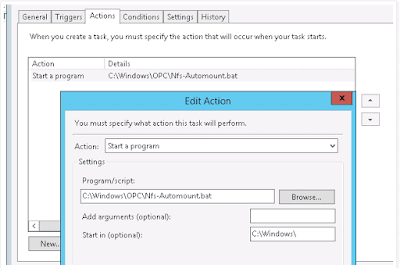
 6. Click Actions > New > Browse, select c:\windows\OPC\Autonfsmount.bat and click OK

Linvirtshell.com


Linvirtshell.com


7. Click OK

8. Restart the machine.
9. The client mounted points will be displayed in Windows explorer as Disconnected Network drivers, and this is the expected normal status. This will ensure the scheduled task is working, as well as causing the drives to be mounted as SYSTEM, which is necessary for the install procedure.

Hope it helps

Friday, October 13, 2017

How to reduce / file system utilization in Linux Server?

Friday, October 13, 2017 0
Reducing / file system utilization in linux server is very rare part.
or we can say, / file system is full, how to do housekeeping?

Situation:

We have separate mount of /boot /usr /tmp /home /var /opt file system but still / file system utilization is almost full.

Solution:

First check under / directory which are the file systems are not mounted, collect it & run the below command

For Ex: Below listed are not mounted, so we need to check which one is huge size.

admin lib middleware net  lib64 srv misc  media mnt

[root@testserver]# du -sk /admin /lib /middleware /net  /lib64 /srv /misc  /media /mnt | sort -n

4       /srv
16      /mnt
20      /middleware
31852   /lib64
920388  /lib


So lets see what's under /lib

[root@testserver ]# du -sk /lib/* | sort -n
109096  /lib/firmware
793332  /lib/modules


looks modules is huge size, lets check that one also

du -sk /lib/modules/* | sort -n

105840  /lib/modules/2.6.32-431.20.3.el6.x86_64
107040  /lib/modules/2.6.39-400.215.3.el6***.x86_64
109152  /lib/modules/2.6.32-504.23.4.el6.x86_64
116676  /lib/modules/2.6.32-696.1.1.el6.x86_64
176888  /lib/modules/3.8.13-68.3.3.el6***.x86_64
177732  /lib/modules/3.8.13-118.17.5.el6***.x86_64


Now Check the current kernal, which running on the server

[root@testserver firmware]# uname -a
Linux testserver 3.8.13-118.17.5.el6***.x86_64 #2 SMP Wed Apr 12 09:16:08 PDT 2017 x86_64 x86_64 x86_64 GNU/Linux


Check, what are the packages are related to 2.6 (old) kernel

#rpm -qf /lib/modules/2.6.*

kernel-2.6.32-431.20.3.el6.x86_64
kernel-2.6.32-504.23.4.el6.x86_64
kernel-2.6.32-696.1.1.el6.x86_64
kernel-uek-2.6.39-400.215.3.el6***.x86_64


We can see some old kernel is still available. So remove that one

#yum remove kernel-2.6.32-431.20.3.el6.x86_64

We can get some space if not sufficient then remove other (unused) older kernal.

Hope it helps.

Tuesday, October 3, 2017

How to restart the VNC viewer session in Linux Server?

Tuesday, October 03, 2017 0

For Restarting the VNC viewer session in Linux Server, first login to the server with root user.

Check the session port no by using ps command

[root@testserver ~]# ps -ef | grep -i vnc

testuser 21118     1  0 11:28 ?        00:00:01 /usr/bin/Xvnc :2 -desktop testserver.test.com:2 (testuser) -auth /testuser1/local/.Xauthority -geometry 1024x768 -rfbwait 30000 -rfbauth /testuser1/local/.vnc/passwd -rfbport 5902 -fp catalogue:/etc/X11/fontpath.d -pn
testuser 21124     1  0 11:28 ?        00:00:00 vncconfig -iconic
testuser 21156     1  0 11:28 ?        00:00:01 /usr/bin/Xvnc :3 -desktop testserver.test.com:3 (testuser) -auth /testuser1/local/.Xauthority -geometry 1024x768 -rfbwait 30000 -rfbauth /testuser1/local/.vnc/passwd -rfbport 5903 -fp catalogue:/etc/X11/fontpath.d -pn
testuser 21162     1  0 11:28 ?        00:00:00 vncconfig -iconic
testuser 21199     1  0 11:28 ?        00:00:01 /usr/bin/Xvnc :5 -desktop testserver.test.com:5 (testuser) -auth /testuser1/local/.Xauthority -geometry 1024x768 -rfbwait 30000 -rfbauth /testuser1/local/.vnc/passwd -rfbport 5905 -fp catalogue:/etc/X11/fontpath.d -pn
testuser 21226     1  0 11:28 ?        00:00:00 vncconfig -iconic
root     21840 21775  0 11:34 pts/3    00:00:00 grep -i vnc


Now switch to testuser & kill the vnc viewer session port. :2, :3, :5

[root@testserver ~]# su - testuser
-bash-4.1$ vncserver -kill :2
Killing Xvnc process ID 21118
-bash-4.1$ vncserver -kill :3
Killing Xvnc process ID 21156
-bash-4.1$ vncserver -kill :5
Killing Xvnc process ID 21199

Now start the vnc viewer session.

-bash-4.1$ vncserver :2
New 'testserver:2 (testuser1)' desktop is testserver:2

Starting applications specified in /testuser1/local/.vnc/xstartup
Log file is /testuser1/local/.vnc/testserver:2.log


-bash-4.1$ vncserver :3

New 'testserver:3 (testuser1)' desktop is testserver:3

Starting applications specified in /testuser1/local/.vnc/xstartup
Log file is /testuser1/local/.vnc/testserver:3.log

-bash-4.1$ vncserver :5

New 'testserver:5 (testuser1)' desktop is testserver:5

Starting applications specified in /testuser1/local/.vnc/xstartup
Log file is /testuser1/local/.vnc/testserver:5.log

-bash-4.1$ exit

hope it helps.

Monday, October 2, 2017

How to solve the Resource temporarily unavailable issue in RHEL6?

Monday, October 02, 2017 0
Situation:

While switching from one user to other user, getting below error. Still we have entry in limits.conf  (special case)

[root@testserver ~]#  su - testuser

su: cannot set user id: Resource temporarily unavailable

Solution:

[root@testserver ~]# cd /etc/security/limits.d/

[root@testserver limits.d]# ls -l
total 4
-rw-r--r-- 1 root root 191 Mar 23  2017 90-nproc.conf


[root@testserver limits.d]# cat 90-nproc.conf
# Default limit for number of user's processes to prevent
# accidental fork bombs.
# See rhbz #432903 for reasoning.

*            soft    nproc     1024
root       soft    nproc     unlimited

Take the backup & add the below entry

testuser    soft    nproc     327679

[root@testserver limits.d]# cp -p 90-nproc.conf 90-nproc.conf.org

[root@testserver limits.d]# cat 90-nproc.conf
# Default limit for number of user's processes to prevent
# accidental fork bombs.
# See rhbz #432903 for reasoning.

*               soft    nproc     1024
root          soft    nproc     unlimited
testuser    soft    nproc     327679

Now able to switch

root@testserver limits.d]# su - testuser

Current version is 034.008.001.001 with 10.3.6.0.170718-JDK1.7U111


-bash-4.1$

Hope it helps