This Blog is to share our knowledge and expertise on Linux System Administration and VMware Administration

Saturday, March 5, 2016

Importing media into VMware Update Manager fails with the error: Cannot upload file, because it is an invalid package

Saturday, March 05, 2016 0
Whenever
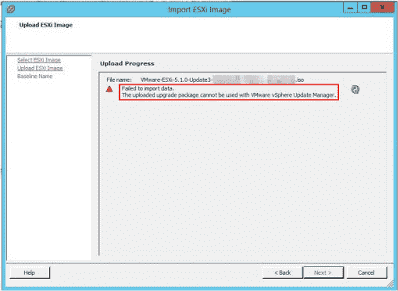
Attempting to import an ESXi update image fail with below erros

    Cannot upload file, because it is an invalid package.
    Failed to import data. The uploaded upgrade package cannot be used with VMware vSphere Update Manager


The resolution will be

 “ You must use the same version of vSphere Update Manager to upgrade to the corresponding version of ESXi”

vSphere 6.0 – What’s New in VMware Fault Tolerance (FT)

Saturday, March 05, 2016 0
Finally, With vSphere 6.0, VMware broken the limitation lock of Fault Tolerance. FT VM now Supports upto 4 vCPUs and 64 GB of RAM (Which was 1 vCPu and 64 GB RAM in vSphere 5.5). With this vSMP support, Now FT can be used to protect your Mission Critical applications. Along with the vSMP FT support, There are lot more features has been added in FT with vSphere 6.0, Let’s take a look at what’s new in vSphere 6.0 Fault Tolerance(FT)

 
Benefits of Fault Tolerance
  •     Continuous Availablity with Zero downtime and Zero data loss
  •     NO TCP connections loss during failover
  •     Fault Tolerance is completely transparent to Guest OS.
  •     FT doesn’t depend on Guest OS and application
  •     Instantaneous Failover from Primary VM to Secondary VM in case of ESXi host failure
What’s New in vSphere 6.0 Fault Tolerance
  •     FT support upto 4 vCPUs and 64 GB RAM
  •     Fast Check-Pointing, a new Scalable technology is introduced to keep primary and secondary in Sync by replacing “Record-Replay”
  •     vSphere 6.0, Supports vMotion of both Primary and Secondary Virtual Machine
  •     With vSphere 6.0, You will be able to backup your virtual machines. FT supports for vStorage APIs for Data Protection (VADP) and it also supports all leading VADP solutions in Market like symantec, EMC, HP ,etc.
  •     With vSphere 6.0, FT Supports all Virtual Disk Type like EZT, Thick or Thin Provisioned disks. It supports only Eager Zeroed Thick with vSphere 5.5 and earlier versions
  •     Snapshot of FT configured Virtual Machines are supported with vSphere 6.0
  •     New version of FT keeps the Separate copies of VM files like .VMX, .VMDk files to protect primary VM from both Host and Storage failures. You are allowed to keep both Primary and Secondary VM files on different datastore.
  •  


Friday, March 4, 2016

Deprecated VMFS Volumes found on host. Please consider upgrading volume(s) to the latest version error in vsphere 6.0

Friday, March 04, 2016 0
The ESXi hosts display a false positive warning:

Deprecated VMFS volume(s) found on the host. Please consider upgrading volume(s) to the latest version

This is a known issue affecting vCenter Server 6.0.

Currently, there is no resolution.

This issue occurs because the version of the filesystem is not known during the initial detection. Therefore, comparing it against the list of valid filesystems does not return a match.

Workaround or Fix :

To work around this issue, restart the management agents on the impacted hosts to clear the warning using the below command.

Services.sh restart

After restarting the management agents on my ESXi 6.0 host, warning about deprecated VMFS volumes on ESXi host is cleared automatically. I hope this informative for you. Thanks for Reading!!!. Be Social and share it in social media, if you feel worth sharing it.


Thursday, March 3, 2016

How can I add more ethernet interface to a guest Linux server after installation?

Thursday, March 03, 2016 0

Add more ethernet interface to a guest after installation

Issue 

When a guest OS was created using virt-manager or virt-install, it created one ethernet interface for the guest. How do I create a second and third interface and attach them to the guest post insatllation?

Resolution
 

Xen

Using virt-manager. (Recommended)
  •     Right Click the Guest in virt-manager and select "Open" an dselect "Hardware" tab
  •     Click on "Add Hardware"
  •     Select "Network" as the "Hardware Type" and click Forward.
  •     Select "Virtual Network" or "Shared physical device" depending upon the requirement. Set fixed MAC address if needed. Select "Hypervisor default" or another appropriate Deivce Model. Click Forward
  •     Then Click "Finish".
  •     New network will be attached to the guest on the next reboot.

By manually editing the guest configuration file. (Not recommended)

    Edit the configuration file for that guest at /etc/xen/guestname and add nic = 2 for two interfaces and or nic = 3 for three interfaces.
    Change the vif = entry.

     vif = [ 'mac=xx:xx:xx:xx:xx:xx, bridge=xenbr0' ]
     To (For two interfaces)
     vif = [ 'mac=xx:xx:xx:xx:xx:xx, bridge=xenbr0', 'mac=xx:xx:xx:xx:xx:xx:xx,

    bridge=xenbr0' ]
     OR To (For three interfaces)
     vif = [ 'mac=xx:xx:xx:xx:xx:xx, bridge=xenbr0', 'mac=xx:xx:xx:xx:xx:xx:xx,
    bridge=xenbr0', 'mac=xx:xx:xx:xx:xx:xx, bridge=xenbr0' ]

    For fully virtualised guests it should be as below:

     vif = [ 'type=ioemu,mac=xx:xx:xx:xx:xx:xx, bridge=xenbr0',
    'type=ioemu,mac=xx:xx:xx:xx:xx:xx:xx, bridge=xenbr0',
    'type=ioemu,mac=xx:xx:xx:xx:xx:xx, bridge=xenbr0' ]

    Configure eth1 and eth2 inside the guest OS as usual.

Note: xx:xx:xx:xx:xx:xx needs to be replaced by a unique mac address.


KVM

Using virt-manager.
  •     Right Click the Guest in virt-manager and select "Open" an dselect "Hardware" tab
  •     Click on "Add Hardware"
  •     Select "Network" as the "Hardware Type" and click Forward.
  •     Select "Virtual Network" or "Shared physical device" depending upon the requirement. Set fixed MAC address if needed. Select "Hypervisor default" or another appropriate Deivce Model. Click Forward
  •     Then Click "Finish".
    New network will be attached to the guest on the next reboot.

Wednesday, March 2, 2016

How to find WWPN (world wide port name) WWNN (world wide node name) and of my QLogic card in Linux Server

Wednesday, March 02, 2016
The directory /proc/scsi/qla2xxx/ is not available in Red Hat Enterprise Linux 5, but the informations can now be found in the /sys/class/scsi_host/ tree.

    Locate the file called isp_name in /sys/class/scsi_host/.
    
    # ls /sys/class/scsi_host/*/isp_name

    /sys/class/scsi_host/host1/isp_name

    # ls /sys/class/scsi_host/*/device/fc_host:*/port_name

    /sys/class/scsi_host/host1/device/fc_host:host1/port_name

    # cat /sys/class/scsi_host/host1/device/fc_host:host1/port_name

    0x210000e08b8f9be6
    
    # ls /sys/class/scsi_host/*/device/fc_host:*/node_name

    /sys/class/scsi_host/host1/device/fc_host:host1/node_name

    # cat /sys/class/scsi_host/host1/device/fc_host:host1/node_name

    0x210000e08b8f9be6    

    From that directory, look for port_name& and node_name

Tuesday, March 1, 2016

Running the gcc preprocessor in RHEL

Tuesday, March 01, 2016 0
Issue

In certain situations it is needed to have source code preprocessed by gcc without undergoing the full compilation process. For example, this might be necessary when embedded SQL is included in C or C++ programs and the preprocesssed file will be passed on to another tool which will convert the SQL in native source code.

Resolution


Using the -E parameter with gcc or g++ will produce only the preprocessed source code:

$ gcc -E program.c -o program.preprocessed

The program.preprocessed file will contain the file preprocessed by gcc (Macros will be expanded and all include files will be resolved). This preprocessed

# 131 "/usr/include/bits/types.h" 3 4
# 1 "/usr/include/bits/typesizes.h" 1 3 4
# 132 "/usr/include/bits/types.h" 2 3 4

These lines are linemarkers that show from which include files specific

$ gcc -E -P program.c -o program.preprocessed

How to resolve : User is unable to change its password and getting error as "You must wait longer to change your password"

Tuesday, March 01, 2016 0
Getting error as "You must wait longer to change your password" while changing user password in Red Hat Enterprise Linux

Issue

    While changing the user password getting following error:

You must wait longer to change your password 
passwd: Authentication token manipulation error

    User is unable to change its password and getting error as "You must wait longer to change your password".
    Copied the user passwd entries from a BSD box. That may be what is causing the problem. However, pwck come back clean.

Resolution

    First check password aging policies/information for user as follows:

# chage -l user 
Last password change: Feb 07, 2011 
Password expires: May 08, 2011 
Password inactive: never 
Account expires: never 
Minimum number of days between password change: 7       <---
Maximum number of days between password change: 90 
Number of days of warning before password expires: 28

If Minimum number of days required for password change is set to 7 days then it will prompt an error message as You must wait longer to change your password while changing password using command passwd
Change the password aging information to linux defaults and try to change the password.
Changing 4th field to '0' will change Minimum number of days between password change to '0' so that user will be able to change its password without any restrictions.
 Make following changes to "/etc/shadow" file as root user:

user:$1$rmOPqlKQ$DMS2VsQuV/LNh8it5jT.N0:15012:0:99999:7:::     <---

OR

Expire the user's password using root account:

# chage -d 0 user

Then check again for password aging information for user:

* # chage -l user 
Last password change: Feb 07, 2011 
Password expires: May 08, 2011 
Password inactive: never 
Account expires: never 
Minimum number of days between password change: 0    <--- 
Maximum number of days between password change: 90 
Number of days of warning before password expires: 28
 

Try to change the password and it should work now.

Root Cause

    The issue mentioned above seems to be due to user password expiry settings are too restrictive.
    Minimum number of days between password change was set to 7 days so password change was not allowed before 7 days. The error You must wait longer to change your password was suggesting the same.