This Blog is to share our knowledge and expertise on Linux System Administration and VMware Administration

Saturday, November 21, 2015

Brief about ESXTOP - Batch Mode

Saturday, November 21, 2015 0
Batch mode – Statistics can be collected  and output can be saved in a file (csv) and  also  it can be viewed & analyzed using windows perfmon & other tools in later time.

To run esxtop in batch mode and save the output file for feature analysis use the command as in in below syntax

esxtop -b -d 10 -n 5 >/home/nagu/esxtstats.csv

–d Switch is used for the number of seconds between refreshes
–n switch is the number of iterations to run the esxtop


In our above example, esxtop command will run for about 50 seconds. 10 seconds dealy* 5 iterations. redirecting the output of above esxtop stats into csv file to store in the location  

/home/nagu/esxstats.csv


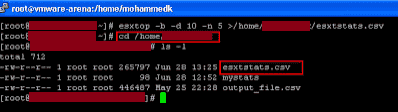
Once the command completed, Browse towards the location /home/nagu to see the esxtop output file “esxstats.csv”. Transfer the csv file using winscp to your windows desktop and analyze using windows perfmon or esxplot.

VMWare Interview Questions and answers on vMotion

Saturday, November 21, 2015 0
1.What is vMotion?

      Live migration of a virtual machine from one ESX server to another with Zero downtime.

2. What are the use cases of vMotion ?
  • Balance the load on ESX servers (DRS
  • Save power by shutting down ESX using DPM
  • Perform patching and maintenance on ESX server (Update Manager or HW maintenance
3.  What are Pre-requisites for the vMotion to Work?
  • ESX host must be licensed for VMotion
  • ESX  servers must be configured with vMotion Enabled VMkernel Ports.   
  • ESX servers must have compatible CPU’s for the vMotion to work
  • ESX servers should have Shared storage (FB, iSCSI or NFS) and VM’s should be stored on that    storage.
  • ESX servers should have exact similar network & network names
4. What are the Limitations of vMotion?
  • Virtual machines configured with the Raw Device Mapping(RDM) for clustering features using vMotion
  • VM cannot be connected to a CD-ROM or floppy drive that is using an ISO or floppy image stored on a drive that is local to the host server. The device should be disconnected before initiating the vMotion.
  • Virtual Machine cannot be migrated with VMotion unless the destination swapfile location is the same as the source swapfile location. As a best practice, Place the virtual machine swap files with the virtual  machine configuration file.
  • Virtual Machine affinity must not be set (aka, bound to physical CPUs).
5. Steps involved in VMWare vMotion ?
  • A request has been made that VM-1 should be migrated (or “VMotioned”) from ESX A to ESX B.
  • VM-1’s memory is pre-copied from ESX A to ESX B while ongoing changes are written to a memory bitmap on ESX A.
  • VM-1 is quiesced on ESX A and VM-1’s memory bitmap is copied to ESX B.
  • VM-1 is started on ESX B and all access to VM-1 is now directed to the copy running on ESX B.
  • The rest of VM-1’s memory is copied from ESX A all the while memory is being read and written from VM-1 on ESX A when applications attempt to access that memory on VM-1 on ESX B.
  • If the migration is successful, VM-1 is unregistered on ESX A. 

PowerShell Script to List all VM’s with a connected CD-ROM/floppy device

Saturday, November 21, 2015 0
This script will report all VMs with a connected CD-ROM/floppy device. It will give you information about the device status – e.g. connected, connect at power on, client device

Replace vCenter Server with your vCenter Server name in the first line:

Connect-VIServer vCenter_name

$vms = Get-VM
write “VMs with a connected CD-ROM:”
foreach ($vm in $vms | where { $_ | Get-CDDrive | where { $_.ConnectionState.Connected -eq “true”}}) {
write $vm.name
}
write “VMs with CD-ROM connected at power on:”
foreach ($vm in $vms | where { $_ | Get-CDDrive | where { $_.ConnectionState.StartConnected -eq “true”}}) {
write $vm.name
}
write “VMs with CD-ROM connected as ‘Client Device’:”
foreach ($vm in $vms | where { $_ | Get-CDDrive | where { $_.RemoteDevice.Length -ge 0}}) {
write $vm.name
}
write “VMs with CD-ROM connected to ‘Datastore ISO file’:”
foreach ($vm in $vms | where { $_ | Get-CDDrive | where { $_.ISOPath -like “*.ISO*”}}) {
write $vm.name
}
write “VMs with connected Floppy:”
foreach ($vm in $vms | where { $_ | Get-FloppyDrive | where { $_.ConnectionState.Connected -eq “true”}}) {
write $vm.name
}
write “VMs with floppy connected at power on:”
foreach ($vm in $vms | where { $_ | Get-FloppyDrive | where { $_.ConnectionState.StartConnected -eq “true”}}) {
write $vm.name
}
write “VMs with floppy connected as ‘Client Device’:”
foreach ($vm in $vms | where { $_ | Get-FloppyDrive | where { $_.RemoteDevice.Length -ge 0}}) {
write $vm.name
}

Note: Copy this code in a notepad and save the file as .ps1

vSphere 6.0 -Difference between vSphere 5.0, 5.1, 5.5 and vSphere 6.0

Saturday, November 21, 2015 0
vSphere 6.0 -Difference between vSphere 5.0, 5.1, 5.5 and vSphere 6.0
vSphere 6.0 released with lot of new features and enhancements as compared to the previous versions of vSphere releases. Below is the difference between vSphere 5.0, 5.1, 5.5 and vSphere 6.0:


VMWare HA Slots Calculation

Saturday, November 21, 2015 0
 What is SLOT?

As per VMWare’s Definition,
“A slot is a logical representation of the memory and CPU resources that satisfy the requirements for any powered-on virtual machine in the cluster.”
If you have configured reservations at VM level, It influence the HA slot calculation. Highest memory reservation and highest CPU reservation of the VM in your cluster determines the slot size for the cluster.

Here is the Example,

If you have the VM configured with the highest memory reservation of 8192 MB (8 GB) and  highest CPU reservation of 4096 MHZ. among the other VM’s  in the cluster, then the slot size for memory is 8192 MB and slot size for CPU is 4096 MHZ. in the cluster.


If no VM level reservation is configured , Minimum CPU size of 256 MHZ and memory size of 0 MB +  VM memory overhead will be considered as CPU and Memory slot size.
Calculation for Number of Slots in cluster :-
Once we got the Slot size for memory and CPU by the above method , Use the below calculation
Num of CPU Slots  = Total available CPU resource of ESX or cluster   /  CPU Slot Size
Num of memory slots = Total available memory resource of ESX or cluster minus memory used for service console & ESX system /  Memory Slot size

Let’s take a Example, 
I have 3 host on the cluster and 6 Virtual machine is running on the cluster and Each host capacity as follows
RAM = 50 GB per Host
CPU = 8 X 2.666 GHZ  per host
Cluster RAM Resources = 50 X 3 = 150 GB – Memory for service console and system = 143 GB
Cluster CPU resources = 8 X 2.6 X 3 =  63 GHZ (63000 MHZ) of total CPU capacity in the cluster – CPU Capacity used by the ESX System = 60384 MHZ


I don’t have any memory  or CPU reservation in my cluster, So,  the default CPU slot size 256 MHZ and one of my Virtual machine is assigned with 8 vcpu and its memory overhead is  344.98 MB (which is the highest overhead among my 6 virtual machines in the cluster)
Let’s calculate the num of  CPU  & Memory slots
Num of CPU Slots  = Total available CPU resource of cluster /  CPUSlot size in MHZ
No of CPU Slots = 60384 MHZ / 256 MHZ = 235.875 Approx
Num of Memory Slots =  Total available Memory resource of cluster  /  memory Slot Size  in MB
Num of Memory Slots =  146432 / 345 =  424 Approx
The most restrictive number among CPU and Memory slots determines the amount of slots for this cluster. We have 235 slots available for  CPU and 424 Slots available for Memory. So the most restrictive number is 235.
So, Total number of slots for my cluster is 235 Approx. Please find the below snapshot


Installing Esxi Patches by using LCI

Saturday, November 21, 2015 0
Pre-requisites steps for installing ESXi patches

    Download the patches applicable for our ESX/ESXi  version manually

    We can install patches using esxcli command by using SSH connection or via ESXi shell using remote console connections like ILO, DRAC.
    Now the downloaded patches needs to be transferred to the datastore of ESX/ESXi hosts

 Implementation steps

    1. Login to your ESXi host using SSH or ESXi shell with your root credentials
    2. Browse towards the Patch location in your datastore  and verify the donwloaded patches are alreadys in and note down the complete path for the patch.
   3 .Before installing patches placing your ESXi host in maintenance mode    is  very important.

    esxcli software vib install -d /vmfs/volumes/datastore1/ESXi\ patches/ESXi510-201210001.zip

    To verify the installed VIB's installed on your host execute the below command

esxcli software vib list

    Reboot your ESXi host for the changes to take effect and exit your host from the maintenance mode

Explain the Vmotion Background Process

Saturday, November 21, 2015 0
 Vmotion Background Process
  • The Virtual Machine Memory state is copied over the Vmotion Network from the source Host to the Target Host. users continue to access the virtual machine and potentially update pages in memory. A list of modified pages in memory is kept in a memory Bitmap on the source Host.
  • After most of the virtual machine memory is copied from the source host to target host the virtual machine quiesced no additional activity occurs on the virtual machine. In quiesce period VMOTION transfers the virtual machine device state and memory Bitmap to the destination Host.
  • Immediately after the virtual machine is quiesced on the source host, the virtual machine initialized and starts running on the target host.
  • Users access the virtual machine on the target host instead of the source host.
  • The memory pages that the virtual machine was using on the source host are marked as free.