This Blog is to share our knowledge and expertise on Linux System Administration and VMware Administration

Tuesday, October 31, 2017

Different types of Kernel packages in Red Hat Enterprise Linux?

Tuesday, October 31, 2017

Red Hat Enterprise Linux contains the following kernel packages (some may not apply to your architecture, and not all are available in all major releases):

    Kernel - contains the Kernel and following key features:
        Uniprocessor support (will utilize a single processor on multi-processor systems) (RHEL3,4,5)
        Multi-processor support for Intel EM64T systems (RHEL 3 only)
        4GB RAM support on Intel and AMD x86 systems (1)
    Kernel-BOOT contains the installation Kernel (x86 only)  Uniprocessor support
    Kernel-{*-}devel (RHEL 4 and ongoing) - contains kernel header files replaces Kernel-source
    Kernel-debug - contains the same kernel as kernel but with debugging options enabled (RHEL 5 only)
    Kernel-doc - contains kernel documentation previously found in /usr/src/linux{-*}/Documentation
    Kernel-hugemem (i686 only) - in addition to the options of kernel-smp :
        4GB/4GB split - ~4GB of virtual address space for kernel resources and ~4GB for each user processor  Should be utilized on systems/loads where more addressable kernel resources are required including greater than 16GB systems isn't shipped in RHEL5 and above.

    Kernel-kdump (RHEL 6 only; POWER and s390x architectures only) - secondary Kernel for Kernel crash dump capture;
    Kernel-largesmp (RHEL 4 only; 64-bit architectures only) - similar to kernel-smp, but with support for higher numbers of CPU on x86_64, Itanium2 and POWER;
    Kernel-PAE (RHEL 5 only; x86 only) - kernel with support for up to 16 Gb of RAM;
    Kernel-rt-* (Red Hat Enterprise MRG Realtime) - realtime kernels, discussed in the section of the MRG Realtime Installation Guide.
    Kernel-smp - in addition to the options of kernel (not shipped with RHEL6 and above:
        multi-processor support (all architectures)
    Kernel-PAE - Physical Address Extension (Intel x86 only) upto 16GB RAM (2)
    Kernel-pcmcia-cs (RHEL 3 only) - contains support for PCMCIA cards
    Kernel-source (RHEL 3 only) - contains complete source code for the Linux Kernel
    Kernel-utils - contains utilities that can be used to control the kernel or system hardware
    Kernel-xenU - kernel used by paravirtualised guests (RHEL 4.5+)

    Kernel-xen - kernel which runs in Xen VM (RHEL 5 only)
    * for X86 only
    * supports up to 16 Gb of RAM in all installs if the processor allows it.
    * supports a maximum of 16 CPUs
        for AMD64 and Intel 64
            supports up to 1TB of RAM
            on RHEL5.0 and 5.1, supports up to 32 CPUs
            on RHEL5.2 supports up to 64 CPUs
            on RHEL5.3 supports up to 126 CPUs
            on RHEL5.4 and 5.5 supports up to 192 CPUs
        for Intel Itanium
            supports up to 32 CPUs
            
    Kernel-{*-}unsupported (RHEL 3 only/some architectures) - contains modules not supported by Red Hat, Inc. in any SLA  is not installed during installation updates and fixes may not be provided over time

(1) Refer to the Red Hat Enterprise Linux product pages, in particular for other configuration limits.

(2) Kernel-hugemem is required if system memory is greater than 16GB on x86 machines. x86_64 and AMD64 architectures support 64GB and EM64T supports 6GB.

Thursday, October 26, 2017

How to Covert the Time Zone in Linux Server?

Thursday, October 26, 2017 0
Below steps are used to Covert the GMT time zone UTC time zone.

1. Check the current Time zone.

[root@testserver ~]# date
Tue Feb  7 07:51:59 GMT+6 2017

2. List the available Time zone (Check the UTC is abavilable or not)

[root@testserver ~]# ls /usr/share/zoneinfo/Etc/

Linvirtshell.com

3. Copy the UTC Time Zone file to /etc/localtime & run the date command to verify.

[root@testserver ~]# cp /usr/share/zoneinfo/Etc/UTC /etc/localtime
cp: overwrite `/etc/localtime'? y
[root@testserver ~]#
[root@testserver ~]# date -u
Tue Feb  7 13:52:32 UTC 2017
[root@testserver ~]# date
Tue Feb  7 13:52:33 UTC 2017


Some special case (RHEL 6.9), need to update the /etc/sysconfig/clock file as well.

[root@testserver ~]#cat  /etc/sysconfig/clock
ZONE="Asia/Kuala_Lumpur"

Hope it helps

Wednesday, October 25, 2017

How to get the huge files size & name with single command in Linux Server?

Wednesday, October 25, 2017 0

Use the below command to get the huge file size and name.

root@testserver:~# /usr/bin/find / -xdev -type f -size +1024 -ls | awk '{print $7,"",$11}' |sort -m | awk '{print $1/1024/1024,"","MB","",$2}' |sort -rn -k 1

45.284  MB  /var/cache/apt/pkgcache.bin
45.264  MB  /var/cache/apt/srcpkgcache.bin
39.8765  MB  /var/lib/apt/lists/in.archive.ubuntu.com_ubuntu_dists_xenial_universe_binary-amd64_Packages
39.7197  MB  /var/lib/apt/lists/in.archive.ubuntu.com_ubuntu_dists_xenial_universe_binary-i386_Packages
26.518  MB  /var/cache/apt/archives/libpython2.7-dev_2.7.12-1ubuntu0~16.04.1_amd64.deb
24.7127  MB  /usr/lib/x86_64-linux-gnu/libicudata.so.55.1
22.3409  MB  /var/lib/apt/lists/in.archive.ubuntu.com_ubuntu_dists_xenial_universe_i18n_Translation-en
21.4124  MB  /usr/lib/gcc/x86_64-linux-gnu/5/cc1plus
19.9162  MB  /usr/lib/gcc/x86_64-linux-gnu/5/cc1
19.4404  MB  /usr/lib/python2.7/config-x86_64-linux-gnu/libpython2.7.a
19.1068  MB  /usr/lib/gcc/x86_64-linux-gnu/5/lto1
18.8433  MB  /usr/lib/python2.7/config-x86_64-linux-gnu/libpython2.7-pic.a
18.7048  MB  /usr/lib/snapd/snapd
14.6835  MB  /usr/bin/snap

....
...
..
.
Hope it helps.

Tuesday, October 24, 2017

How to solve the Error "sendmail dead but subsys locked" sm-client (pid 28752) is running?

Tuesday, October 24, 2017 0
 Error "sendmail dead but subsys locked" sm-client (pid  28752) is running - This is because of 2 MTA (Mail Transfer Agent) were sunning same time. Something is trying to start the postfix service also cause this issue.

[root@testserver ~]# /etc/init.d/sendmail status
sendmail dead but subsys locked
sm-client (pid  28752) is running...
First check postfix is running on the server

[root@testserver ~]# /etc/init.d/postfix status
-b (pid  1765) is running...
[root@testserver ~]#


Try to stop the service if not able to bring down the service & kill the process. Then restart the sendmail service.

[root@testserver ~]# /etc/init.d/postfix stop
Shutting down postfix:                                     [FAILED]
[root@testserver ~]#

[root@testserver ~]# ps -ef | grep -i postfix
root      1765     1  0 Jun09 ?        00:02:06 /usr/libexec/postfix/master
postfix   1772  1765  0 Jun09 ?        00:00:03 qmgr -l -t fifo -u
root     25822 24576  0 16:56 pts/7    00:00:00 grep -i postfix

[root@testserver ]# kill -9 1765
[root@testserver ]#

[root@testserver ]# /etc/init.d/sendmail restart
Shutting down sm-client:                                   [  OK  ]
Shutting down sendmail:                                    [  OK  ]
Starting sendmail:                                         [  OK  ]
Starting sm-client:                                        [  OK  ]
[root@testserver ]#

[root@testserver ]# /etc/init.d/sendmail status
sendmail (pid  28421) is running...
sm-client (pid  28429) is running...

Hope it helps

Monday, October 23, 2017

Multipath Queries & Multipath Command Options in Linux Server

Monday, October 23, 2017 0
You can use the -l and -ll options of the multipath command to display the current multipath configuration.

The -l option displays multipath topology gathered from information in sysfs and the device mapper.

The -ll option displays the information the -l displays in addition to all other available components of the system.

When displaying the multipath configuration, there are three verbosity levels you can specify with the -v option of the multipath command. Specifying -v0 yields no output. Specifying -v1 outputs the created or updated multipath names only, which you can then feed to other tools such as kpartx. Specifying -v2 prints all detected paths, multipaths, and device maps.

The following example shows the output of a multipath -l command.

# multipath -l

3600d0230000000000e13955cc3757800 dm-1 WINSYS,SF2372
size=269G features='0' hwhandler='0' wp=rw
|-+- policy='round-robin 0' prio=1 status=active
| `- 6:0:0:0 sdb 8:16  active ready  running
`-+- policy='round-robin 0' prio=1 status=enabled
  `- 7:0:0:0 sdf 8:80  active ready  running

The following example shows the output of a multipath -ll command.

# multipath -ll

3600d0230000000000e13955cc3757801 dm-10 WINSYS,SF2372
size=269G features='0' hwhandler='0' wp=rw
|-+- policy='round-robin 0' prio=1 status=enabled
| `- 19:0:0:1 sdc 8:32  active ready  running
`-+- policy='round-robin 0' prio=1 status=enabled
  `- 18:0:0:1 sdh 8:112 active ready  running
3600d0230000000000e13955cc3757803 dm-2 WINSYS,SF2372
size=125G features='0' hwhandler='0' wp=rw
`-+- policy='round-robin 0' prio=1 status=active
  |- 19:0:0:3 sde 8:64  active ready  running
  `- 18:0:0:3 sdj 8:144 active ready  running

Useful multipath Command Options

Option                Description
-l                    Display the current multipath configuration gathered from sysfs and the   device mapper.
-ll                   Display the current multipath configuration gathered from sysfs, the device mapper, and all other available components on the system.
-f device         Remove the named multipath device.
-F                   Remove all unused multipath devices.
-w device        Red Hat Enterprise Linux 6.6 and later) Remove the wwid of the specified device from the wwids file.
-W                  Red Hat Enterprise Linux 6.6 and later) Reset the wwids file to include only the current multipath devices.

Saturday, October 21, 2017

How to limit yum so that it lists or installs only Security Updates in Linux Server?

Saturday, October 21, 2017
Install the yum-security plugin

It is now possible to limit yum to install only security updates  using Red Hat Enterprise Linux 5,6, and 7. To do so, simply install the yum-security plugin:

For Red Hat Enterprise Linux 7

The plugin is already a part of yum itself, no need to install anything.

For Red Hat Enterprise Linux 6

# yum install yum-plugin-security

For Red Hat Enterprise Linux 5

# yum install yum-security

Alternatively, download the yum-security package from the Red Hat Network (RHN) and manually install it on the system.

For Red Hat Enterprise Linux 6 and 7

Using yum-security plugin

To list all available erratas without installing them, run:

# yum updateinfo list available

To list all available security updates without installing them, run:

# yum updateinfo list security all
# yum updateinfo list sec


To get a list of the currently installed security updates this command can be used:

# yum updateinfo list security installed

For Red Hat Enterprise Linux 5

Using yum-security plugin

To list all available erratas without installing them, run:

# yum list-sec

To list all available security updates without installing them, run:

# yum list-security --security

For both Red Hat Enterprise Linux 5, 6, and 7

To list all available security updates with verbose descriptions of the issues they apply to:

# yum info-sec

Run the following command to download and apply all available security updates from Red Hat Network hosted or Red Hat  Network Satellite:

# yum -y update --security

NOTE: It will install the last version available of any package with at least one security errata thus can install non-security erratas if they provide a more updated version of the package.

To only install the packages that have a security errata use
# yum update-minimal --security -y

yum-security also allows installing security updates based on the CVE reference of the issue. To install a security update  using a CVE reference run:

# yum update --cve <CVE>

e.g.

# yum update --cve CVE-2008-0947


Viewing available advisories by severities:

# yum updateinfo list

This system is receiving updates from RHN Classic or RHN Satellite.
RHSA-2014:0159 Important/Sec. kernel-headers-2.6.32-431.5.1.el6.x86_64
RHSA-2014:0164 Moderate/Sec.  mysql-5.1.73-3.el6_5.x86_64
RHSA-2014:0164 Moderate/Sec.  mysql-devel-5.1.73-3.el6_5.x86_64
RHSA-2014:0164 Moderate/Sec.  mysql-libs-5.1.73-3.el6_5.x86_64
RHSA-2014:0164 Moderate/Sec.  mysql-server-5.1.73-3.el6_5.x86_64
RHBA-2014:0158 bugfix         nss-sysinit-3.15.3-6.el6_5.x86_64
RHBA-2014:0158 bugfix         nss-tools-3.15.3-6.el6_5.x86_64

If you want to apply only one specific advisory:

# yum update --advisory=RHSA-2014:0159

However, if you would like to know more information about this advisory before to apply it:

# yum updateinfo RHSA-2014:0159

For more commands consult the manual pages of yum-security with

# man yum-security

If you face any missing dependency issue while applying security patches on system then refer to yum update --security fails with missing dependency errors.

Friday, October 20, 2017

How to solve the issue with Large Number of LUNs in Linux server?

Friday, October 20, 2017 0
When a large number of LUNs are added to a node, using multipathed devices can significantly increase the time it  takes for the udev device manager to create device nodes for them. If you experience this problem, you can correct  it by deleting the following line in /etc/udev/rules.d/40-multipath.rules:

KERNEL!="dm-[0-9]*", ACTION=="add", PROGRAM=="/bin/bash -c '/sbin/lsmod | /bin/grep ^dm_multipath'", RUN+="/sbin/multipath -v0 %M:%m"


This line causes the udev device manager to run multipath every time a block device is added to the node. Even with this line removed, the multipathd daemon will still automatically create multipathed devices, and multipath will still be called during the boot process for nodes with multipathed root file systems. The only change is that multipathed devices will not be automatically created when the multipathd daemon is not running, which should not be a problem for the vast majority of multipath users.

How to enable log for chroot sftp users in Linux Server?

Friday, October 20, 2017 0
Follow the below steps to enable logs for chroot sftp users

1. Take the backup of /etc/ssh/sshd_config

2. Add the below settings to sshd_config

Subsystem       sftp   internal-sftp  -f LOCAL6 -l INFO

  Match group sftpgroup
  ChrootDirectory /home/%u
  KbdInteractiveAuthentication no
  PasswordAuthentication no
  AllowTCPForwarding no
  X11Forwarding no
  Subsystem       sftp  internal-sftp -f LOCAL6 -l INFO

Save & Exit the sshd configuration.

3. Take the back of /etc/sysconfig/rsyslog & add the below entry.

SYSLOGD_OPTIONS="-m 0 -a /home/sftpuser/dev/log"

4. Create sftp.log file under /etc/rsyslog.d & add the below entry (This is used for create sockets)

# create additional sockets for the sftp chrooted users
module(load="imuxsock")
input(type="imuxsock" Socket="/path/to/somedirectory/dev/log" CreatePath="on")
input(type="imuxsock" Socket="/path/to/anotherdirectory/dev/log" CreatePath="on")

# log internal-sftp activity to sftp.log
if $programname == 'internal-sftp' then /var/log/sftp/sftp.log
& stop

5. Create dev directory under /home/sftpuser user

6. Now restart both sshd & rsyslog service

7. Now chroot sftp users activity logs are enabled & available under /var/log/sftp/

Hope it helps.

Thursday, October 19, 2017

Kernel: WARNING calibrate_APIC_clock: the APIC timer calibration may be wrong appear on Guest 5.x Linux VM's

Thursday, October 19, 2017 0
This was due to the MAX_DIFFERENCE parameter value (in the APIC calibration loop) of 1000 cycles being too aggressive for virtual guests. APIC (Advanced Programmable Interrupt Controllers) and TSC (Time Stamp Counter) reads normally take longer than 1000 cycles when performed from inside a virtual guest, due to processors being scheduled away from and then back onto the guest. With this update, the MAX_DIFFERENCE parameter value has been increased to 10,000 for virtual guests.

These messages can be stopped by adding ‘apiccalibrationdiff=10000’ to guest kernel in /etc/grub.conf.

How to Activate the Logical Volumes on Individual Cluster Member Nodes in a RHEL Cluster?

Thursday, October 19, 2017 0
If you have LVM installed in a cluster environment, you may at times need to activate logical volumes exclusively on one node.

To activate logical volumes exclusively on one node, use the lvchange -aey command. Alternatively, you can use lvchange -aly command to activate logical volumes only on the local node but not exclusively.


You can later activate them on additional nodes concurrently.

How to Power on a virtual machine from the command line?

Thursday, October 19, 2017 0
ESXi 4.x, 5.x and 6.0

To power on a virtual machine from the command line:

    List the inventory ID of the virtual machine with the command:

    vim-cmd vmsvc/getallvms |grep <vm name>Note: The first column of the output shows the vmid.   

    Check the power state of the virtual machine with the command:

    vim-cmd vmsvc/power.getstate <vmid>   

    Power-on the virtual machine with the command:

    vim-cmd vmsvc/power.on <vmid>


ESX 4.0 and ESX 4.1

To power on a virtual machine from the command line:

    To list the path of all the virtual machines on the host:

    vmware-cmd -l   

    Get the state of the virtual machine with the command:

    vmware-cmd <path to the VMX file> getstate

    Power on the virtual machine with the command:

    vmware-cmd <path to the VMX file> start

ESXi 3.5

To power on a virtual machine from the command line:

    List the inventory ID of the virtual machine with the command:

    vim-cmd vmsvc/getallvms |grep <vm name>

    Check the power state of the virtual machine with the command:

    vim-cmd vmsvc/power.getstate <vmid>

    Power on the virtual machine with the command:

    vim-cmd vmsvc/power.on <vmid>

ESX 3.5
To power on a virtual machine from the command line:

    To list the path of all the virtual machines on the host:

    vmware-cmd -l

    Get the state of the virtual machine with the command:

    vmware-cmd <path to the VMX file> getstate

    Power on the virtual machine with the command:

    vmware-cmd <path to the VMX file> start

Wednesday, October 18, 2017

How to solve "Cannot vMotion virtual machines with physical mode RDM"

Wednesday, October 18, 2017 0

1.  Open the vSphere PowerCLI command-line.

2.  Run the command:

Get-VM | Get-HardDisk -DiskType "RawPhysical","RawVirtual" | Select Parent,Name,DiskType,ScsiCanonicalName,DeviceName | fl

This command produces a list of virtual machines with RDMs, along with the backing SCSI device for the RDMs.

    An output looks similar to:

    Parent              Virtual Machine Display Name
    Name                Hard Disk n
    DiskType            RawVirtual
    ScsiCanonicalNamenaa.60123456789abcdef0123456789abcde
    DeviceName            vml.020000000060123456789abcdef0123456789abcde1234567890ab

    If you need to save the output to a file the command can be modified:

Get-VM | Get-HardDisk -DiskType "RawPhysical","RawVirtual" | Select Parent,Name,DiskType,ScsiCanonicalName,DeviceName | fl | Out-File –FilePath RDM-list.txt
    
  3.  Identify the backing SCSI device from either the ScsiCanonicalName or DeviceName identifiers.

How to Identify Raw Device Mappings (RDMs) using the vSphere Client?

Wednesday, October 18, 2017 0

To identify RDMs using the vSphere Client:

1. Connect to vCenter Server or a host using the vSphere Client.
2. Select a virtual machine in the inventory.
3. Right-click the virtual machine and click Edit Settings.
4. Select each hard disk in the Virtual Hardware list with a summary Mapped Raw LUN. The path to the RDM virtual disk mapping file and the name of the backing SCSI device are listed.

Tuesday, October 17, 2017

When the : "Error: Driver 'pcspkr' is already registered" will appear in Virtual Machine?

Tuesday, October 17, 2017 0

On Virtual machine's, if you are observing following message 'Error: Driver 'pcspkr' is already registered'  in /var/log/messages file, then we get rid of this by adding  'blacklist snd-pcsp' in /etc/modeprobe.d/blacklist.conf file.

#echo 'blacklist snd-pcsp' >> /etc/modprobe.d/blacklist.conf

How to Update the BIOS of the ESX/ESXi host?

Tuesday, October 17, 2017 0

Updating the BIOS of the ESX/ESXi host

The steps required to update firmware or a system BIOS varies depending on the hardware vendor and the component to be updated. Typically, the vendor will supply some type of utility that will update the component automatically.

For example, to update a motherboard's BIOS:

Notes:

    Before performing this procedure, ensure to migrate the virtual machines and appliances in the ESX/ESXi host.    

    This a only an example. The results may vary from each manufacturer.

 1. Download the update utility from the vendor.

 2. Create a bootable floppy disk or CD/DVD-ROM that contains the utility.

 3. Physically be in front of the server that hosts ESX/ESXi.

 4. Reboot the host.
   
 5. Access the BIOS of the server.
    Note: You may access the BIOS by pressing F2 or DEL. However, this varies depending on the vendor and is usually displayed on your screen.

 6. Find the System Information section of the BIOS. The location varies depending on vendor.

 7. Note the BIOS version and any other relevant information before upgrading.

 8. Ensure that your BIOS is capable of booting from a floppy or CD/DVD-ROM.

 9. Place the floppy or CD/DVD-ROM in the server and reboot the system. 

 10.Boot from the device and follow the on-screen instructions to update the hardware.

 11.Verify if the firmware/BIOS has been updated.

 12.Proceed with the ESX/ESXi installation or upgrade.

How to check the vMotion Count by using PowerCLI

Tuesday, October 17, 2017 0

Below script can help you to get the count of all vMotion events that has happened in the past 24 hrs.

If you want to calculate the count for longer period then change the number AddDays.

Get-VIEvent -Entity (Get-VM -Location $_) -MaxSamples ([int]::MaxValue) -Start (Get-Date).AddDays(-1) |Where { $_.GetType().Name -eq “TaskEvent” -and $_.Info.DescriptionId -eq “VirtualMachine.migrate”} | Measure-Object | Select-Object -ExpandProperty Count

Monday, October 16, 2017

Brief explai about - Modes in esxtop - Vmware

Monday, October 16, 2017 0
ESXTOP

ESXTOP is the utility only for ESX host to examine real-time resource usage for ESX and resxtop for ESX & ESXi hosts.esxtop can only be used for the local ESX machine but resxtop can be used remotely to view the resource utilization of ESX/ESXi hosts from other ESX/ESXi servers or VMA.

There are 3 different types of Modes in esxtop/resxtop

Interactive Mode

Batch Mode

Replay Mode.

Interactive mode (the default mode) – All statistics are displayed  are in real time

Batch mode – Statistics can be collected so that the output can be saved in a file (csv) and can be viewed & analyzed using windows perfmon & other tools in later time.

Replay mode – It is similar to record and replay operation. Data that was collected by the vm-support command is interpreted and played back as esxtop statistics. We can view the captured performance information for a particular duration or time period as like real time to view what was happening during that time. It is perfectly used for the VMware support person to replay the stats to understand what was happening to the server during that time.


Thanks for reading!!!!


VMware Tools Installation for Linux Guests with the RPM installer and with the Tar Installer

Monday, October 16, 2017 0

TO INSTALL VMWARE TOOLS FROM X WITH THE RPM INSTALLER:

1. Choose VM > Install VMware Tools.

The guest operating system mounts the VMware Tools installation virtual CD.

2. Double-click the VMware Tools CD icon on the desktop.

Note: In some Linux distributions, the VMware Tools CD icon may fail to appear when you install VMware Tools within an X windows session on a guest. In this case, you should continue installing VMware Tools as described in Installing VMware Tools from the Command Line with the Tar Installer, beginning with step 3.

3. Double-click the RPM installer in the root of the CD-ROM.

4. Enter the root password.

5. Click Continue.

The installer prepares the packages.

6. Click Continue when the installer presents a dialog box saying Completed System Preparation.

A dialog appears for Updating system, with a progress bar. When the installer is done, VMware Tools are installed. There is no confirmation or finish button.

7. In an X terminal, as root (su -), configure VMware Tools.

vmware-config-tools.pl

Respond to the questions the installer displays on the screen. Press Enter to accept the default value.

Note: Be sure to respond yes when the installer offers to run the configuration program.

8. Launch the VMware Tools background application:

vmware-toolbox &

Note: Some guest operating systems require a reboot for full functionality.

INSTALLING VMWARE TOOLS FROM THE COMMAND LINE WITH THE TAR INSTALLER:


The first steps are performed on the host, within Workstation menus:

1. Power on the virtual machine.

2. After the guest operating system has started, prepare your virtual machine to install VMware Tools.

Choose VM > Install VMware Tools.

The remaining steps take place inside the virtual machine.

3. As root (su -), mount the VMware Tools virtual CD-ROM image, change to a working directory (for example, /tmp), uncompress the installer, then unmount the CD-ROM image.

Note: Some Linux distributions automatically mount CD-ROMs. If your distribution uses automounting, do not use the mount and umount commands below. You still must untar the VMware Tools installer to /tmp.

Some Linux distributions use different device names or organize the /dev directory differently. If your CD-ROM drive is not /dev/cdrom or if the mount point for a CD-ROM is not /mnt/cdrom, you must modify the following commands to reflect the conventions used by your distribution.

mount /dev/cdrom /mnt/cdrom

cd /tmp

Note: If you have a previous installation, delete the previous vmware-distrib directory before installing. The default location of this directory is

/tmp/vmware-tools-distrib.

4. Untar the VMware Tools tar file:

tar zxf /mnt/cdrom/VMwareTools-5.0.0-<xxxx>.tar.gz

umount /dev/cdrom

Where <xxxx> is the build/revision number of the VMware Workstation release.

Note: If you attempt to install a tar installation over an rpm installation — or the reverse — the installer detects the previous installation and must convert the installer database format before continuing.

5. Run the .tar VMware Tools installer:

cd vmware-tools-distrib

./vmware-install.pl

Respond to the configuration questions on the screen. Press Enter to accept the default value.

6. Log off of the root account.

exit

7. Start X and your graphical environment.

8. In an X terminal, launch the VMware Tools background application.

vmware-toolbox &

Note: You may run VMware Tools as root or as a normal user. To shrink virtual disks, you must run VMware Tools as root (su -).

INSTALLING VMWARE TOOLS FROM THE COMMAND LINE WITH THE RPM INSTALLER:

 The first steps are performed on the host, within Workstation menus:

1. Power on the virtual machine.

2. After the guest operating system has started, prepare your virtual machine to install VMware Tools.

Choose VM > Install VMware Tools.

The remaining steps take place inside the virtual machine.

3. As root (su -), mount the VMware Tools virtual CD-ROM image, change to a working directory (for example, /tmp), uncompress the installer, then unmount the CD-ROM image.

Note: Some Linux distributions automatically mount CD-ROMs. If your distribution uses automounting, do not use the mount and umount commands below. You still must untar the VMware Tools installer to /tmp.

Some Linux distributions use different device names or organize the /dev directory differently. If your CD-ROM drive is not /dev/cdrom or if the mount point for a CD-ROM is not /mnt/cdrom, you must modify the following commands to reflect the conventions used by your distribution.

mount /dev/cdrom /mnt/cdrom

cd /tmp

Note: If you have a previous installation, delete the previous vmware-distrib directory before installing. The default location of this directory is

/tmp/vmware-tools-distrib.

4. At the command prompt, enter:

rpm -Uhv /mnt/cdrom/VMwareTools-5.0.0-<xxxx>.i386.rpm

umount /dev/cdrom

Where <xxxx> is the build/revision number of the VMware Workstation release.

Note: If you attempt to install an rpm installation over a tar installation — or the reverse — the installer detects the previous installation and must convert the installer database format before continuing.

5. Configure VMware Tools:

vmware-config-tools.pl

Respond to the questions the installer displays on the screen. Press Enter to accept the default value.

6. Log off of the root account.

exit

7. Start X and your graphical environment.

8. In an X terminal, launch the VMware Tools background application.

vmware-toolbox &

Note: You may run VMware Tools as root or as a normal user. To shrink virtual disks, you must run VMware Tools as root (su -).

STARTING VMWARE TOOLS AUTOMATICALLY

You may find it helpful to configure your guest operating system so VMware Tools starts when you start your X server. The steps for doing so vary depending on your Linux distribution and your desktop environment. Check your operating system documentation for the appropriate steps to take.

For example, in a Red Hat Linux 7.1 guest using GNOME, follow these steps.

1. Open the Startup Programs panel in the GNOME Control Center.

Main Menu (click the foot icon in the lower left corner of the screen) > Programs > Settings > Session > Startup Programs

2. Click Add.

3. In the Startup Command field, enter vmware-toolbox.

4. Click OK, click OK again, then close the GNOME Control Center.

The next time you start X, VMware Tools starts automatically.

UNINSTALLING VMWARE TOOLS

To remove VMware Tools from your Linux guest operating system, log on as root (su -) and enter the following command:


From a tar install

vmware-uninstall-tools.pl


From an RPM install

rpm -e VMwareTools

How to check the UDP port is listening on Remote host?

Monday, October 16, 2017 0
The nc (or netcat) utility is used for just about anything under the sun involving TCP or UDP.  It can open TCP connections, send UDP packets, lis-ten on arbitrary TCP and UDP ports, do port scanning, and deal with both IPv4 and IPv6.
  
NAME

     nc - arbitrary TCP and UDP connections and listens

[root@nsk-linux ~]# nc -v -u -z -w 3 10.0.2.15 1-1024
Connection to 10.0.2.15 68 port [udp/bootpc] succeeded!
Connection to 10.0.2.15 631 port [udp/ipp] succeeded!


10.0.2.15= Server IP (chane as per your needs)
1-1024    = Range of UDP ports

Saturday, October 14, 2017

How to roll back an update in Linux Server?

Saturday, October 14, 2017 0

Roll back packages by using yum in linux


Downgrading a system to minor version (ex: RHEL6.8 to RHEL6.7) is not recommended as this might leave the system in broken state where libgcc and other libraries won't rollback as expected. Use the history option for small update rollbacks.

Roll back of some package to older version is not supported & it makes server crash or installed application will not work properly.

We can use yum history command to rollback.

Please find the below example.

[root@nsklinux ~]# yum install dovecot

Loaded plugins: fastestmirror, security
Setting up Install Process
Loading mirror speeds from cached hostfile
 * base: mirror.vbctv.in
 * extras: centos-hn.viettelidc.com.vn
 * updates: centos-hn.viettelidc.com.vn
Resolving Dependencies
--> Running transaction check
---> Package dovecot.x86_64 1:2.0.9-22.el6 will be installed
--> Finished Dependency Resolution

Dependencies Resolved


===============================================================

 Package                         Arch       Version           Repository          Size
===============================================================
Installing:                                                             
 dovecot                         x86_64     1:2.0.9-22.el6    base               1.9 M
                                                                        
Transaction Summary                                                     
===============================================================
Install       1 Package(s)

Total download size: 1.9 M

Installed size: 5.7 M
Is this ok [y/N]: y
Downloading Packages:
dovecot-2.0.9-22.el6.x86_64.rpm              | 1.9 MB     00:00
Running rpm_check_debug
Running Transaction Test
Transaction Test Succeeded
Running Transaction
  Installing : 1:dovecot-2.0.9-22.el6.x86_64       1/1
  Verifying  : 1:dovecot-2.0.9-22.el6.x86_64       1/1

Installed:

  dovecot.x86_64 1:2.0.9-22.el6

Complete!

[root@nsklinux ~]#
[root@nsklinux ~]#


[root@nsklinux ~]# yum history

Loaded plugins: fastestmirror, security
ID     | Login user               | Date and time    | Action(s)      | Altered
-------------------------------------------------------------------------------
     5 | root <root>              | 2017-10-14 08:01 | Install        |    1
     4 | root <root>              | 2017-10-14 07:52 | I, O, U       |  506 EE
     3 | root <root>              | 2017-10-14 07:27 | Update      |    2
     2 | root <root>              | 2017-10-14 07:17 | I, O            |     3
     1 | System <unset>      | 2017-10-14 07:07 | Install        |  610
history list


[root@nsklinux ~]# yum history undo 5

Loaded plugins: fastestmirror, security
Undoing transaction 5, from Sat Oct 14 08:01:55 2017
    Install dovecot-1:2.0.9-22.el6.x86_64 @base
Resolving Dependencies
--> Running transaction check
---> Package dovecot.x86_64 1:2.0.9-22.el6 will be erased
--> Finished Dependency Resolution

Dependencies Resolved


=============================================================

 Package                       Arch         Version           Repository    Size
=============================================================
Removing:                                                               
 dovecot                       x86_64       1:2.0.9-22.el6    @base        5.7 M
                                                                        
Transaction Summary                                                     
=============================================================
Remove        1 Package(s)

Installed size: 5.7 M

Is this ok [y/N]: y
Downloading Packages:
Running rpm_check_debug
Running Transaction Test
Transaction Test Succeeded
Running Transaction
  Erasing    : 1:dovecot-2.0.9-22.el6.x86_64      1/1
  Verifying  : 1:dovecot-2.0.9-22.el6.x86_64     1/1

Removed:

  dovecot.x86_64 1:2.0.9-22.el6

Complete!

[root@nsklinux ~]# rpm -qa | grep -i dovecot
[root@nsklinux ~]#

Linux NFS share on Windows 2012 server & Visible for all Windows user

Saturday, October 14, 2017 0

Linux NFS share on Windows 2012 server & Visible for all Windows user

Normally Linux - Linux, we can easily mount the NFS share. But mounting Linux NFS share on Windows server need to follow below steps & Also that share should be visible on all Windows user.

Situation :
NFS Server : Linux Server
NFS Client : Windows2012 server
NFS Share name : u01
Windows mount drive : Z


The following steps are for Windows 2012 Server.

1.  Ensure that you are logged into the Windows server as an administrator.
2.  Start the command console as the administrator (Click Start > All Programs >  Accessories > Windows Powershell or Command Prompt)
3.  Right-click the Windows Powershell or Command Prompt, and select Run as administrator.
4.  Run the following command to install FS-NFS-Services:
5.  servermanagercmd.exe -install FS-NFS-Services or follow below GUI
6.  Note: To Windows Server 2012 Datacenter/Standard/Essentials Edition, you can run the command through

powerscript:

    Import-Module ServerManager
    Install-WindowsFeature -Name FS-NFS-Service
    Install-WindowsFeature NFS-Client

Linvirtshell.com


In GUI

a.  Run servermanager.exe.
b.  From the Add Roles and Features Wizard, under Server Roles, select File and Storage Services if it has not been installed.
c.  Under File and iSCSI Services, select File Server and Server for NFS. Click Add Features to select Client for NFS.

7.  Run
    nfsadmin client stop

Linvirtshell.com


8.  Open Regedit and navigate to the following branch:
    HKEY_LOCAL_MACHINE\SOFTWARE\Microsoft\ClientForNFS\CurrentVersion\Default
9.  In the main window, right-click and select New > DWORD 32-bit Value. Set the name as AnonymousGID.
10. Right-click and select New > DWORD 32-bit Value again. Set the name as AnonymousUID.
11. Double-click on AnonymousGID and AnonymousUID, set the value as 0 and the base as Decimal respectively.  


Linvirtshell.com


Click OK.
Close Regedit.

12. In the command prompt, run:
    nfsadmin client start

Linvirtshell.com


13. Close the Windows Powershell Console.
14. Open a command prompt.
15. Run the following command in a command prompt (not Powershell) to set the NFS configuration:
    nfsadmin client localhost config fileaccess=755 SecFlavors=+sys -krb5 -krb5i

Linvirtshell.com


16. Run the following commands to mount the share:
    mount -o mtype=soft retry=10 timeout=6 casesensitive=yes anon nfsservername:/u01  Z:

Linvirtshell.com


Linvirtshell.com


Mount the share automatically with windows restart


1. Create a batch file, for example, c:\windows\OPC\Autonfsmount.bat, and type:
    mount -o mtype=soft retry=10 timeout=6 casesensitive=yes anon nfsservername:/u01 Z:
2. Click Start > Administrative Tools > Task Scheduler.
3. Click Create Task in Task Scheduler (Local).
4. Click General, and type nfs_auto_mount for Name. In Security options, click Change User or Group > Advanced > Find Now, and select SYSTEM. Select Run whether user

    is logged on or not Select, along with Do not store password, and then select Run with highest privileges. Finally click OK.    
 
Linvirtshell.com


5. Click Triggers > New, select At startup for Begin the task. Click OK

Linvirtshell.com


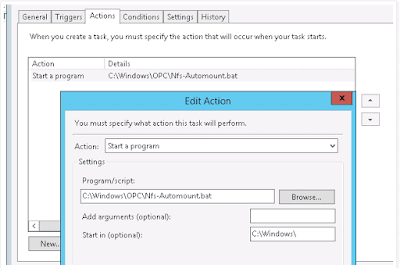
 6. Click Actions > New > Browse, select c:\windows\OPC\Autonfsmount.bat and click OK

Linvirtshell.com


Linvirtshell.com


7. Click OK

8. Restart the machine.
9. The client mounted points will be displayed in Windows explorer as Disconnected Network drivers, and this is the expected normal status. This will ensure the scheduled task is working, as well as causing the drives to be mounted as SYSTEM, which is necessary for the install procedure.

Hope it helps