Linux NFS share on Windows 2012 server & Visible for all Windows user
Normally Linux - Linux, we can easily mount the NFS share. But mounting Linux NFS share on Windows server need to follow below steps & Also that share should be visible on all Windows user.Situation :
NFS Server : Linux Server
NFS Client : Windows2012 server
NFS Share name : u01
Windows mount drive : Z
The following steps are for Windows 2012 Server.
1. Ensure that you are logged into the Windows server as an administrator.
2. Start the command console as the administrator (Click Start > All Programs > Accessories > Windows Powershell or Command Prompt)
3. Right-click the Windows Powershell or Command Prompt, and select Run as administrator.
4. Run the following command to install FS-NFS-Services:
5. servermanagercmd.exe -install FS-NFS-Services or follow below GUI
6. Note: To Windows Server 2012 Datacenter/Standard/Essentials Edition, you can run the command through
powerscript:
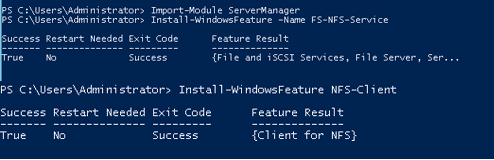
Import-Module ServerManagerInstall-WindowsFeature -Name FS-NFS-Service
Install-WindowsFeature NFS-Client
 |
| Linvirtshell.com |
In GUI
a. Run servermanager.exe.b. From the Add Roles and Features Wizard, under Server Roles, select File and Storage Services if it has not been installed.
c. Under File and iSCSI Services, select File Server and Server for NFS. Click Add Features to select Client for NFS.
7. Run
nfsadmin client stop
| Linvirtshell.com |
8. Open Regedit and navigate to the following branch:
HKEY_LOCAL_MACHINE\SOFTWARE\Microsoft\ClientForNFS\CurrentVersion\Default
9. In the main window, right-click and select New > DWORD 32-bit Value. Set the name as AnonymousGID.
10. Right-click and select New > DWORD 32-bit Value again. Set the name as AnonymousUID.
11. Double-click on AnonymousGID and AnonymousUID, set the value as 0 and the base as Decimal respectively.
 |
| Linvirtshell.com |
Click OK.
Close Regedit.
12. In the command prompt, run:
nfsadmin client start
 |
| Linvirtshell.com |
13. Close the Windows Powershell Console.
14. Open a command prompt.
15. Run the following command in a command prompt (not Powershell) to set the NFS configuration:
nfsadmin client localhost config fileaccess=755 SecFlavors=+sys -krb5 -krb5i
 |
| Linvirtshell.com |
16. Run the following commands to mount the share:
mount -o mtype=soft retry=10 timeout=6 casesensitive=yes anon nfsservername:/u01 Z:
| Linvirtshell.com |
 |
| Linvirtshell.com |
Mount the share automatically with windows
restart
1. Create a batch file, for example, c:\windows\OPC\Autonfsmount.bat, and type:
mount -o mtype=soft retry=10 timeout=6 casesensitive=yes anon nfsservername:/u01 Z:
2. Click Start > Administrative Tools > Task Scheduler.
3. Click Create Task in Task Scheduler (Local).
4. Click General, and type nfs_auto_mount for Name. In Security options, click Change User or Group > Advanced > Find Now, and select SYSTEM. Select Run whether user
is logged on or not Select, along with Do not store password, and then select Run with highest privileges. Finally click OK.
 |
| Linvirtshell.com |
5. Click Triggers > New, select At startup for Begin the task. Click OK
 |
| Linvirtshell.com |
6. Click Actions > New > Browse, select c:\windows\OPC\Autonfsmount.bat and click OK
 |
| Linvirtshell.com |
 |
| Linvirtshell.com |
7. Click OK
8. Restart the machine.
9. The client mounted points will be displayed in Windows explorer as Disconnected Network drivers, and this is the expected normal status. This will ensure the scheduled task is working, as well as causing the drives to be mounted as SYSTEM, which is necessary for the install procedure.
Hope it helps