This Blog is to share our knowledge and expertise on Linux System Administration and VMware Administration

Friday, October 21, 2016

Reset the Root Password of RHEL-7 - Linvirtshell

Friday, October 21, 2016 0
Here is the procedure of what needs to be done in order to recover a forgotten root password on Redhat 7 Linux:
  1. We need to edit GRUB2 boot menu and enter user single mode
  2. Next, we need to remount / partition to allow read and write
  3. Reset the actual root password
  4. Set entire system for SElinux relabeling after first reboot
  5. Reboot the system from a single mode
Now that we understand the procedure we can proceed with Redhat 7 password recovery.

1. Edit GRUB2 boot menu

Start your system and once you see your GRUB2 boot menu use e key to edit your default boot item. Usually it is the first line:
Edit boot menu to initiate RHEL7 root password recovery
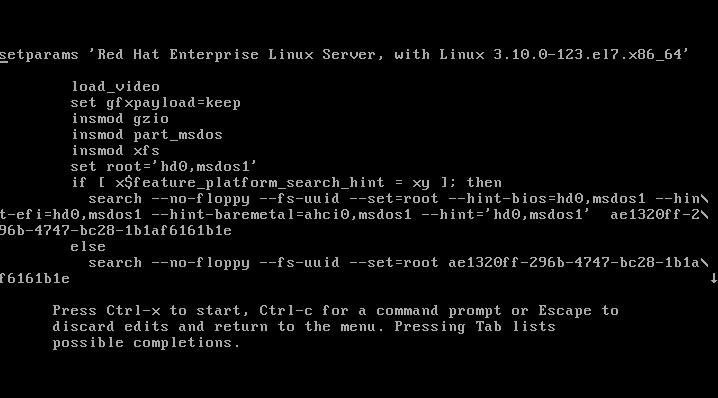
Once you hit e key you will see a screen similar to the one below:
Editing RHEL7 boot menu to enter single mode
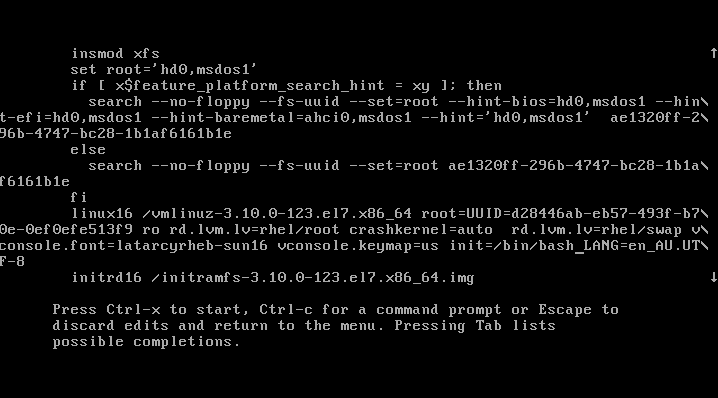
Depending on you terminal screen size you may see more or less information. In case you have a small terminal screen size note the little down pointing arrow on the right edge of your screen. The arrow means that more text is available when scrolling down. Scroll down and locate a line with rhgb quiet keywords:
RHEL 7 boot line locate - edit
Move your cursor ( HINT: move to end of the line with CTRL+E ) on rhgb quiet keywords and replace them with init=/bin/bash as show below:
Edit grub to enter single mode to reset root password Redhat 7
Once you edit the boot line as show above press CTRL + x to start booting your RHEL 7 system into a single mode. At the end of the system boot you will enter a single mode:
RHEL 7 - entering single mode after system reboot

2. Read&Write root partition remount

Once you enter a single your root partition is mounted as Read Only ro. You ca confirm it with the following command:
# mount | grep root
In order to mount our partition with Read/Write flag we use mount with a remount option as follows:
# mount -o remount,rw /
Next, confirm that the root file system is mounted Read/Write rw:
# mount | grep root
All the above steps are show below:
Remount root filesystem as read&write on redhat 7 Linux server

3. Change root's password

Still in the single mode we can proceed with the actual root password recovery. To do this we use passwd command:
# passwd
You will need to enter your password twice as shown below:
Recover a forgotten root password on RHEL7 linux server

4. SELinux relabeling

The additional step which needs to be taken on SELinux enables Linux system is to relabel SELinux context. If this step is ommited you will not be able to login with your new root password. The following command will ensure that the SELinux context for entire system is relabeled after reboot:
# touch /.autorelabel
SELinux relabel system after reboot - Redhat 7 Server

5. Reboot System

The final step when resetting your lost root password on RHEL 7 linux system is to reboot. This can be done with a following command:
# exec /sbin/init

After reboot you will be able to use your new root password.

Wednesday, June 15, 2016

Brief - multipath Command

Wednesday, June 15, 2016 0

Use the Linux multipath command to configure and manage multipathed devices.

General syntax for the multipath command:

multipath [-v verbosity] [-d] [-h|-l|-ll|-f|-F] [-p failover|multibus|group_by_serial|group_by_prio|group_by_node_name] 

Configure multipath devices

#multipath

Configure a specific multipath device

#multipath devicename

Replace devicename

 Replace devicename with the device node name such as /dev/sdb (as shown by udev in the $DEVNAME variable), or in the major:minor format.Selectively suppress a multipath map, and its device-mapped partitions:
#multipath -f

Display potential multipath devices

Display potential multipath devices, but do not create any devices and do not update device maps (dry run):
#multipath -d

Configure multipath devices and display multipath map information

#multipath -v2  
#multipath -v3

The -v2 option in multipath -v2 -d shows only local disks. Use the -v3 option to show the full path list.lliiFor example

#multipath -v3 -d

Display the status of all multipath devices, or a specified multipath device

#multipath -ll 
#multipath -ll 

Flush all unused multipath device maps 

Flush all unused multipath device maps (unresolves the multiple paths; it does not delete the device)

#multipath -F
#multipath -F  

Set the group policy

multipath -p [failover|multibus|group_by_serial|group_by_prio|group_by_node_name] 
Group Policy Options for the multipath -p Command

Policy Option             Description
failover                        One path per priority group. You can use only one path at a time.
multibus                       All paths in one priority group.
group_by_serial           One priority group per detected SCSI serial number 
group_by_prio              One priority group per path priority value. Paths with the same priority                          are in the same priority group. Priorities are determined by callout                                           programs specified as a global, per-controller, or per-multipath                                               option in  the /etc/multipath.conf configuration file.
group_by_node_          
name                           One priority group per target node name. Target node names are                                            fetched in the /sys/class/fc_transport/target*/node_name location.

How to fix the delay in SSH Login

Wednesday, June 15, 2016 0
Have you ever faced  login delays  when you tried to connect to the Linux systems, if yes this is happening due to  reverse DNS look-up  query that is been made to DNS Server.

We can fix this issue as mentioned below steps:

1) Take /etc/ssh/sshd_config  backup

# cp -p /etc/ssh/sshd_config /etc/ssh/sshd_config.`date '+%m-%d-%Y_%H:%M:%S'`

2) Edit  /etc/ssh/sshd_config  on sshd  Server

vi /etc/ssh/sshd_config

  And add this DNS option to the file:
  UseDNS no

3) Now add the following line to your /etc/resolv.conf

   options single-request-reopen

4) Restart ssh daemon

 service sshd restart

Sometimes adding the client's net address to the server's /etc/hosts can fix this issue  which is an alternative method.

Compressing files by using Linux commands

Wednesday, June 15, 2016 0
Compress Files


SyntaxDescriptionExample(s)
gzip {filename}Gzip compress the size of the given files using Lempel-Ziv coding (LZ77). Whenever possible, each file is replaced by one with the extension .gz.gzip mydata.doc
gzip *.jpg
ls -l
bzip2 {filename}bzip2 compresses files using the Burrows-Wheeler block sorting text compression algorithm, and Huffman coding. Compression is generally considerably better than that achieved by bzip command (LZ77/LZ78-based compressors). Whenever possible, each file is replaced by one with the extension .bz2.bzip2 mydata.doc
bzip2 *.jpg
ls -l
zip {.zip-filename} {filename-to-compress}zip is a compression and file packaging utility for Unix/Linux. Each file is stored in single .zip {.zip-filename} file with the extension .zip.zip mydata.zip mydata.doc
zip data.zip *.doc
ls -l
tar -zcvf {.tgz-file} {files}
tar -jcvf {.tbz2-file} {files}
The GNU tar is archiving utility but it can be use to compressing large file(s). GNU tar supports both archive compressing through gzip and bzip2. If you have more than 2 files then it is recommended to use tar instead of gzip or bzip2.
-z: use gzip compress
-j: use bzip2 compress
tar -zcvf data.tgz *.doc
tar -zcvf pics.tar.gz *.jpg *.png
tar -jcvf data.tbz2 *.doc
ls -l
De-Compressing File

SyntaxDescriptionExample(s)
gzip -d {.gz file}
gunzip {.gz file}
Decompressed a file that is created using gzipcommand. File is restored to their original form using this command.gzip -d mydata.doc.gz
gunzip mydata.doc.gz
bzip2 -d {.bz2-file}
bunzip2 {.bz2-file}
Decompressed a file that is created using bzip2command. File is restored to their original form using this command.bzip2 -d mydata.doc.bz2
gunzip mydata.doc.bz2
unzip {.zip file}Extract compressed files in a ZIP archive.unzip file.zip
unzip data.zip resume.doc
tar -zxvf {.tgz-file}
tar -jxvf {.tbz2-file}
Untar or decompressed a file(s) that is created using tar compressing through gzip and bzip2 filtertar -zxvf data.tgz
tar -zxvf pics.tar.gz *.jpg
tar -jxvf data.tbz2
 List the contents of an archive/compressed file

Some time you just wanted to look at files inside an archive or compressed file. Then all of the above command supports file list option.
SyntaxDescriptionExample(s)
gzip -l {.gz file}List files from a GZIP archivegzip -l mydata.doc.gz
unzip -l {.zip file}List files from a ZIP archiveunzip -l mydata.zip
tar -ztvf {.tar.gz}
tar -jtvf {.tbz2}
List files from a TAR archivetar -ztvf pics.tar.gz
tar -jtvf data.tbz2

Explain the Resource limits on UNIX systems

Wednesday, June 15, 2016 0
On UNIX systems, the ulimit command controls the limits on system resource, such as process data size, process virtual memory, and process file size. Specifically.

On UNIX systems, each user can either inherit resource limits from the root user or have specific limits defined. When setting resource limits for a process, it is important to know that the limits that apply are those that are in effect for the parent process and not the limits for the user under which the process runs. For example, the IBM Directory server runs under the ldap user account that was created at install time. However, the IBM Directory server is typically started while logged in as the root user. Starting while logged in as the root user means that any limits that are in effect for the ldap user have no effect on the IBM Directory server process unless the IBM Directory server process is started while logged in as the ldap user.

To display the current user’s resource limits, use the ulimit command (see the following example):

# ulimit -Ha
time(seconds) unlimited
file(blocks) 2097151
data(kbytes) unlimited
stack(kbytes) unlimited
memory(kbytes) unlimited
coredump(blocks) unlimited
nofiles(descriptors) unlimited

# ulimit -Sa
time(seconds) unlimited
file(blocks) 2097151
data(kbytes) 131072
stack(kbytes) 32768
memory(kbytes) 32768
coredump(blocks) 2097151
nofiles(descriptors) 2000

 -H option instructs the command to display hard resource limits.
 -S option instructs the command to display soft resource limits.

The hard resource limit values are set by the root user using the chuser command for each user. The soft resource limit values can be relaxed by the individual user using the ulimit command, as long as the values are smaller than the hard resource limit values.
Increasing process memory size limit

Enter the following command to check the current process data size and virtual memory size limits:

ulimit -d
ulimit -m

It is recommended that the process data size and virtual memory size be set to unlimited. Setting to unlimited can be done by modifying the following lines in the /etc/security/limits file:

default:
data = -1
rss = -1

For changes to the /etc/security/limits file to take effect, the user must log out of the current login session and log back in.

At minimum, set these size limits to 256 MB, which is the value of 256000 in the /etc/security/limits file. Increase these limits when a larger-than-default IBM Directory server cache is to be used. For more information, see the IBM Directory Server documentation.

In addition to the /etc/security/limits file, the process virtual memory size is limited by the number of segments that a process can use. By default, a process can only use one memory segment, which limits a process to 128 MB. AIX support a large memory model that is enabled through the LDR_CNTRLenvironment variable.
Increase file size limit

Enter the following command to check the current file size limits:

ulimit -f

It is recommended that the file size limit be set to unlimited. Setting to unlimited can be done by modifying the following lines in the /etc/security/limits file:

default:
fsize = -1

Create file systems with large file support

The standard file system on AIX has a 2 GB file size limit, regardless of the ulimit setting. One way to enable files larger than the 2 GB limit is to create the file system with the Large File Enabled option. This option can be found through the Add a Journaled File System option of the smit menu. Refer to AIX documentation for additional information and file system options.
Edit/Change the Ulimit  Values for uid:

    Edit the limits file under /etc/security/limits (takes effect after reboot)
    Use the chuser command to change individual user settings (logout and login required)

Here are a few of the flags that can be set:

chuser rss=-1 username
chuser fsize=-1 username
chuser data=-1 username
chuser nofiles=4000 username
chuser “stack=8388608? username

Explain the Linux OS Return Codes

Wednesday, June 15, 2016 0
When computer programs are executed, the operating system creates an abstract entity called a process in which the book-keeping for that program is maintained. In multitasking operating systems such as Unix or Linux, new processes can be created by active processes.

The process that spawns another is called a parent process, while those created are child processes. Child processes run concurrently with the parent process.

 The technique of spawning child processes is used to delegate some work to a child process when there is no reason to stop the execution of the parent. When the child finishes executing, it exits by calling theexit system call. This system call facilitates passing the exit status code back to the parent, which can retrieve this value using the wait system call.

There is no  straight way to get return code when it come to Linux/AIX operating systems.I found indirect method. Always 0 = Success anything else is an error.
Return Codes:

The exit status or return code of a process in computer programming is a small number passed from a child process (or callee) to a parent process (or caller) when it has finished executing a specific procedure or delegated task. In DOS, this may be referred to as an errorlevel.

0
1       Operation not permitted
2       No such file or directory
3       No such process
4       Interrupted system call
5       Input/output error
6       No such device or address
7       Argument list too long
8       Exec format error
9       Bad file descriptor
10      No child processes
11      Resource temporarily unavailable
12      Cannot allocate memory
13      Permission denied
14      Bad address
15      Block device required
16      Device or resource busy
17      File exists
18      Invalid cross-device link
19      No such device
20      Not a directory
21      Is a directory
22      Invalid argument
23      Too many open files in system
24      Too many open files
25      Inappropriate ioctl for device
26      Text file busy
27      File too large
28      No space left on device
29      Illegal seek
30      Read-only file system
31      Too many links
32      Broken pipe
33      Numerical argument out of domain
34      Numerical result out of range
35      Resource deadlock avoided
36      File name too long
37      No locks available
38      Function not implemented
39      Directory not empty
40      Too many levels of symbolic links
41      Unknown error 41
42      No message of desired type
43      Identifier removed
44      Channel number out of range
45      Level 2 not synchronized
46      Level 3 halted
47      Level 3 reset
48      Link number out of range
49      Protocol driver not attached
50      No CSI structure available
51      Level 2 halted
52      Invalid exchange
53      Invalid request descriptor
54      Exchange full
55      No anode
56      Invalid request code
57      Invalid slot
58      Unknown error 58
59      Bad font file format
60      Device not a stream
61      No data available
62      Timer expired
63      Out of streams resources
64      Machine is not on the network
65      Package not installed
66      Object is remote
67      Link has been severed
68      Advertise error
69      Srmount error
70      Communication error on send
71      Protocol error
72      Multihop attempted
73      RFS specific error
74      Bad message
75      Value too large for defined data type
76      Name not unique on network
77      File descriptor in bad state
78      Remote address changed
79      Can not access a needed shared library
80      Accessing a corrupted shared library
81      .lib section in a.out corrupted
82      Attempting to link in too many shared libraries
83      Cannot exec a shared library directly
84      Invalid or incomplete multibyte or wide character
85      Interrupted system call should be restarted
86      Streams pipe error
87      Too many users
88      Socket operation on non-socket
89      Destination address required
90      Message too long
91      Protocol wrong type for socket
92      Protocol not available
93      Protocol not supported
94      Socket type not supported
95      Operation not supported
96      Protocol family not supported
97      Address family not supported by protocol
98      Address already in use
99      Cannot assign requested address
100     Network is down
101     Network is unreachable
102     Network dropped connection on reset
103     Software caused connection abort
104     Connection reset by peer
105     No buffer space available
106     Transport endpoint is already connected
107     Transport endpoint is not connected
108     Cannot send after transport endpoint shutdown
109     Too many references: cannot splice
110     Connection timed out
111     Connection refused
112     Host is down
113     No route to host
114     Operation already in progress
115     Operation now in progress
116     Stale NFS file handle
117     Structure needs cleaning
118     Not a XENIX named type file
119     No XENIX semaphores available
120     Is a named type file
121     Remote I/O error
122     Disk quota exceeded
123     No medium found
124     Wrong medium type
125     Operation canceled
126     Required key not available
127     Key has expired

Hope it is useful.

How to enable the Name Service cache Daemon (NSCD)

Wednesday, June 15, 2016 0
By enabling the Name Service cache Daemon (NSCD) of the operating system, a significant performance improvement can be achieved when using naming services like DNS, NIS, NIS+, LDAP.

Benefit of name service cache daemon (NSCD) for ClearCase
Example:

WithoutNSCD:

[user@host]$ time cleartool co -nc "/var/tmp/file"
Checked out "/var/tmp/file" from version "/main/10".
real    0m3.355s
user    0m0.020s
sys     0m0.018s

With NSCD

[user@host]$ time cleartool co -nc "/var/tmp/file"
Checked out "/var/tmp/file" from version "/main/11".
real    0m0.556s
user    0m0.021s
sys     0m0.016s
Enabling NSCD

Solaris:

/etc/init.d/nscd start

Linux

service nscd start

AIX:

startsrc -s netcd

Note: In addition to having nscd started it is mandatory to be sure this service will be started after a reboot. For instance on Red Hat and SuSE you can run:

chkconfig nscd  on

For more details on how to configure and or enable NSCD refer to your respective operating system vendor's manpage.